
One of the optional bosses in Elden Ring is Mohg, the Omen, who is really difficult to beat. Here's how you can find this amazing boss at the Leyndell Sewers in the game.
How to find Mohg, the Omen at the Leyndell Sewers in Elden Ring
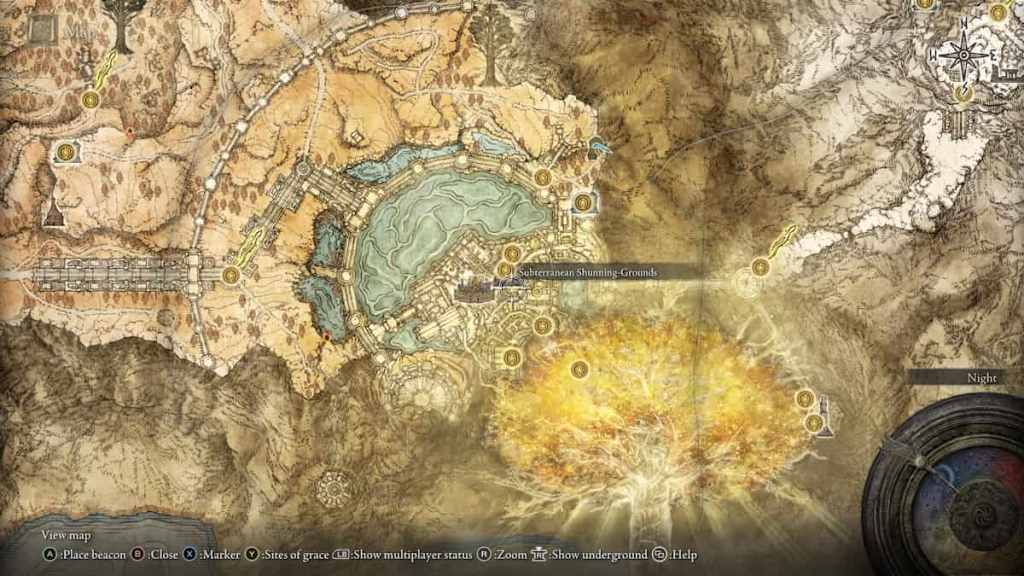
Mohg, the Omen can be found in the sewers underneath Leyndell, Royal Capital in Elden Ring.
The path to Mohg, the Omen can be a long and tedious process. It is difficult to find due to the tunnels under Leyndell being dark and winding. There'll be two Sites of Grace as checkpoints for convenience. The Avenue Balcony Site of Grace and the Underground Roadside Site of Grace.
Here are all the steps you need to follow to find Mohg, the Omen in Elden Ring (if you've already found the Underground Roadside Site of Grace skip to Step 10):
- First, you'll will need to enter Leyndell, Royal Capital and find the Avenue Balcony Site of Grace. You will have to complete a few different steps to make it inside the Capital, but once they are there, the Avenue Balcony Site of Grace can be reached by progressing through the area normally.
- Once at the Avenue Balcony Site of Grace, you should travel down the nearby set of stairs, turning left and going around the buildings when they reach the bottom.
- Looking over the left side of the platform that you're are on, you should see some buildings and structures below. Continue running next to the building until a building with a red dusty roof is spotted. Jump to this roof.
- Once on the roof, jump down towards the well. The well will serve as the entrance to Leyndell's underground.
- Enter the well by jumping inside. Open the first door to the left. It is a large metal grated door that should be openable on first approach. If you encounter a locked door or a wooden door, you are in the wrong place.
- Run forward and off the cliff, or take the ladder for a safer descent. Follow the path in front of you, continuing straight when you reach a split in the path.
- This should lead you down another set of stairs into a room filled with rats. Continue through the room to open a door at the opposite end.
- Walk through the door and off the ledge to the left. This room contains three large enemies that can be difficult to defeat at lower levels so proceed with caution.
- A little bit forward down this hallway and to the left, you should find a door that contains a Site of Grace. This should be the Underground Roadside Site of Grace.
- Take a left when exiting the Site of Grace room and run down the hallway passing the large enemies and keep an eye out for an open grate. Once found, jump down the grate.
- Continue down this new tunnel, eventually turning to the right when an open pipe is found.
- Follow this pipe, taking all of the turns and twists that pop up. When presented with an option, turn right through a metal doorway. There are a few holes in the pipe on the way to this doorway, so you should use a torch to increase visibility in this area.
- Once through the metal door, follow the path straight until you reach a room with a ladder and a large enemy that jumps from the higher platform. Run past this enemy (or fight it) and climb the ladder.
- Once the ladder is climbed, enter the next room and turn right. Pull the lever on the ground in front of you. This will open a large metal door that leads back to the original hallway containing the Site of Grace room. There is no need to re-enter this hallway yet, but having the shortcut open is helpful.
- Now that the shortcut back to the Site of Grace is opened, turn around and run back looking for a door on the right. It is a large wooden door. There are two enemies in this room as well that don't need to be killed.
- Now, open the wooden door. Walk through the door and carefully drop off the ledge to the left. This is a dangerous and easily missed drop. Simply walk off the ledge.
- This should lead you to a staircase that descends lower into the tunnels. Follow the stairs downward, turning right into a oroom with a few small enemies. Follow the path forward.
- Turn left and go down another set of stairs when the option is available. Once down the stairs, immediately turn around and take the path next to the stairs on the lower level.
- Take a left and travel down another pipe-like tunnel. Take the first right available and go up the incline. It is highly advised you use a torch in this area as well.
- Continue straight down this path taking the second right when possible. Taking this right should lead to a room with another large enemy and a ladder in the back right corner of the room. Run (or fight your way) to the ladder and climb up.
- Once at the top, walk through the doorway and straight across the wooden bridge and oppen the door. This door will lead directly back to the Underground Roadside Site of Grace. This door is a nice shortcut back to a familiar area if you get lost in the tunnels.
- Once the door leading to the Site of Grace is opened, turn around and head back the way that was just travelled (towards the doorway mentioned in step 21) turning right to get on top of a large pipe.
- Follow along the top of this pipe all the way to the end. This should lead you to a wooden platform with a small enemy. While travelling on the pipe, you should be mindful of enemies falling from the ceiling. They can be devastating in numbers so killing them when spotted is the best idea if you're a lower level or have low health.
- Once on the wooden platform, turn left and drop down to the lower ledge. On this new wooden platform, you should spot a stone doorway. They should pass through this doorway.
- From the new wooden platform, you should spot another pipe below them. This pipe will have an opening on the top. You should jump into this opening.
- Once inside the pipe, you should follow the path until they can make a sharp left. This left will take them down a small decline within the pipe. At the bottom of this pipe, take a right.
- Continue down this pipe and fall down the first hole found along the path. There should be an enemy behind the player at the bottom of this hole that will try to stab them in the back.
- Continue down the pipe, turning right when possible. This will lead you to a new wooden platform with a ladder leading down. Climb down the ladder to find a room filled with a Large Jar. Run past these enemies and turn right to find a cage-like elevator.
- Ride the elevator down and touch the Forsaken Depths Site of Grace at the bottom. Continue down the stairs in front of the Grace to find Mohg, the Omen.
How to defeat Mohg, the Omen in Elden Ring
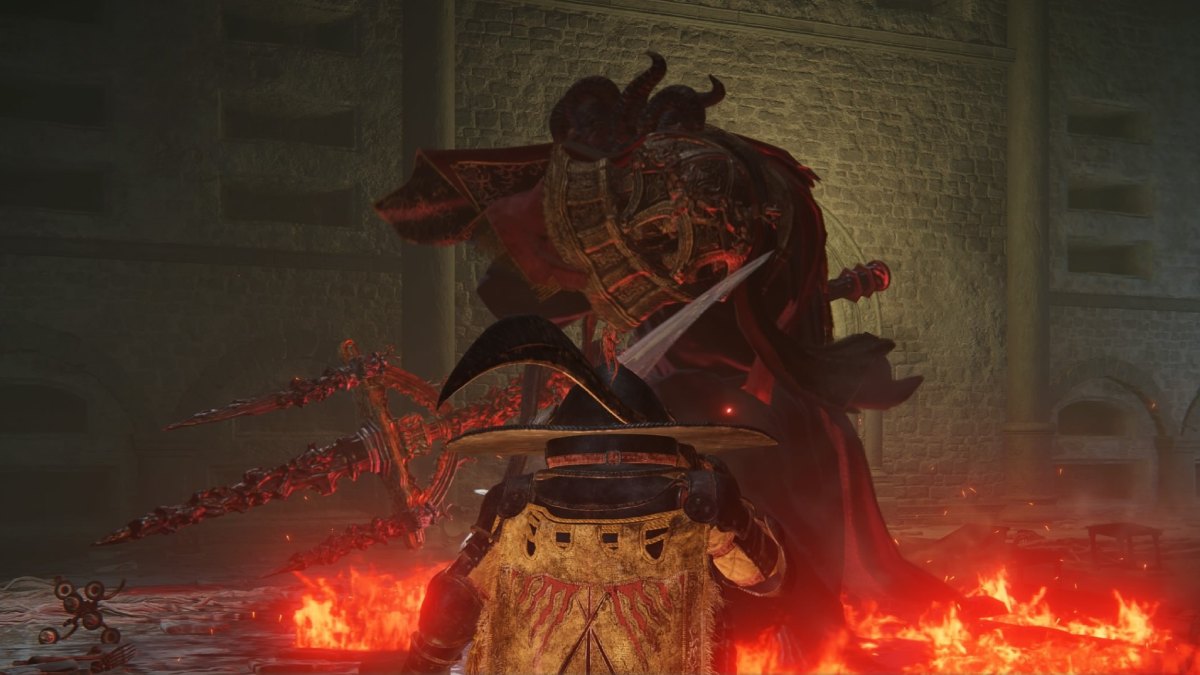
Mohg, the Omen is a very difficult boss fight and should only be attempted when you feel you are strong enough to take him on. It's always recommended to bring a summon to face him, particularly a Mimic Tear Ashes. Additionally, if you've released Dung Eater from his cell as part of his questline, then you can summon him as well. Bring Mohg's Shackle to restrain him for a few seconds twice during the fight. Mohg is also immune to any type of effect buildup so you can't depend on that, with the exception of Bleed, which works great. (Note you can use weapons with the effect buildups, but don't expect them to take a massive amount of his health.)
When starting the fight, wait for him to come close and use Mohg's shackle to restrain him. Then, you'll be able to land some mean hits on him quickly. After he gets aggressive, move away from him and let your summons take the hits. During that time, do some charged attacks on him and he'll health will drop noticeably. Your summons will also be helping you out as well. When he gets aggressive again, use the Mohg's shackle for the second and final time and restrain him. Land some powerful blows and he should be down to his last bits of health.
His Bloodflame Talons attacks i.e. the red slashes and Trident attacks are two things you need to be aware of. These cause massive bleeding damage so you need to maintain your distance or let your summons take all the hits. There are openings right after he does these attacks when you should land your hits.
What does Mohg, the Omen drop when defeated?
Defeating Mohg, the Omen, you will be rewarded with 100,000 Runes and the Bloodflame Talons incantation. This Incantation is very powerful and useful to players who have heavily invested in the Faith and Arcane attributes. The Incantation will require a 13 Faith and 15 Arcane to use.
For more on Elden Ring, check out How to defeat Royal Knight Loretta in Elden Ring, here on Pro Game Guides.
2 Comments
Where to find Mohg, the Omen in Elden Ring- Mohg Sewers (Map Location)
This site is protected by reCAPTCHA and the Google Privacy Policy and Terms of Service apply.