
The Nancy Drew Mystery games are an excellent series of puzzle adventures with great storylines. If you’re playing Mystery of the Seven Keys, read on for my full walkthrough and all the puzzle solutions you need.
Nancy Drew Mystery of the Seven Keys complete walkthrough guide
In this adventure, Nancy is visiting the beautiful city of Prague for the first time. After speaking to Adela and Patricie in the cafe (ask who the gems were stolen from, and then select the blonde lady who is standing as the genuine Adela) you can begin the main game. This walkthrough covers the puzzles in normal mode. Note that some puzzles are slightly different in hard mode.
Explore the cafe
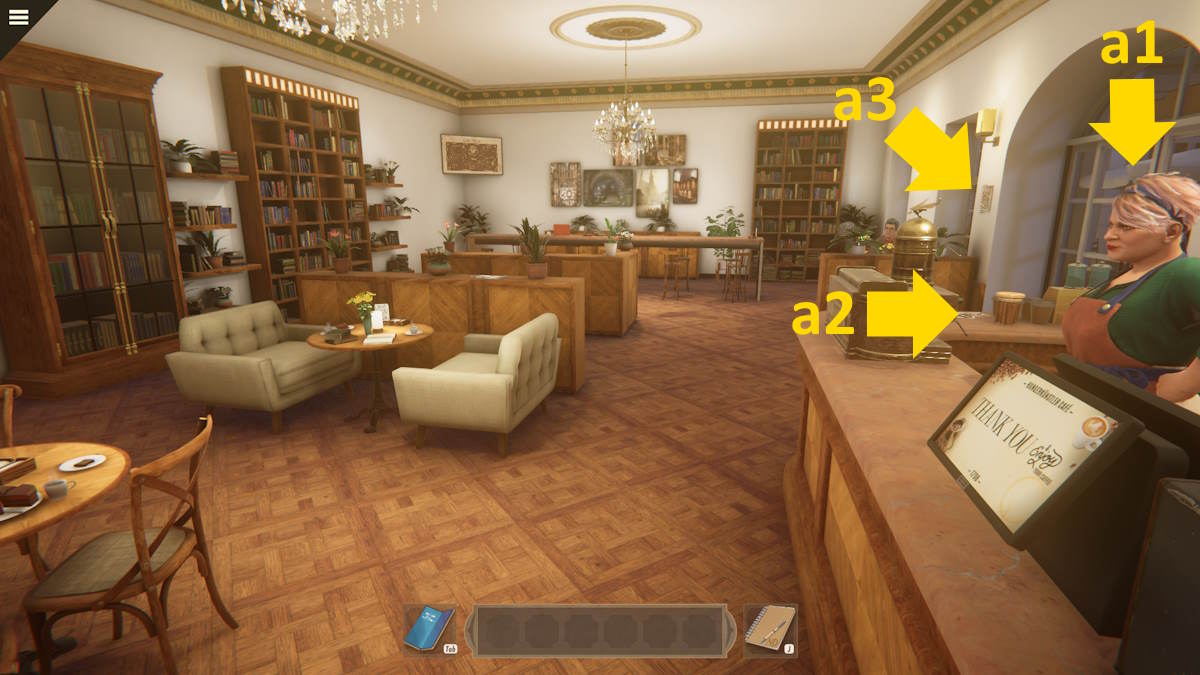
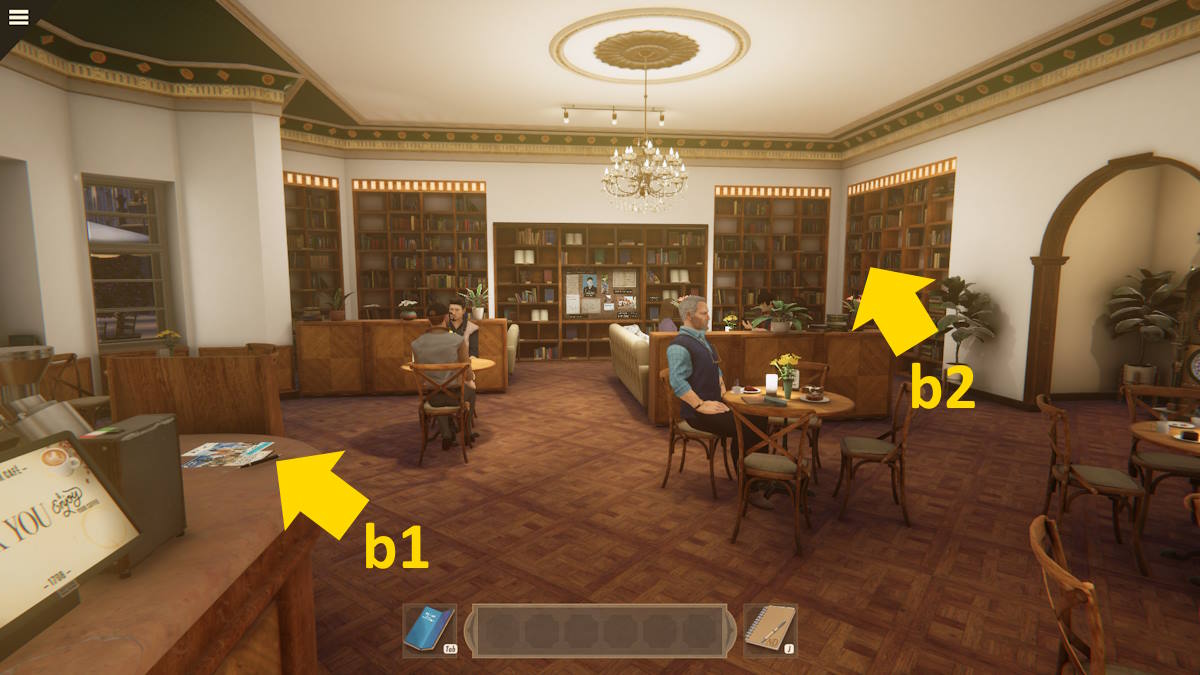
Speak to Patricie (a1) again (she is now behind the serving counter) to find out where the postcards are. Take the Pen from the counter (b1), and the three Postcards from the other end of the counter (a2), and then tick those items off your task list Next, you need to figure out the Wi-Fi password, which is IBRIK1708 (you will find this on the wall (a3) near the door). Now you just need to select a postcode in your inventory and use the pen on the postcard to complete the task.
As you re-enter the cafe afterward you’ll get a text from Unknown with an unknown file. The message reads fall in love with our past, find your own way. This is referencing the names of the book sections around the walls of the cafe (see the History example below). The answer to the riddle is:
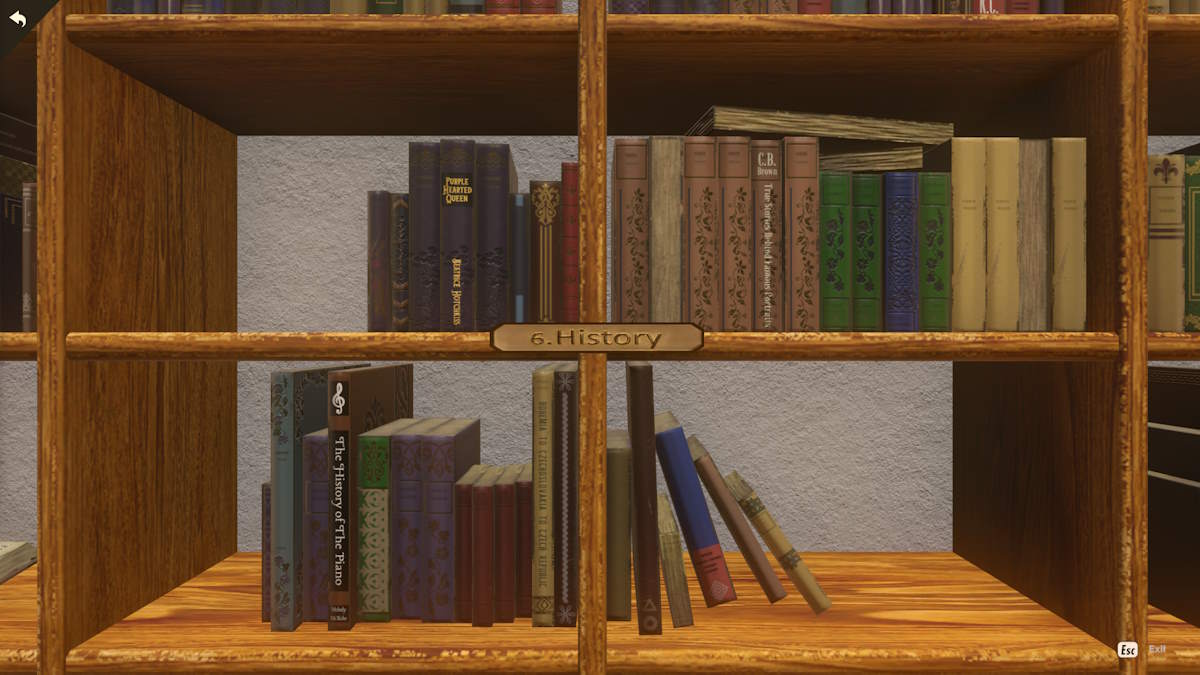
- 11 (Romance) - Fall in love
- 6 (History) - With our past
- 9 (Travel) Find your own way
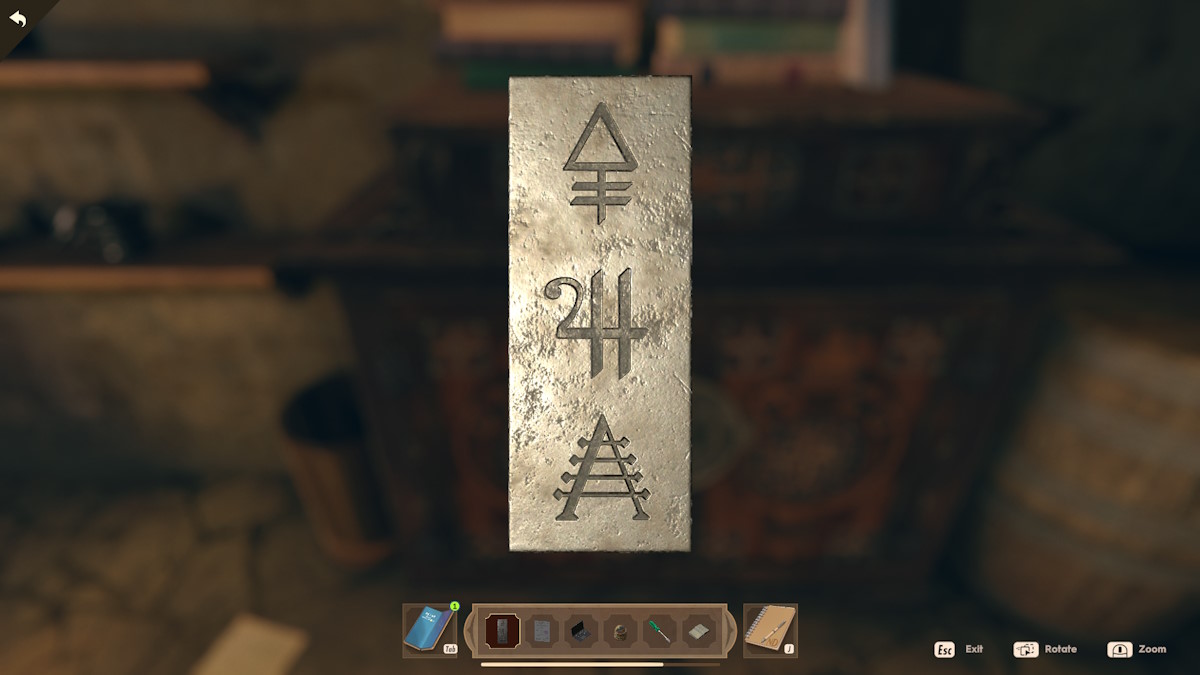
Enter the passcode 1169 into the message and it will open to reveal a map. This leads you to a bookcase in the corner of the cafe (b2) where a close-up of the shelves reveals a clickable book.
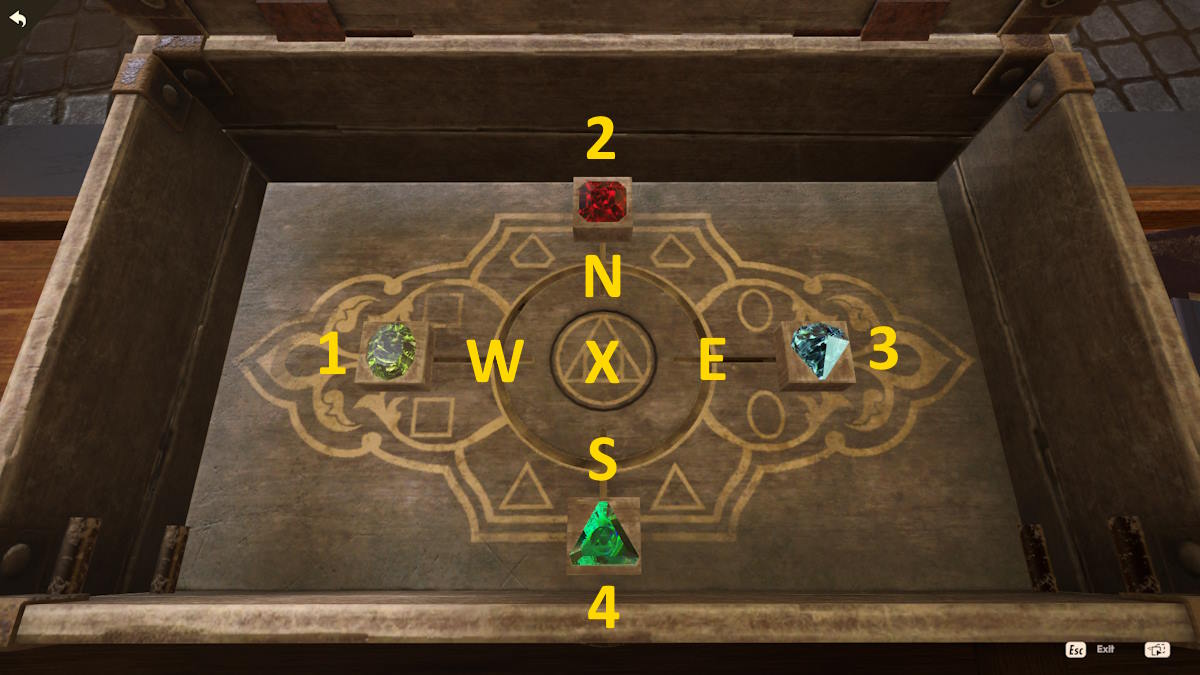
Opening the compass book

The key to the solution is that the numbers on the map match the inner and outer sections of the book cover depending on whether they’re on the inside or the outside of the walls of the cafe. Also, note that the compass is upside down. This means you have:
- 6 = NE
- 4 = E
- 3 = SW
- 1 = W
Each pair of outer numbers adds up to the inner number between them. So, as we have 1 at W and 3 at SW, this means the S number must be 2 (2+1=3). The full solution is below. Once the numbers are in place, click the N in the middle of the book to open it and take the key.

Meet Adela in the cafe
Speak to Patricie and ask what coffee she would recommend. After the conversation move to the table by the window (a5), click the seat to sit down, and Adela will arrive. Run through all the conversation options and take her list of suspects.
Helping around the cafe


Speak to Patricie once more to find she needs some help around the cafe. The three items she needs are in the images above.
- Find the recipe book (first image above): Walk from the counter past where Adela is sitting. Before you get to the wall, you’ll see a wooden case on your left with a plant pot and a book on it. This is the recipe book.
- Find the portafilter basket (second image): This is on the floor by the plant next to the entrance to get behind the counter where Patricie is standing.
- Find the portafilter handle (third image): The handle is on the counter, by the entrance door, in front of the straws.
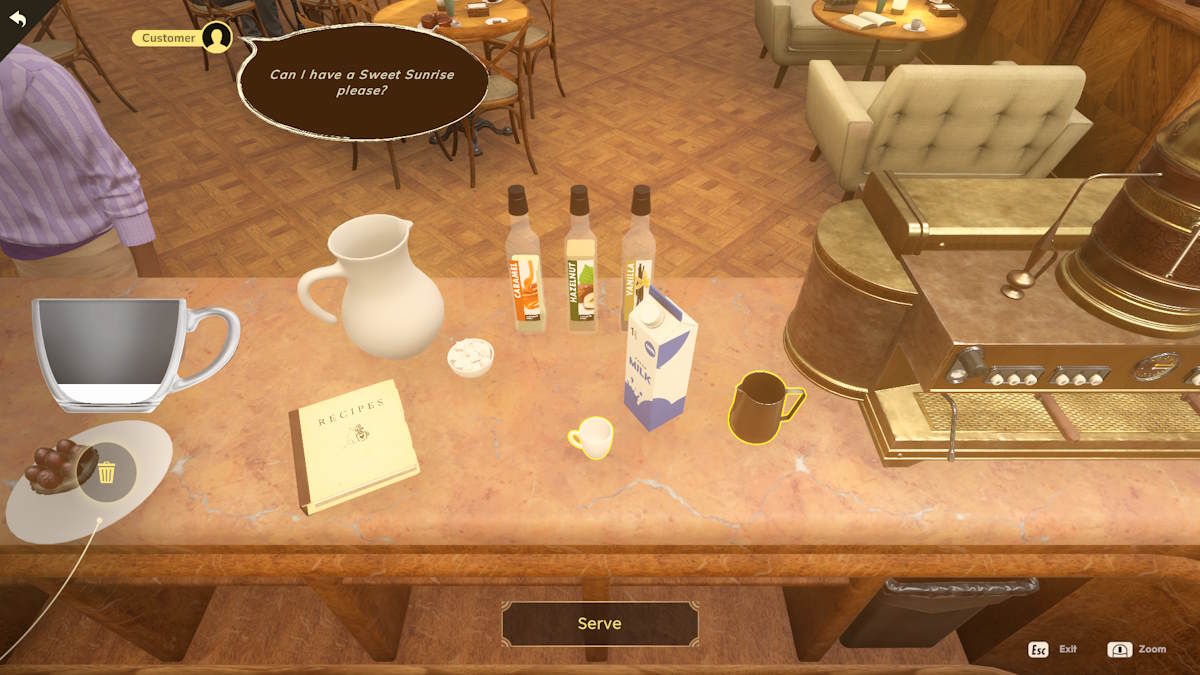
Return to Patrice and talk to her again. She’ll take the items and you’ll start a coffee-making mini-game. You’ll need to prepare the following drinks:
- Cafe con hielo: Single coffee shot, two pours from water jug, one caramel
- Latte: Double coffee shot, three steamed milk, then fill in the key pattern
- Flat white: Double coffee, two steamed milk, one sugar, fill in the crown pattern
- Sweet sunrise: Double coffee, one cold milk, vanilla, sugar
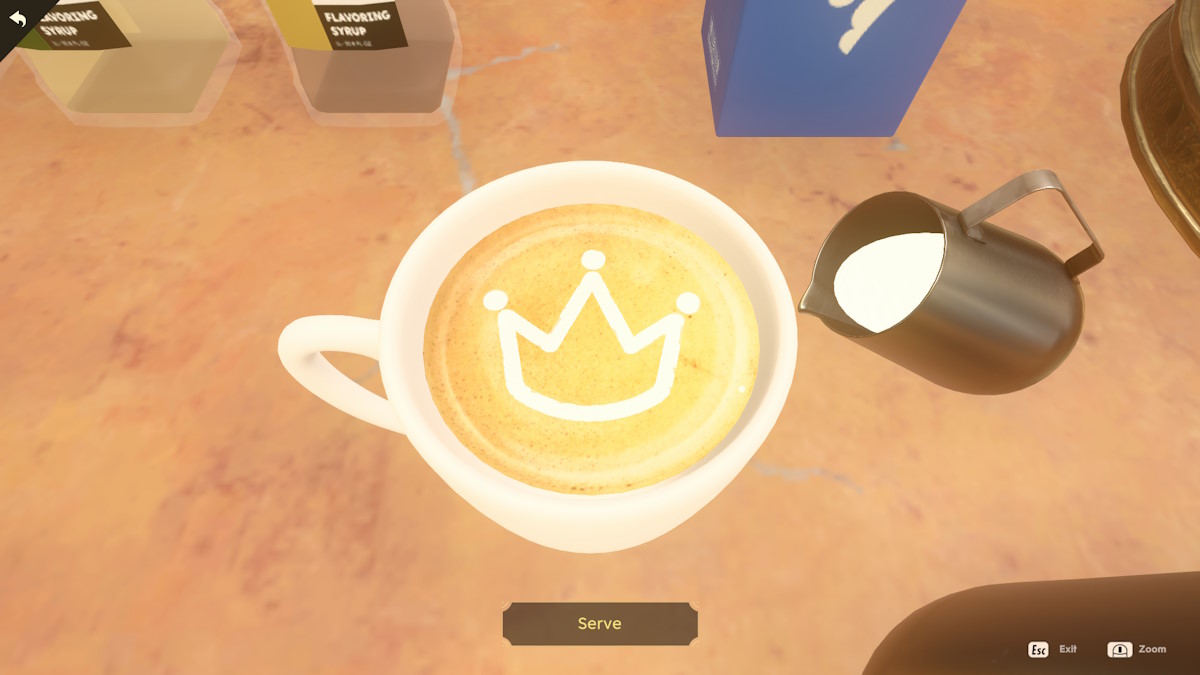
Note that you don’t need to put the ingredients into the cup in any particular order and that once you're done decorating, the word Serve will appear (see above). Once you’re done helping her, Patrice will give you a Snow Globe.
Investigate Adela’s list
Select the note from Adela in your inventory and open it up.
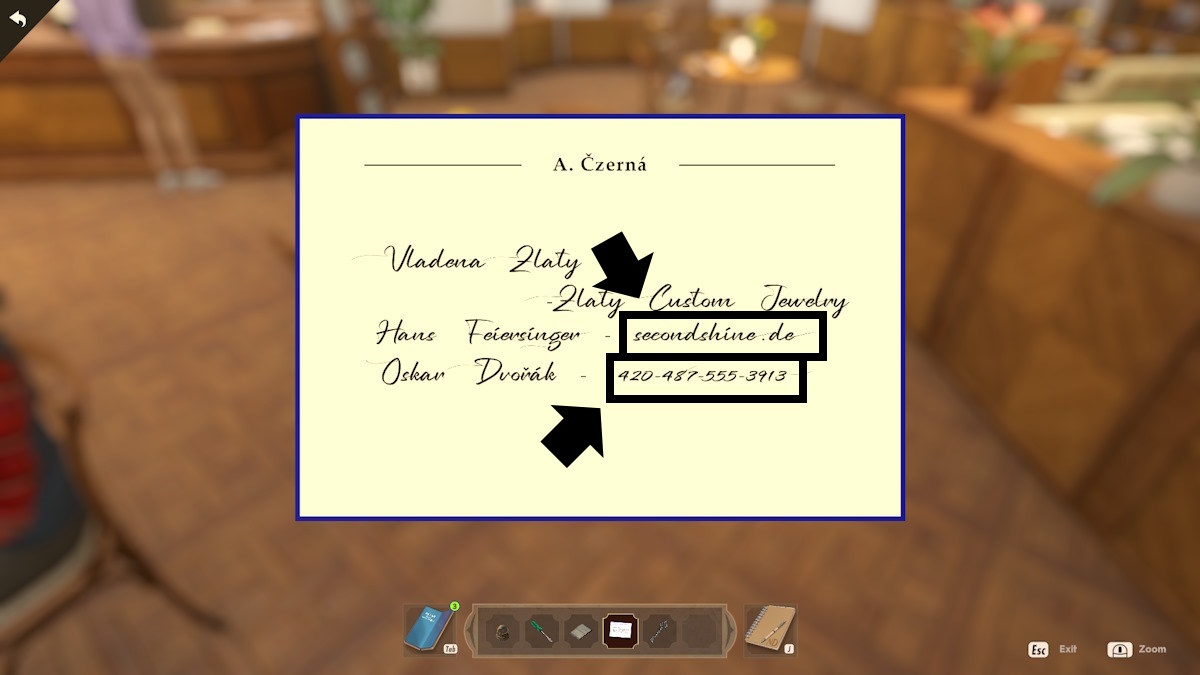
SecondShine

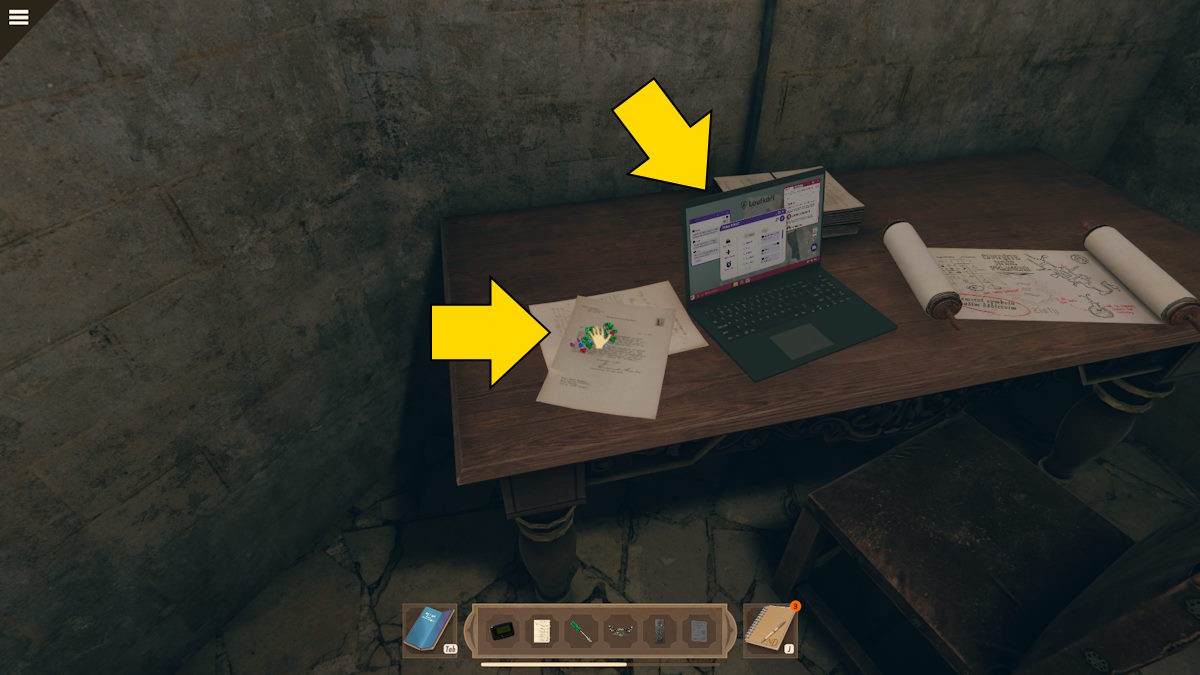
Click the web address, accept the Wi-Fi popup (protected by Loutkari), and scroll to the bottom to get a number for Hans Feirsinger, and call. He will tell you the jewels are securely stored in Germany using DEGAS.
Vladena Zlaty
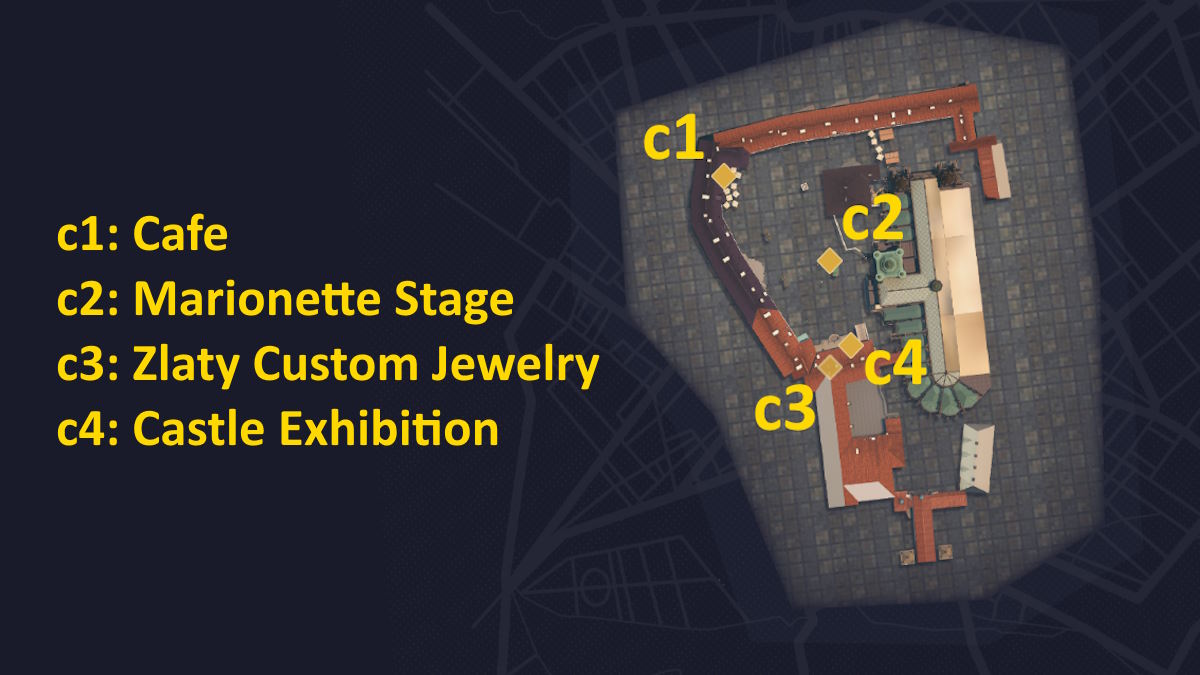
You need to find Zlaty Custom Jewelry. Leave the cafe, turn right, and follow the wall until you get to the store (c3 above). You can only head inside once you’ve examined the note. Once inside you’ll talk to Vladena. Go through all the chat options to find she had to change the DEGAS entry after getting the jewelry back from SecondShine.
Oskar Dvorak
Click his telephone number to add it to your phone, and then call him. He will invite you to the exhibition. Walk through the back of Vladena’s shop (rather than going outside) and you’ll find yourself in the exhibition. Go through all of Oscar’s dialogue questions to find he trusts DEGAS, and then take a look around the exhibits.
Now use Messenger to try and call your dad. When you can’t get through, message Ned. now you need to go back to the cafe and call him. He has nothing concrete, so you need to call the Hardy Boys next. Call Frank and Joe Hardy, who say they can get you the DEGAS file you need but that you’ll need a laptop to access it.
Finding a laptop
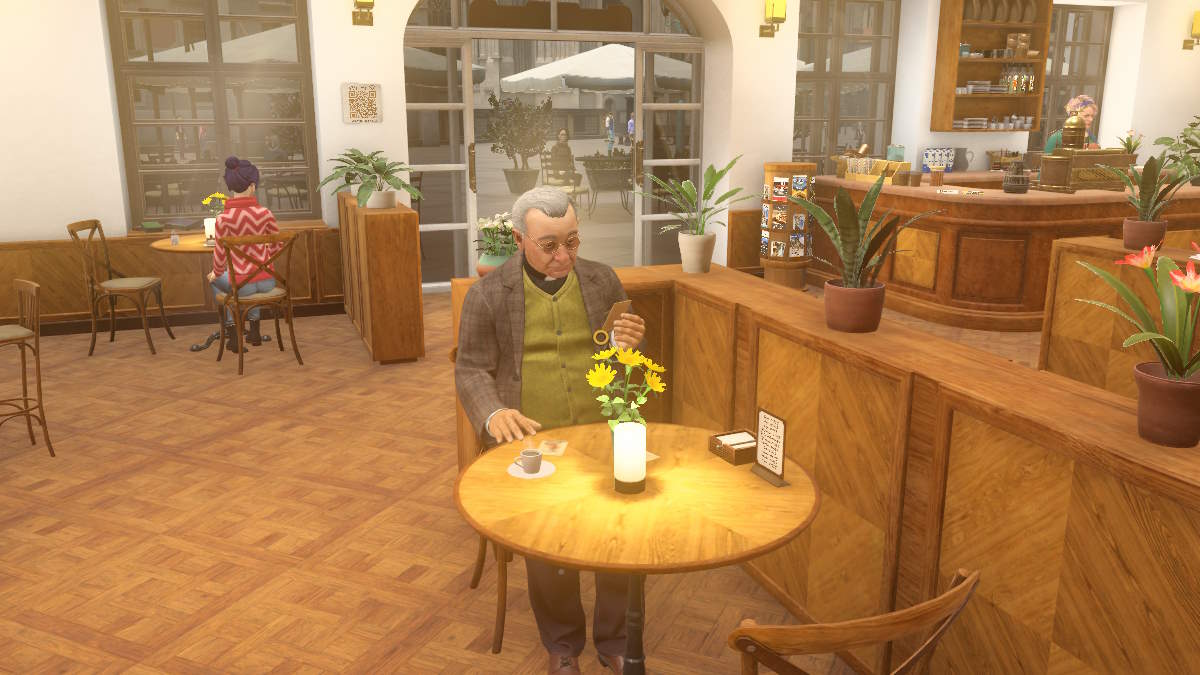
Speak to Patricie in the cafe and she’ll tell you the location of a store to visit to get a laptop. At the end of the conversation, she’ll also give you a coffee to deliver to a customer. The drink is for Leo (above), who came over to the table when you were speaking to Adela. Give him the coffee and run through the chat options to find he is a priest at the cathedral (he’ll invite you to visit him there).
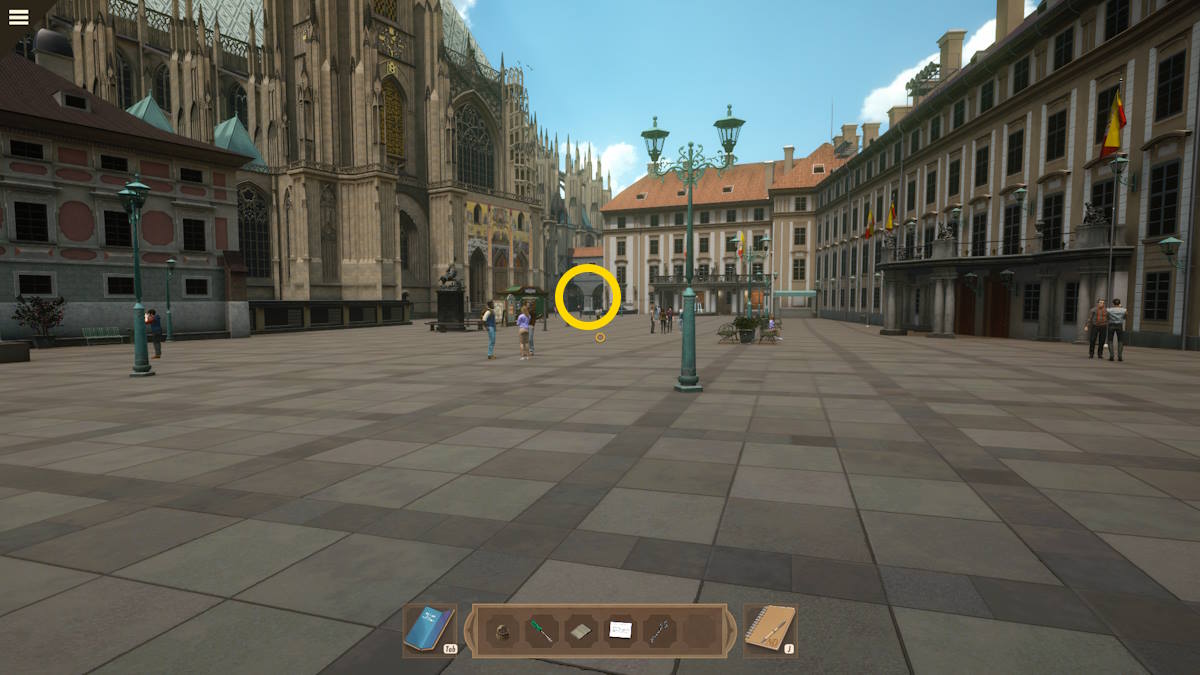
Leave the cafe, turn right, go to the opposite corner from the jewelry shop (see above), and through the gate there into the Old Town Square. The computer store is on your left when you arrive. Head inside and speak to the assistant, Elka, behind the counter. You’ll find out she is learning about cyber security while she sells you a laptop, but also that it is missing its charger.
After speaking to Elka, walk through into Marek’s store next door (you don’t need to go outside). He’ll tell you the key you found is one of the seven keys of Prague. As you leave Radek (a puppeteer) comes into the store and talks to Marek. He suggests you check out his marionette show in the square. This allows you to tick off the visit Aparat task.
The marionette show
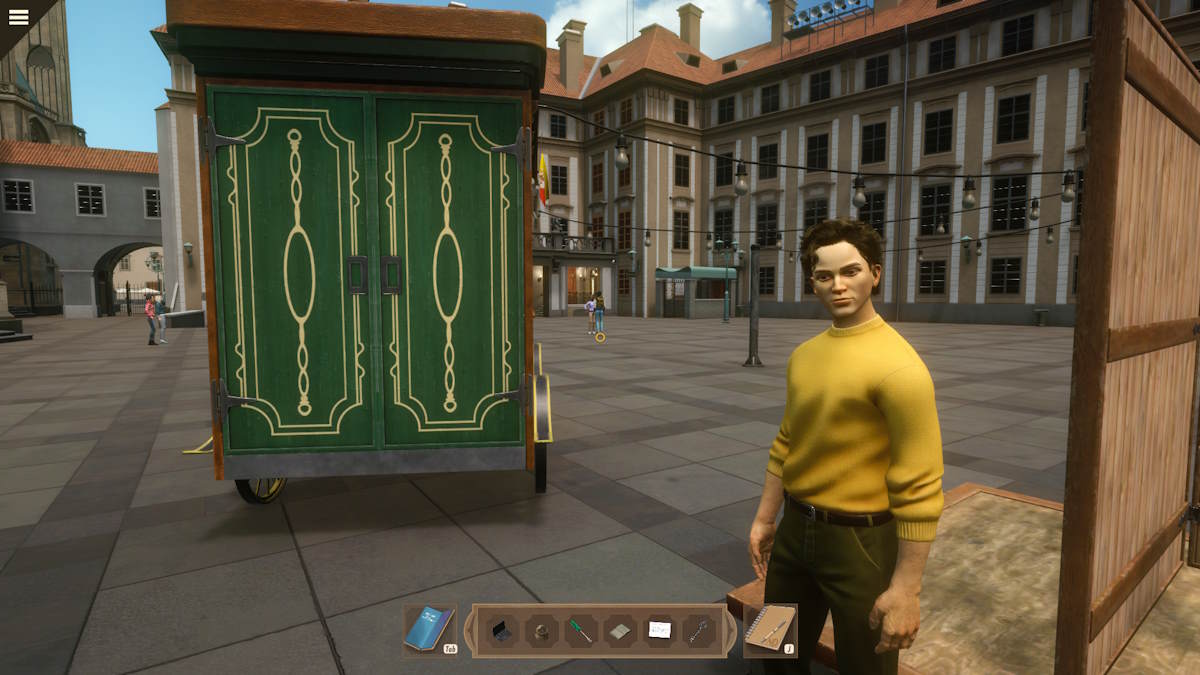
Go back toward the cafe and talk to Radek at the marionette stage (C2, above). He needs you to help him set up the performance. You need to set up seven scenes by putting together the correct puppet, prop, and line. Once you have a scene set correctly, click Action to see if you’ve got it right and can move to the next scene. Note that there is always a puppet (A) and a line (C), but not always a prop (B).
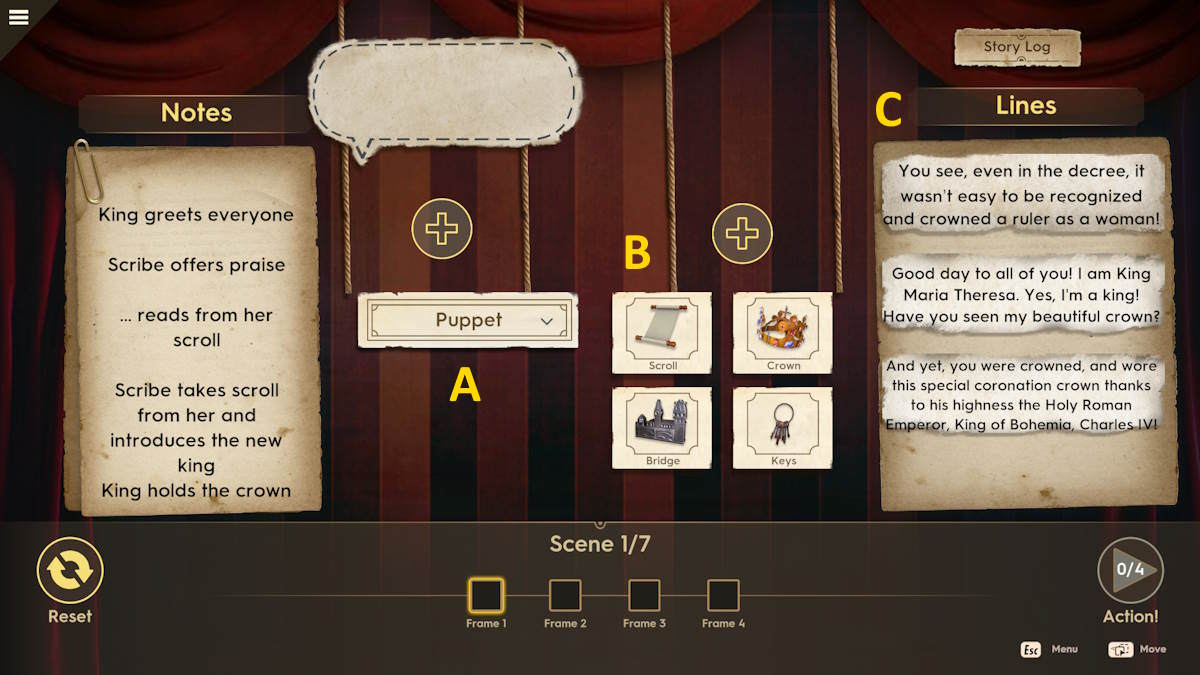
Scene 1
- Marie Theresa, no prop, Good day to all of you…
- Royal Scribe, no prop, Ahem, yes…
- Marie Theresa, Scroll, You see…
- Royal Scribe, Scroll, And yet you were crowned…
Scene 2
- Charles IV, Crown, Stop!
- Marie Theresa, no prop, The king who led…
- Charles IV, Crown, Yes.
- Marie Theresa, Bridge, The King who built…
- Charles IV, Crown, The same.
Scene 3
- Royal Scribe, Scroll, Oh, you did so much…
- Charles IV, Crown, Well, you could go on…
- Marie Theresa, no prop, Not anymore!
- Rudolf II, Crown, Me - Hello!
- Marie Theresa, no prop, You deserve the crown?
Scene 4
- Rudolf II, Crown, Well, I brought Prague…
- Royal Scribe, Scroll, Excuse me…
- Rudolf II, Crown, Yes there is that…
- Marie Theresa, no prop, That’s nice…
- Rudolf II, Crown, Help the people?
- Marie Theresa, no prop, Ha!
Scene 5
- Royal Scribe, Scroll, The story goes…
- Marie Theresa, no prop, Until the Czech Estates…
- Leopold II, no prop, Exactly right.
- Marie Theresa, no prop, Who are you?
Scene 6
- Leopold II, Crown, I am your son!
- Key Maker, Keys, At your service.
- Leopold II, Crown, And I gave those keys…
Scene 7
- Marie Theresa, no prop, You were right…
- Key Maker, Keys, Here, your grace…
- Royal Scribe, Scroll, And the keys have been safe…
After that, you can watch the performance and then speak to Radek. He’ll explain that the seven keys are what, according to legend, keep the Crown Jewels safe. A person would need all seven keys to enter the vault and they are all held by different important people.
Getting the DAGAS file

Go back to the exhibition (next to the jewelry store and where you met Oskar). There is no one there, so head up the staircase and follow the corridor. After a short walk, you’ll get to a door and overhear a conversation involving Oskar and the Dean’s secretary. When it finishes, check your message from the Hardy Boys telling you they’ve sent you the DAGAS file.
Leave the exhibition area and go back to the cafe. Take the charger from the table (see above), open the laptop in your inventory, turn it sideways so you can see the power port, and add the charger. You’ll now get a picture of the laptop screen.
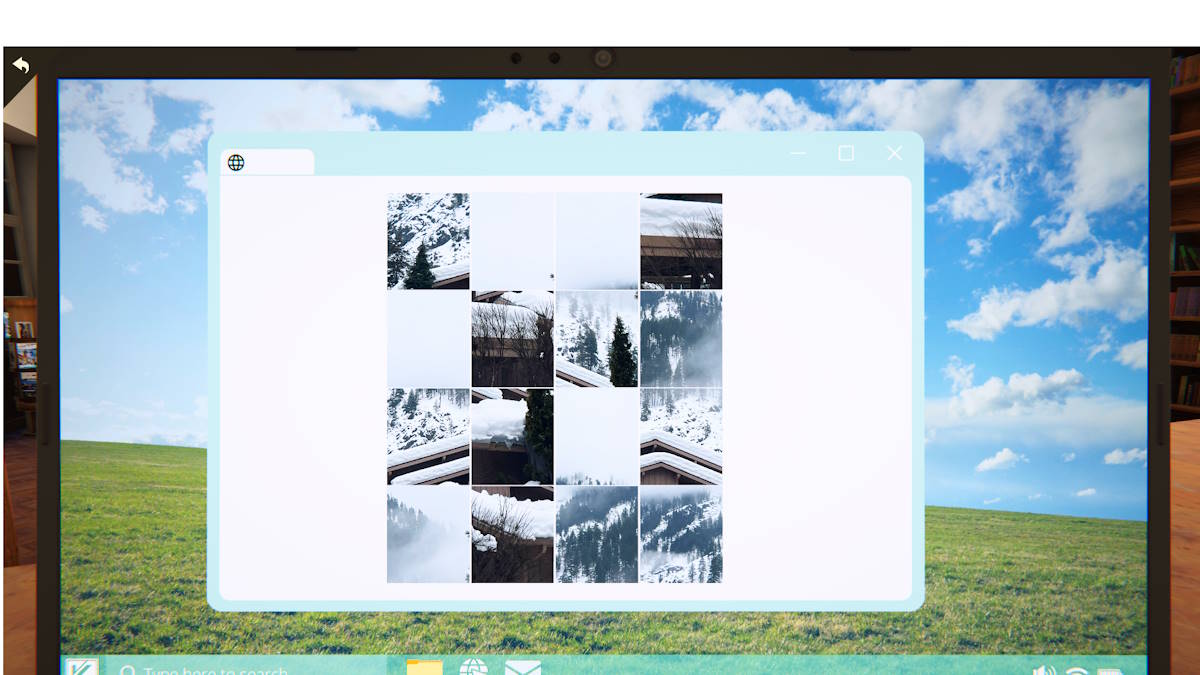
Click the email icon, enter the Wi-Fi password (IBRIK1708), and download the DAGAS attachment. Close the email app and the DEGAS file will be in the middle of the screen. Click it to open it and then attempt to complete the jigsaw puzzle. You’ll get hacked before completing it, so Patrice suggests you take the laptop back to Elka at Aparat Computers.
At Aparat Computers
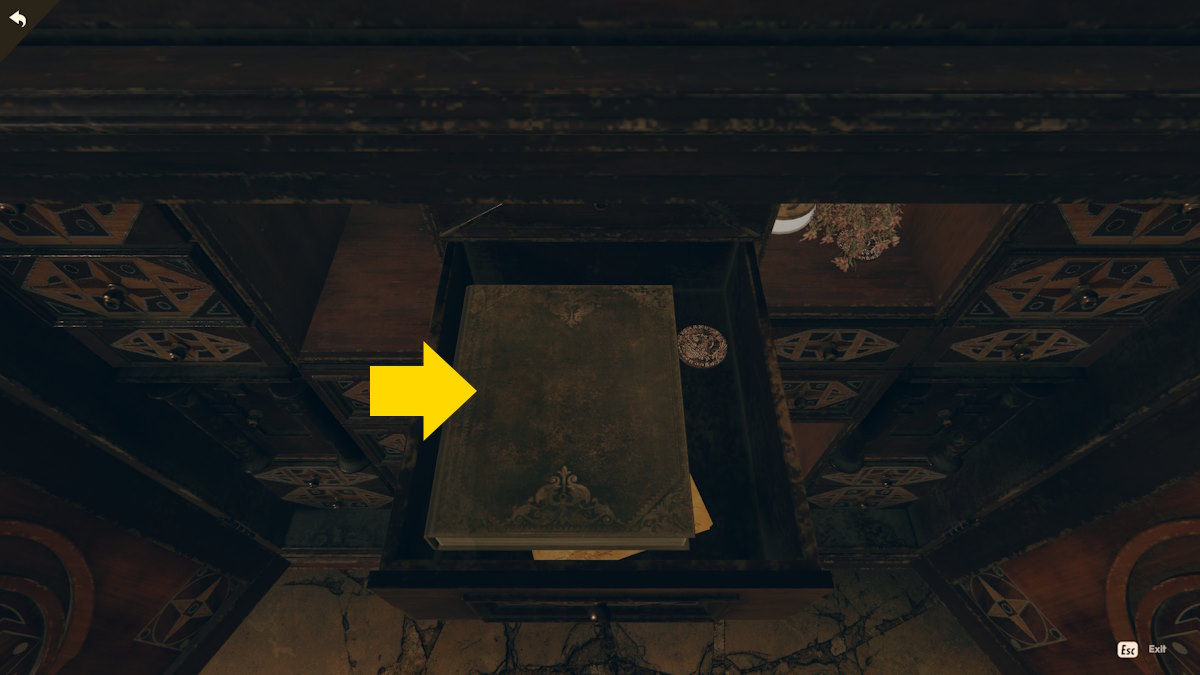
When you arrive, the store is closed but Elka lets you in. You give her your laptop and phone and she takes them away to check them. While she is gone, go behind the counter and examine the desk. Select the keyboard to turn the computer screen on )see above). You can look at everything else on the desk (the colored pen, cyber safety sheet, and the photo of Elka with her mother) but you don't need to remember anything specific.
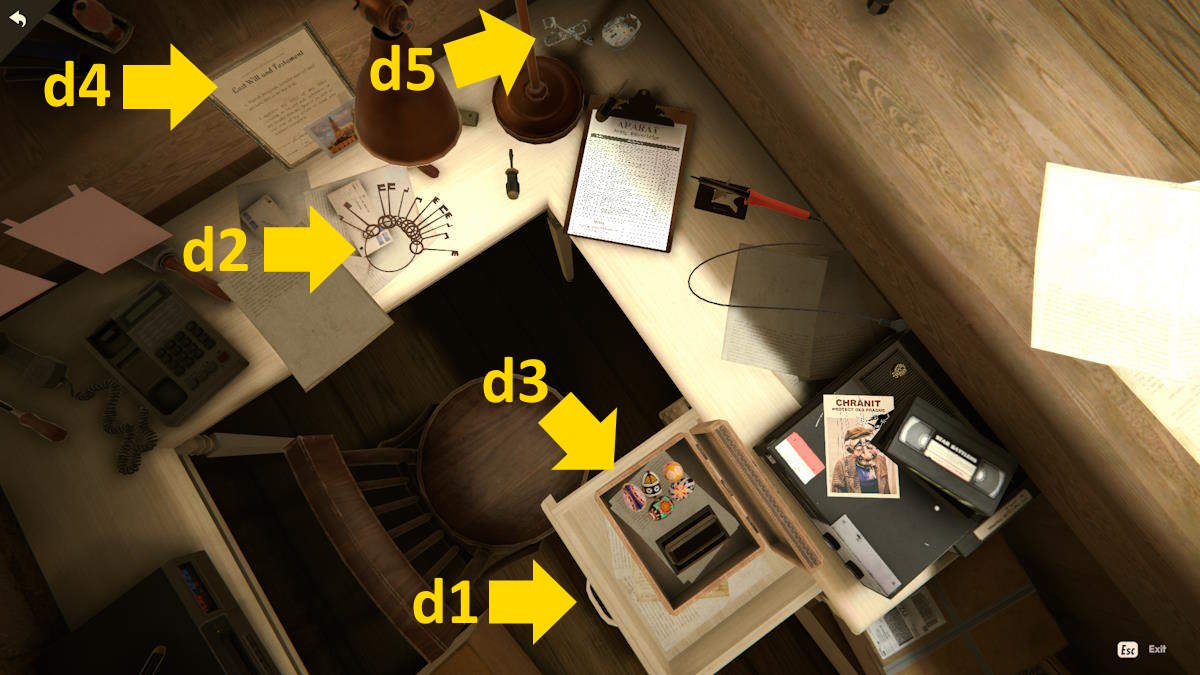
Now go next door and look at the area behind Marek’s desk. Open the drawer (d1) and use the keys on the desk (d2) to open the box inside (d3). Note the will (d4) on the desk (giving everything he has to Elka), the old damaged lock (d5), and the eggs and stamp in the box (d3). Nothing is useful yet and you can’t take anything from either location.
The Cyber Block security puzzles
As soon as you go back into the computer shop Elka will return with your devices. After speaking with her she’ll give you some cyber security training (in the shape of a puzzle). The puzzle has two levels to beat, each of which has to be beaten in 29 turns.
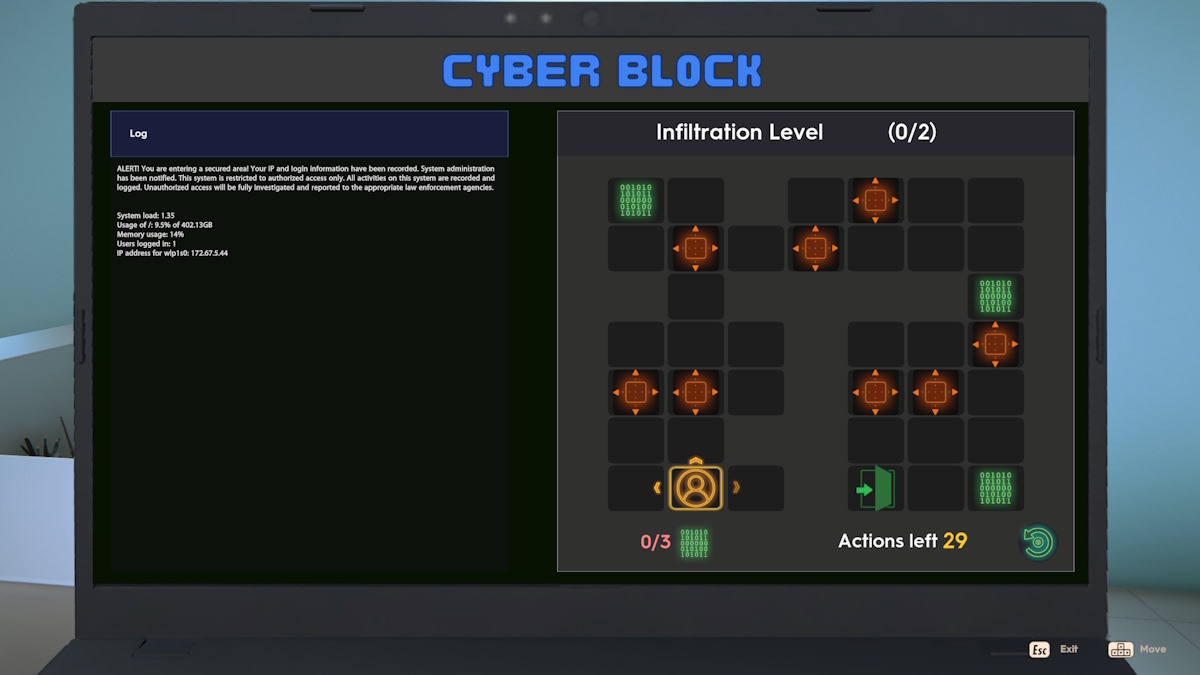
Move orthogonally (up, down, left, right) around the grid. You can push red tiles out of your way and need to collect all the green tiles on each level to beat it. The full solutions are below.
- Puzzle 1 (above): Up, left, up, right, up (x3), left, up, down, right (x3), up, right (x2), down, right, down (x2), left, down (x2), right, down, up, left (x2), down.
- Puzzle 2 (below): Right, down, left, down (x2), left, down (x3), up (x2), right, down, right (x3), down, up, right, up, right, left, up, left, up (x2), right, up, right.
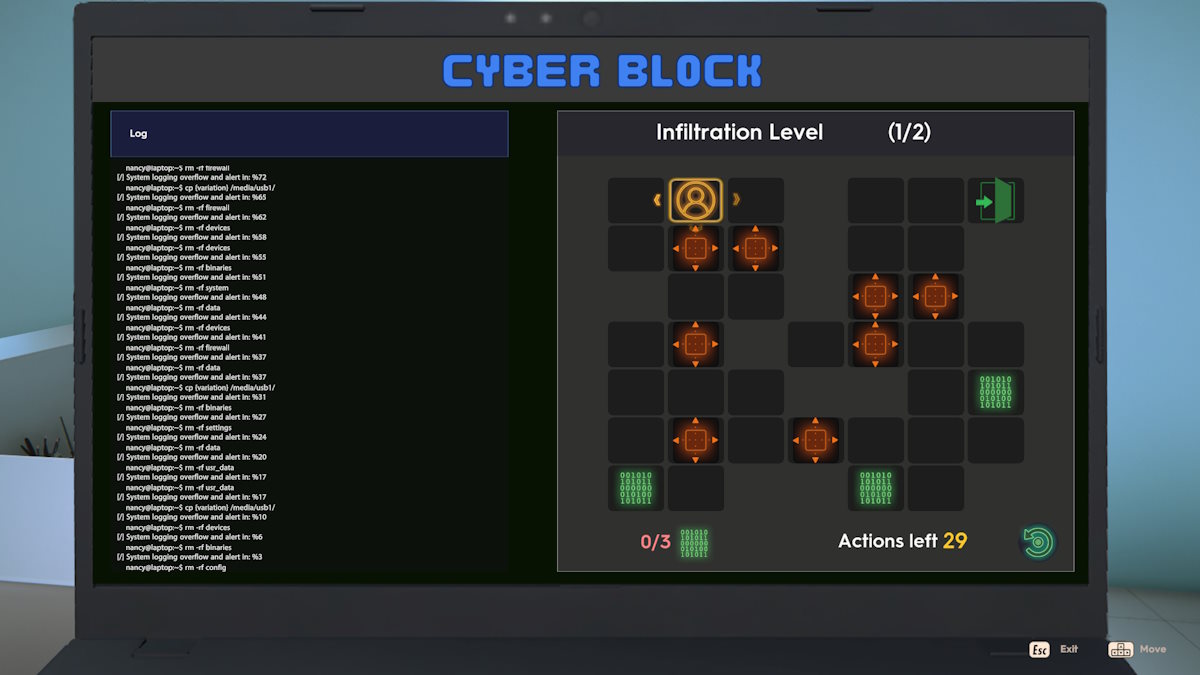
Once completed, you’ll get a call from Agent Zane Garrett about the DAGAS file. He says to look at the dates when the item was transferred. This ends the day.
A morning visit to the Marionette Theatre

After a brief cutscene during which you’ll get a warning to drop the case, you’ll be back outside the cafe. Ned calls, but just to tell you about deadends. Next, Adela calls for an update and lets you know that she visited Marek’s store before she sent the jewelry away. Head over to speak to Radek once more across the square.
After speaking to him, climb into the box where he does the shows and take a look at the desk (see above). The clipboard (e1) shows a huge cash donation from Loutkan, the cyber security firm. Use the chisel (e2) to pry open the red box (e3) and find out his new performance will be Rezidente’s True Tale.
Speak to him afterward about how many puppets he has and he’ll say 10. When you mention the fact he said he was waiting for his 12th puppet from Marek, he gives you a panicked reply. Head back to the cafe and speak to Patricie. She’ll tell you that the Rezidents are a secret group of underground criminals who stalk the shadows of Prague.
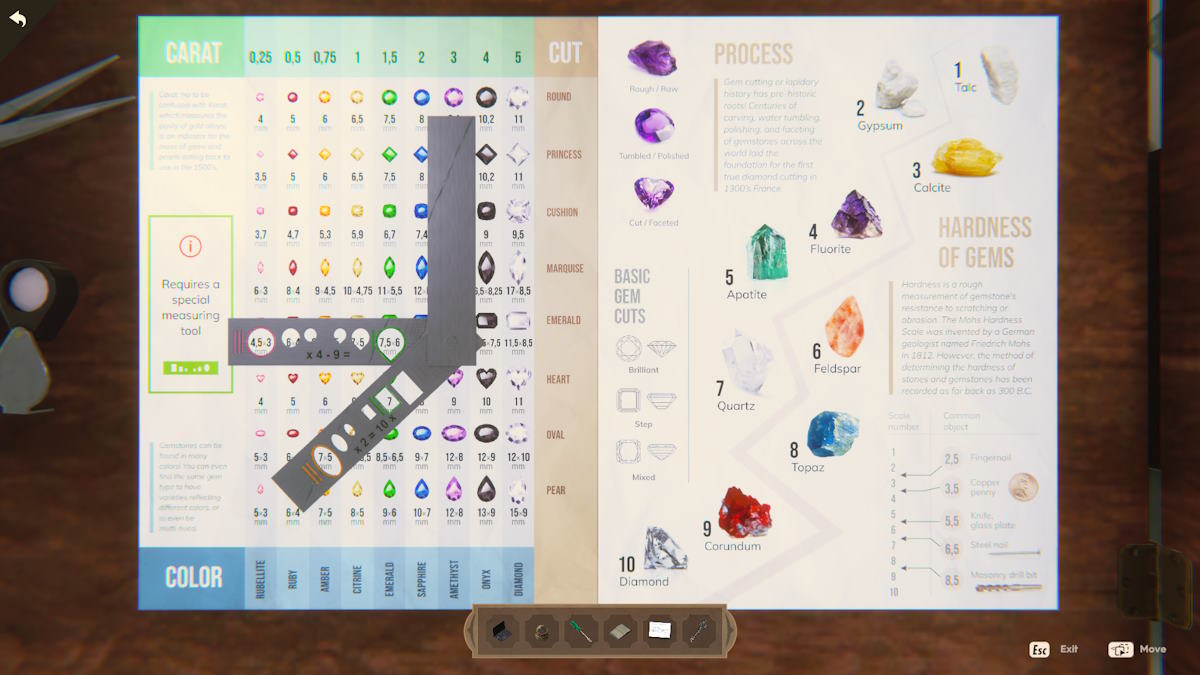
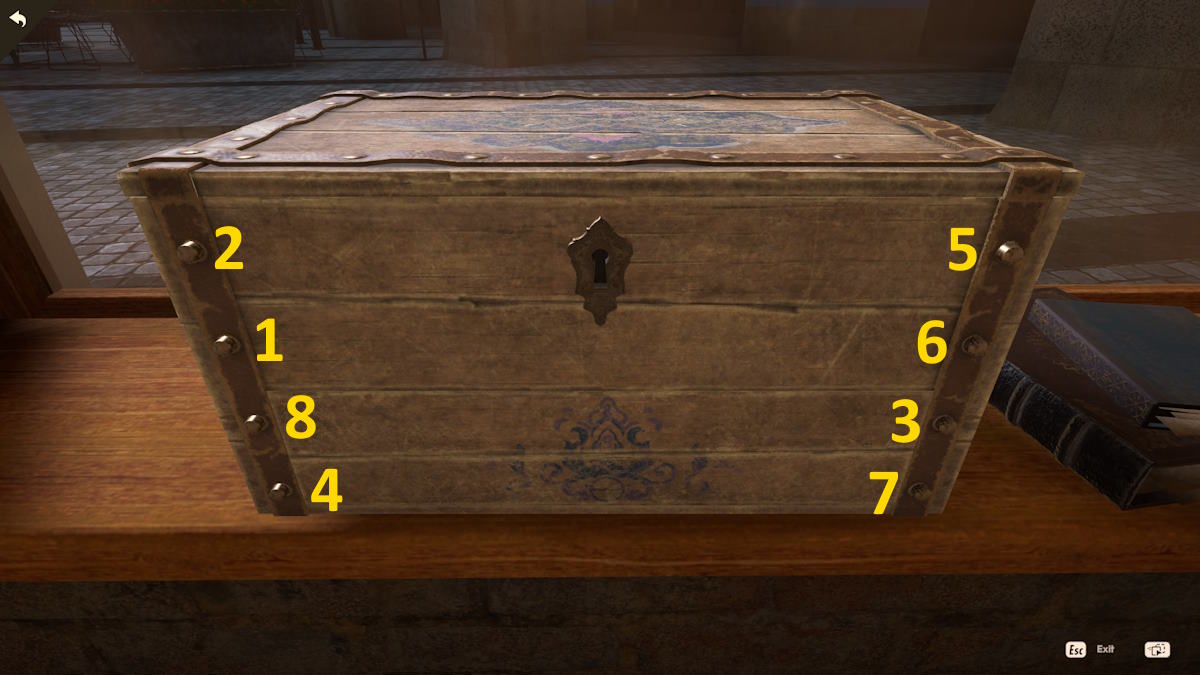
Cracking the safe - maths puzzle solution


Now return to Vladena in Zlaty Custom Jewelry. She confirms Marek is a skilled artisan who would likely have the know-how to tamper with the necklace. She then leaves to speak to Oskar, allowing you to try and crack her safe. To do this, you first need to assemble a tool. You’ll find the first part of the tool on the round table in the corner, the second in the penholder in the desk close-up, and the third next to the large white gemstone (see above).
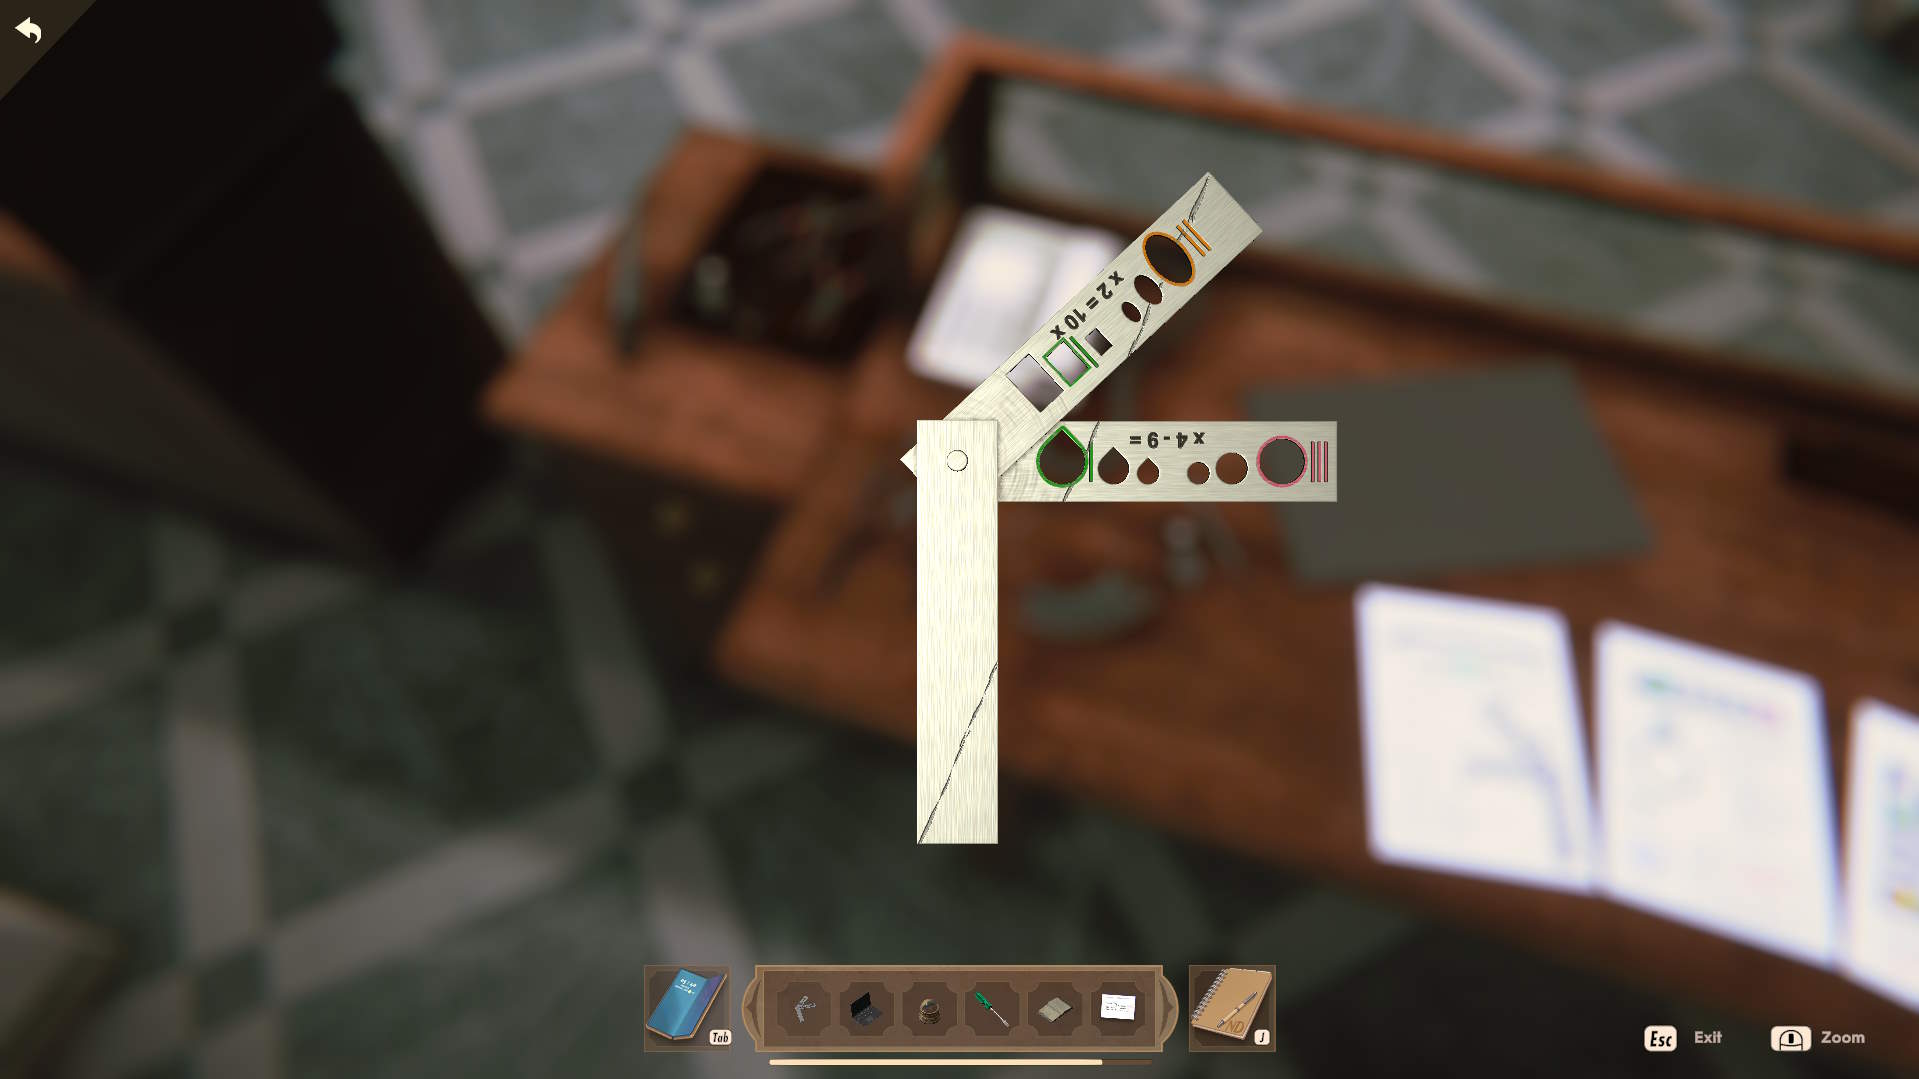
Combine the three pieces in your inventory so that the scratch in the metal in each piece lines up (see above). Now move to the poster on the other half of the desk (see below) and line the device up in the close-up so the four numbers create the equation on the two metal pieces. Also, note that each hole has a number of lines next to it showing the digit in the sequence that is part of the code (so three lines next to 4.5x3 will give you 3).
Finally, note the order of the sun and moon symbols above the safe and how they equate to the diagrams on the desk (see below). This leaves you with the code 5457. Use this to get into the safe and take the document inside. As you step back out from behind her desk, Vladena returns. Before you leave, she tells you Oskar was an assistant when the gems were stolen in London.
Checking the DAGAS files

Briefly pop next door from the jewelry shop to the exhibition and ask Oskar about his argument with Vladena. It turns out Vladena’s family were once the assessors of the crown jewels before being ousted.
Return to the cafe, take the laptop charger from its familiar place on the table, and try again to examine the DAGAS file. The document will open once you’ve completed the CAPTCHA slide puzzle (see above). Click the right arrow twice on the computer image to get to the correct DAGAS file (you’ll know you have the correct one when Nancy comments on it).
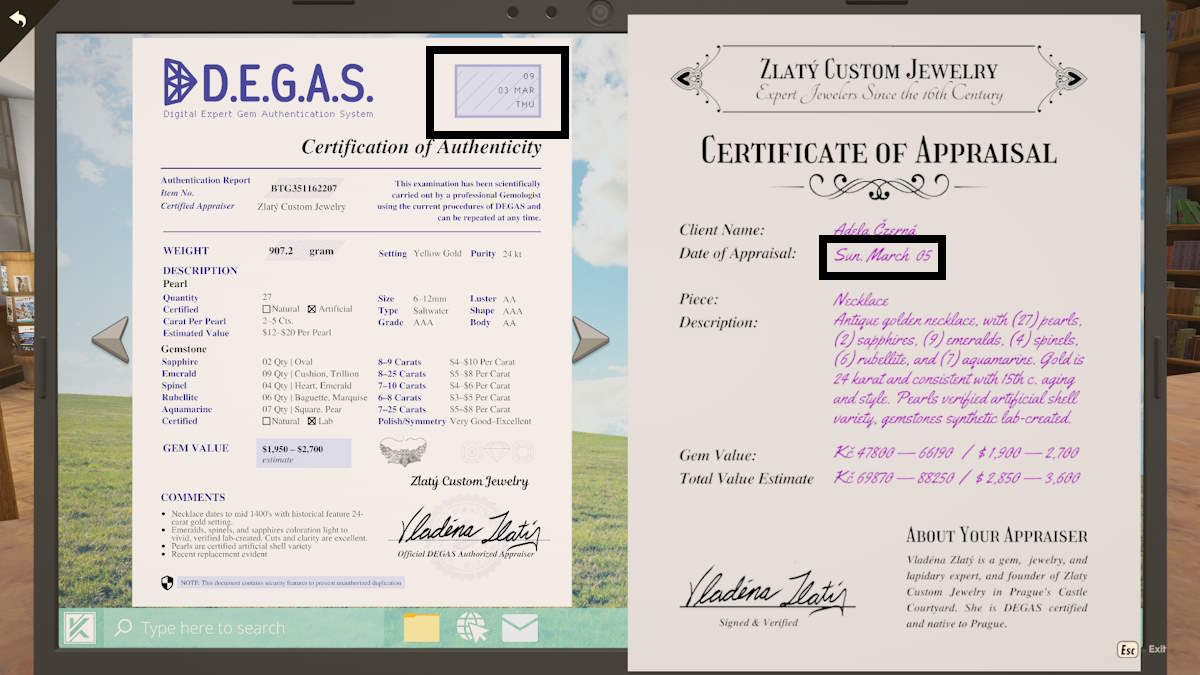
This begins a spot-the-difference puzzle. Move the cursor over the images until the symbol changes, click the detail to highlight it, and then find the corresponding information on the other document. Similarities will show with green lines and discrepancies with red. There are eight details to match up in total but the important one is the date, which is different (see above).
Take this new information back to Vladena at Zlaty Custom Jewelry. After she tells you she should have been the only one able to edit the online version of the DAGAS file, you’ll get a message from the Hardy Boys. Now call Agent Zane at DAGAS with all this new information. After telling him about Rezidente’s possible involvement, tell him about the DEGAS file timestamp discrepancies. You also find out that the Dean of St Vitus may be in danger, as the odds are someone is planning to steal the crown jewels.
Searching for the Dean of St Vitus
Go back into the exhibition room (where Oskar remains) and head up the stairs and along the corridor toward the Dean’s office.
When you arrive at the Dean’s secretary’s desk, there is no one around. Click the ‘gone for coffee’ note on the desk and you’ll get the secretary’s contact details added to your phone. You can optionally use the knife on the secretary’s desk to open the paper file there. It shows a note from Leo, saying he is off to Rome. You’ll also see the Dean’s office door is open, so head inside.
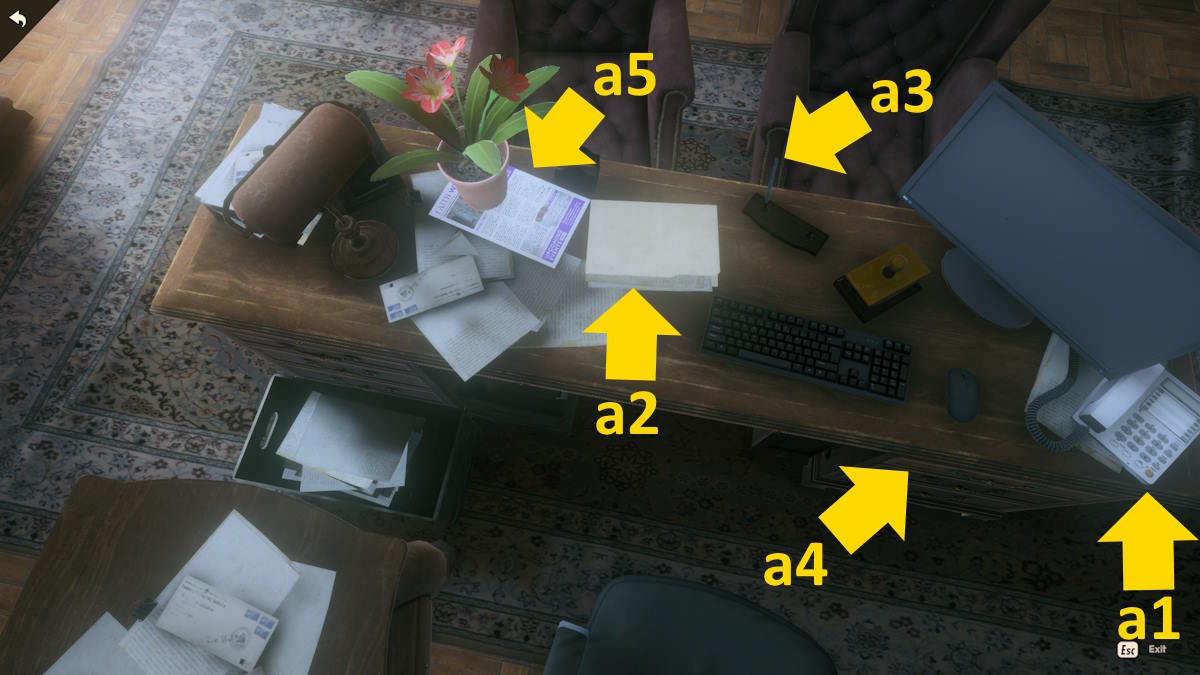
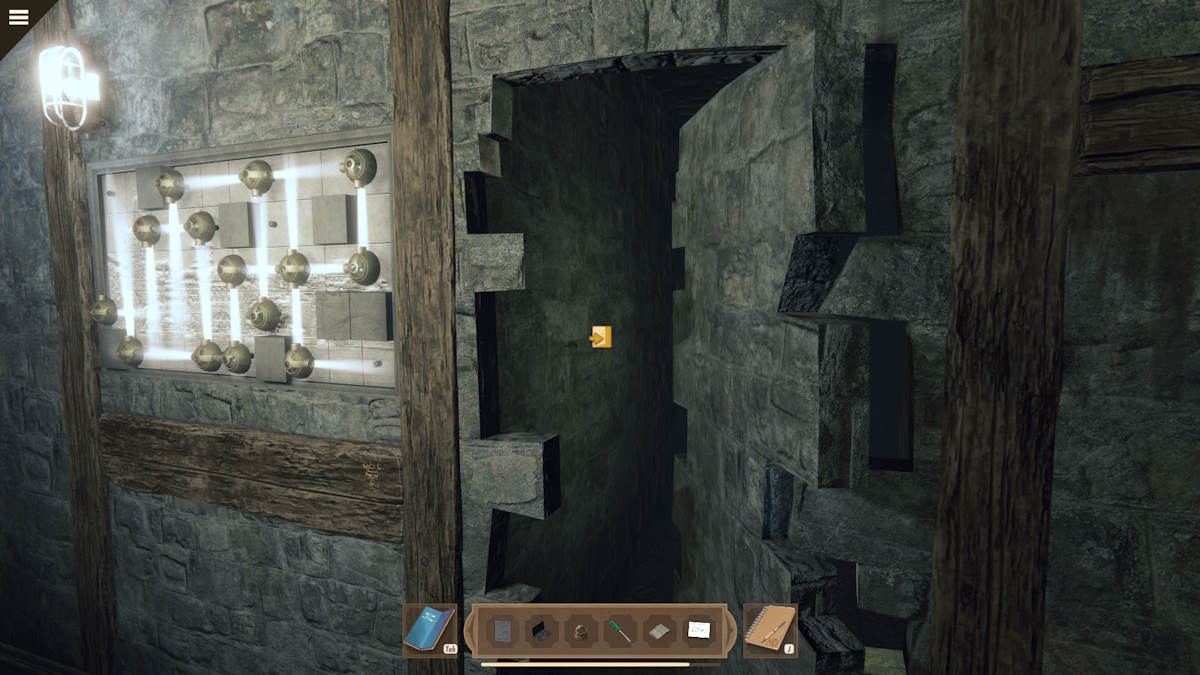
When you enter the Dean’s office the door will shut behind you and you’ll hear another frustrated conversation between Oskar and the Dean’s secretary. You’re trapped! Head over to the Dean’s desk and examine it. Click the telephone (a1) to listen to Leo’s messages, open the folder (a2) to find a pen open, and place it in the pen holder (a3) to open a secret drawer (a4).
Check the calendar inside, read the Faith Weekly magazine (a5), and then turn your attention to the wall behind the desk.
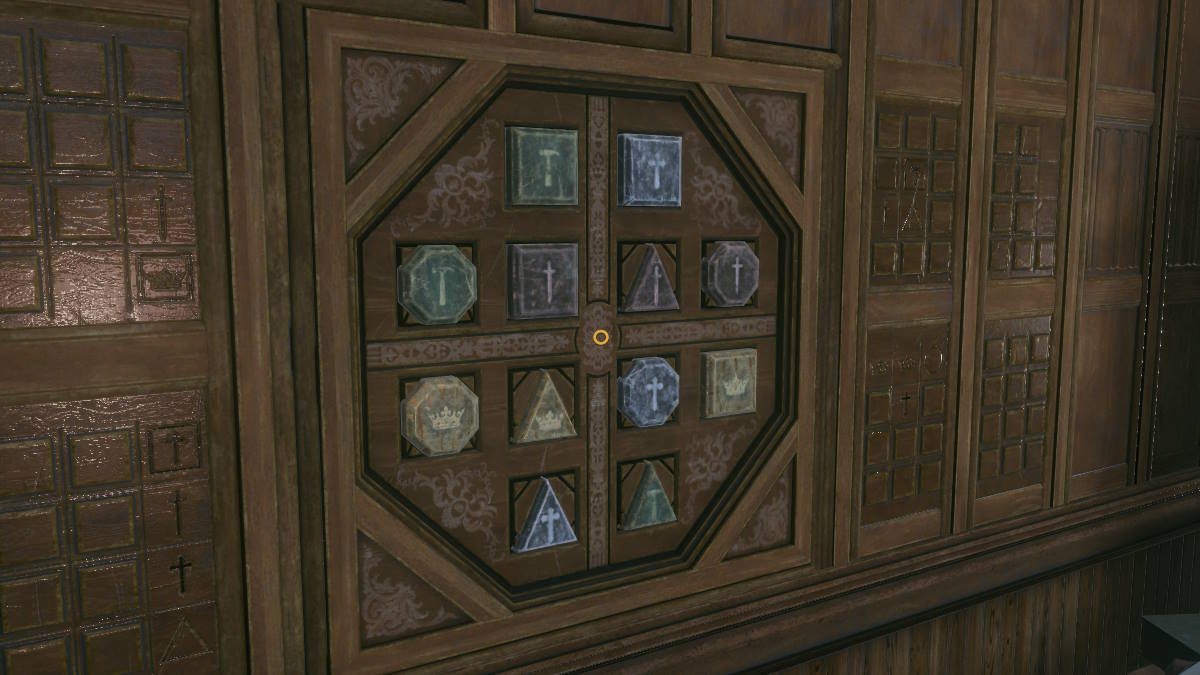
The trick to this puzzle is making sure that all the symbol sets carved into the wood outside of the central pattern are represented in the middle by swapping the symbols. The image above shows the completed pattern.
Entering the tunnels
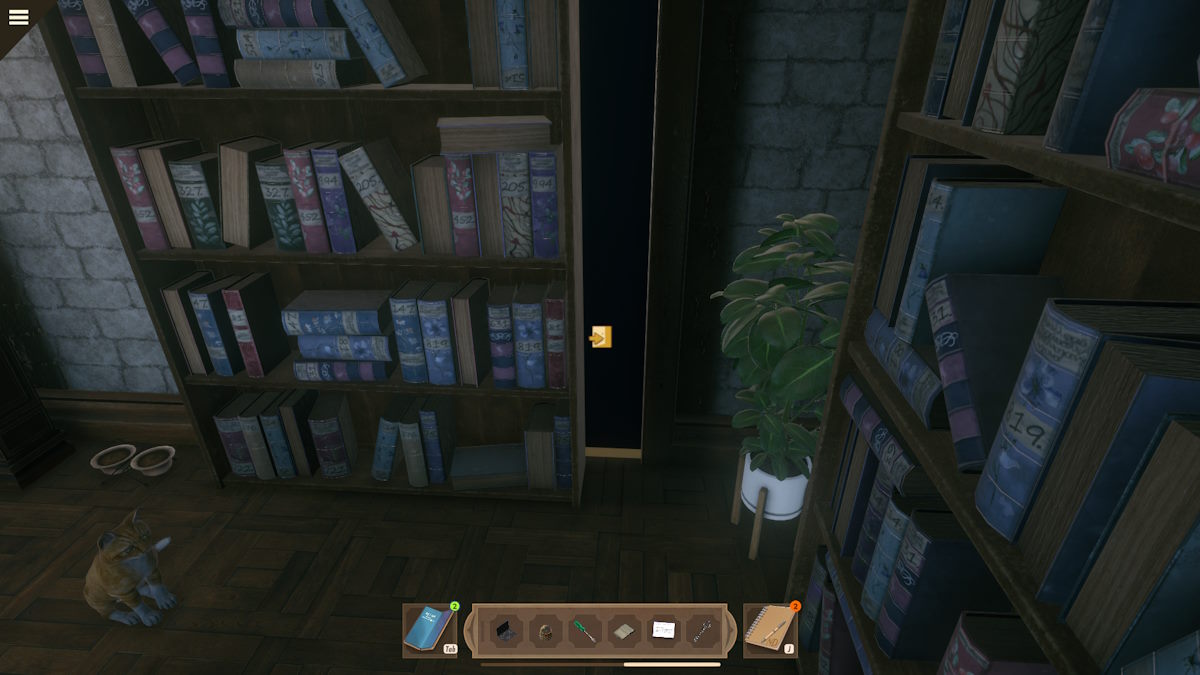
Once done, a bookcase will move on the wall next to you, giving you an exit. Don’t forget to pet the cat on the way out. However, it’s also important to note that the next section is a maze in which you’re being chased.
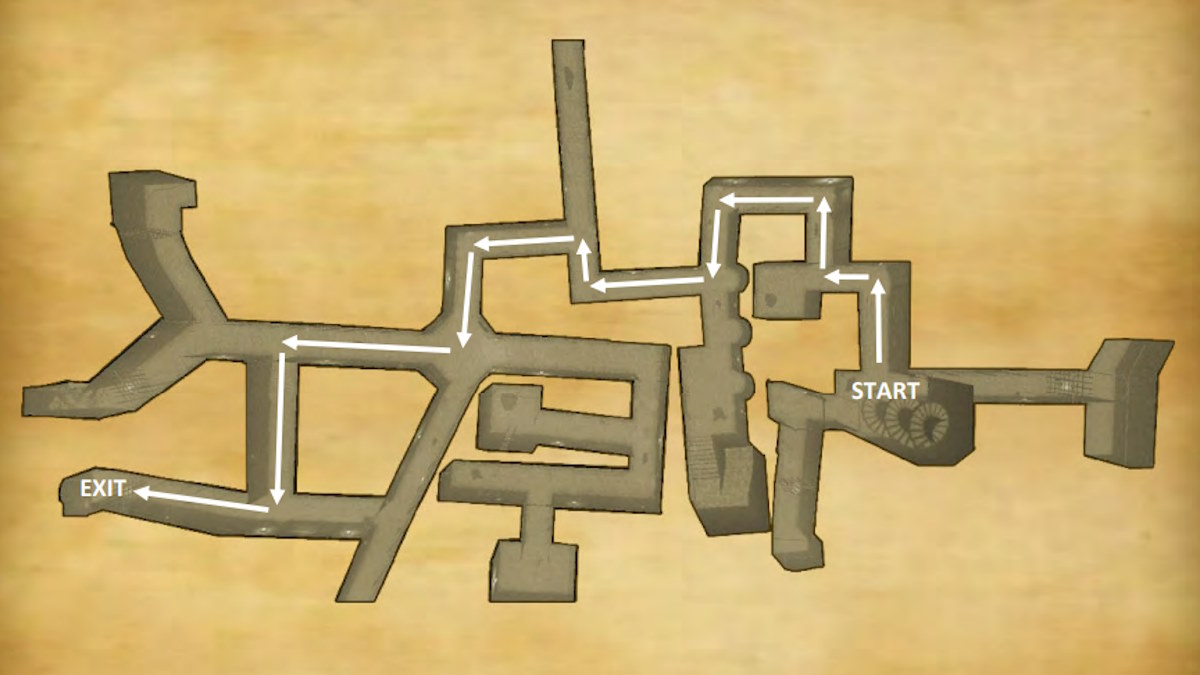
As soon as you arrive in the tunnels you’ll start to be chased by ghostly apparitions. If they catch you, you fail, and you have to start again. You can do this as many times as you like so there’s no need to panic. The map above should help you make it out without too much trouble. However, while you can get out safely in the end, it looks as if the Dean may not have headed to Rome as planned.
Once you’re out and have spoken to the police you’ll find a message from Adela, so go and meet her in the cafe. You can also call the Dean’s secretary, but he doesn’t have much light to shed on matters.
Adela and the hackers

Once you sit down with Adela in the usual spot in the cafe, you’ll find she has been hacked. Luckily, it is a similar Cyber Block program to the one Elka taught you to beat. This time there are three levels to beat and an increasing number of turns.
Cyber Block Level 1
- Left, Down, Left (x2), Right (x2)
- Down, Right, Up, Right, Left
- Down (x3), Left, Down, Up (x2)
- Left (x2), Up, Left, Right, Down (x2), Left
Cyber Block Level 2
- Up, Right, Up, Right, Up, Right, Up
- Left, Up, Down, Right (x2), Up, Right, Up
- Down, Left, Down, Right, Down, Right, Left (x2)
- Down, Left, Down (x2), Right (x3)
Cyber Block Level 3
- Right, Up (x2), Left, Up, Left
- Right, Down, Right (x3), Up (x2)
- Left, Up, Left (x2), Up, Left
- Right, Down, Right (x2), Down, Right (x2)
- Up, Right, Left, Down, Left, Down (x4), Right (x2)
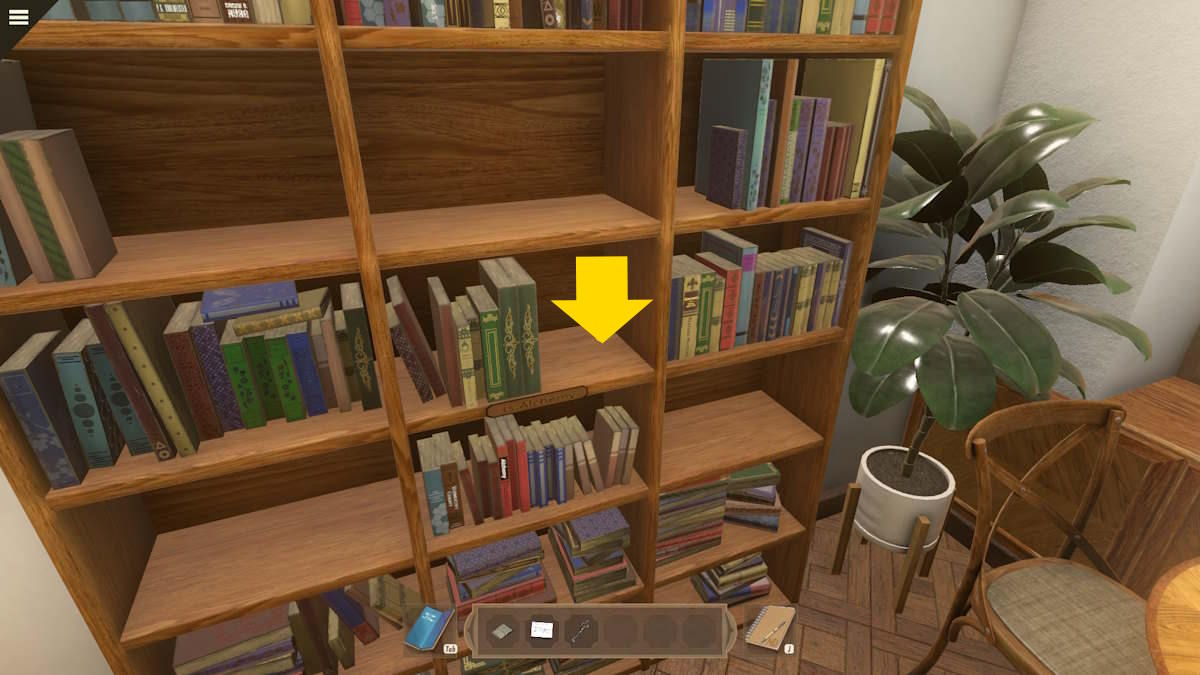
Speak to Adela once you’ve cleaned up the hack and give her a case update. Once you’ve exhausted all conversation options with her, also have a catch-up with Patricie behind the cafe counter. While in the cafe, also head to the Alchemy section (right as you come in through the door, in the corner, see above) and take the book Alchemy’s Golden History from the shelf there.
Investigate Oscar’s artifact
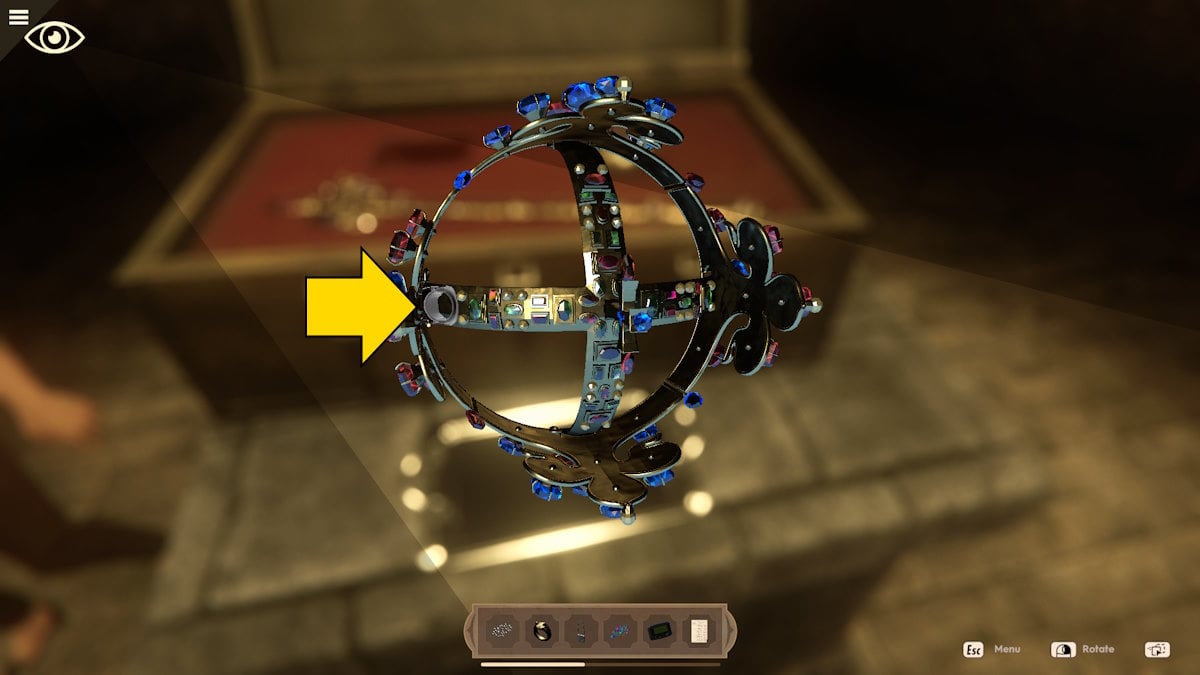
Go back to the museum exhibition and speak to Oskar about the Dean, the Rezidente, and alchemy. You can check out the exhibition, but what you need to do is get into Oskar’s artifact (pictured above). To get anywhere you first need to solve the lid puzzle.
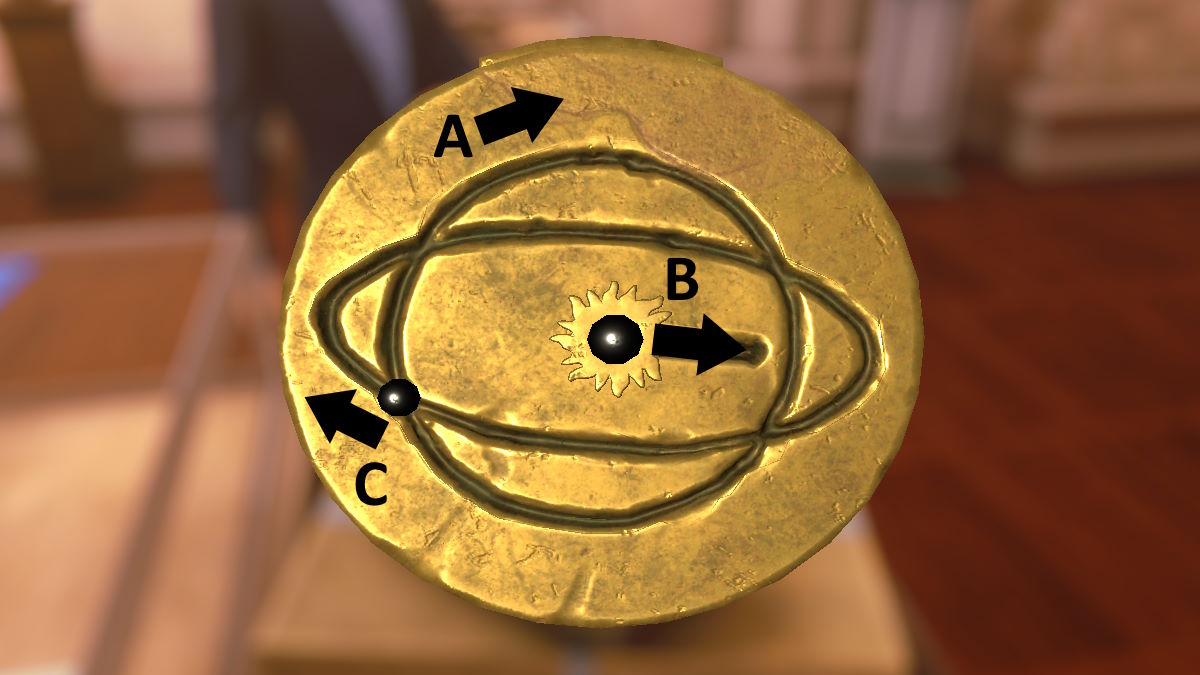
Examine the object and click the top to get a face-on view of it. First, drag the planet (A) clockwise around the circle back to its starting point. Now slide the sun (B) across from left to right. Finally, drag the planet (C) completely around the ellipses. This opens up the rest of the puzzle.
You now need to line up the correct four symbols to open the device. See the image above for the pattern required and the button to press once you’ve aligned the correct symbols. When you try and examine the artifact further, Oskar will intervene. Come out of the close-up and he will explain where the artifact was found.
Learn more about alchemy
Head outside and talk to Radek in the square (in his usual spot at the marionette caravan) about the Rezidente and alchemy. Now return to the Old Town Square and speak first to Elka and then Marek in Aparat Computers.
After exhausting all the conversation topics with Marek, you’ll be able to examine the old alchemist’s case on the windowsill in his section of the store. When you examine it, click the left arrow to look at the left side and click the button there. Now click the right arrow twice and click the button you’ll now find on the opposite end of the box (both buttons are shown above).
You’ll automatically be taken back to the front view of the box and the eight bolts holding it together are now clickable. Click them in the order shown above and the top of the box will open, revealing a marionette. Click the marionette to remove it, noting the symbol underneath (a circle in a square in a triangle in another circle).
The haunted tour
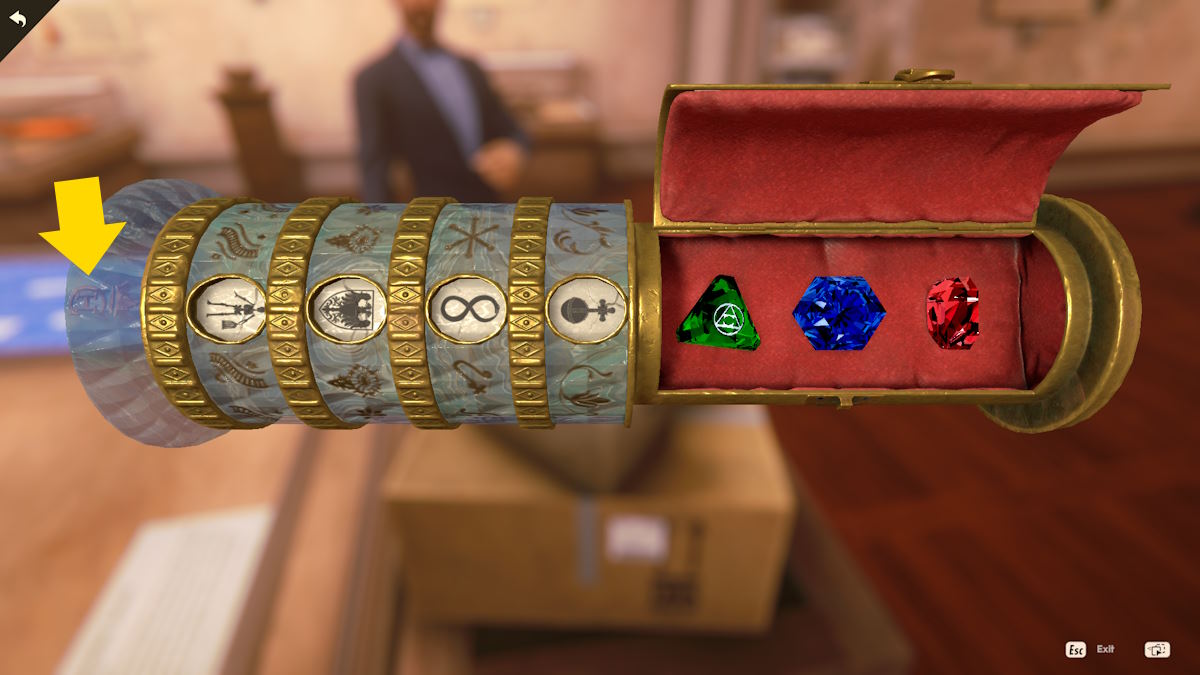
Return to the exhibition but instead of going inside, click the poster for the Haunted Tour outside (pictured) to begin the tour. You can do this earlier, but there’s a reason to do it now. As Oskar isn’t here, you can select the artifact you’ve recently opened and take the jewels (you can’t do this until you’ve seen the symbol in the old case).
You can optionally take the tour itself by clicking the guided tour button next to each of the five numbered pictures on the walls (you’ll have to do it today to progress anyway). Click the Haunted Tour poster again to exit.
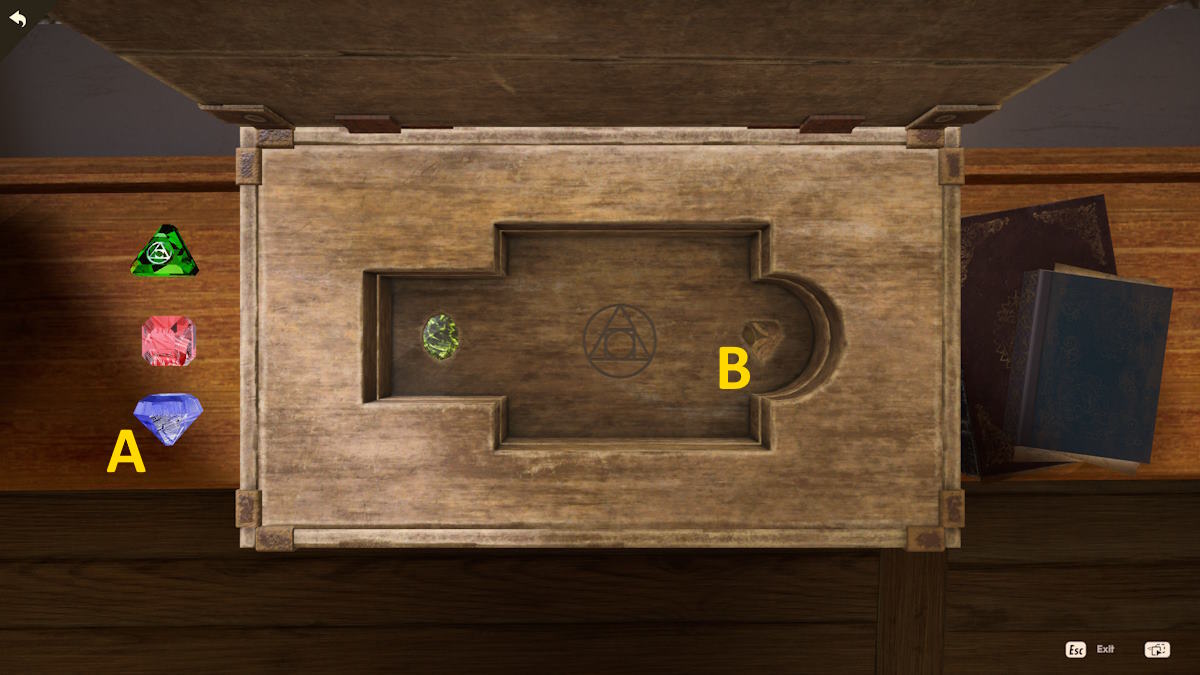
Return to Marek’s workshop and look again at the old case. You’ll note the three gems you ‘borrowed’ from Oskar’s artifact are now on the left of the close-up (see above). Place the blue gem (A) in the empty slot (B) and the top layer of the puzzle will be removed. Place the remaining two gems into the slots matching their shape on the next level to get to the real puzzle below. To finish opening the box, do the following:
- Slide 1 to position S
- Slide 3 to position E
- Slide 2 to position W (which also rotates 3 and then 1)
- Slide 4 to position S
- Press X
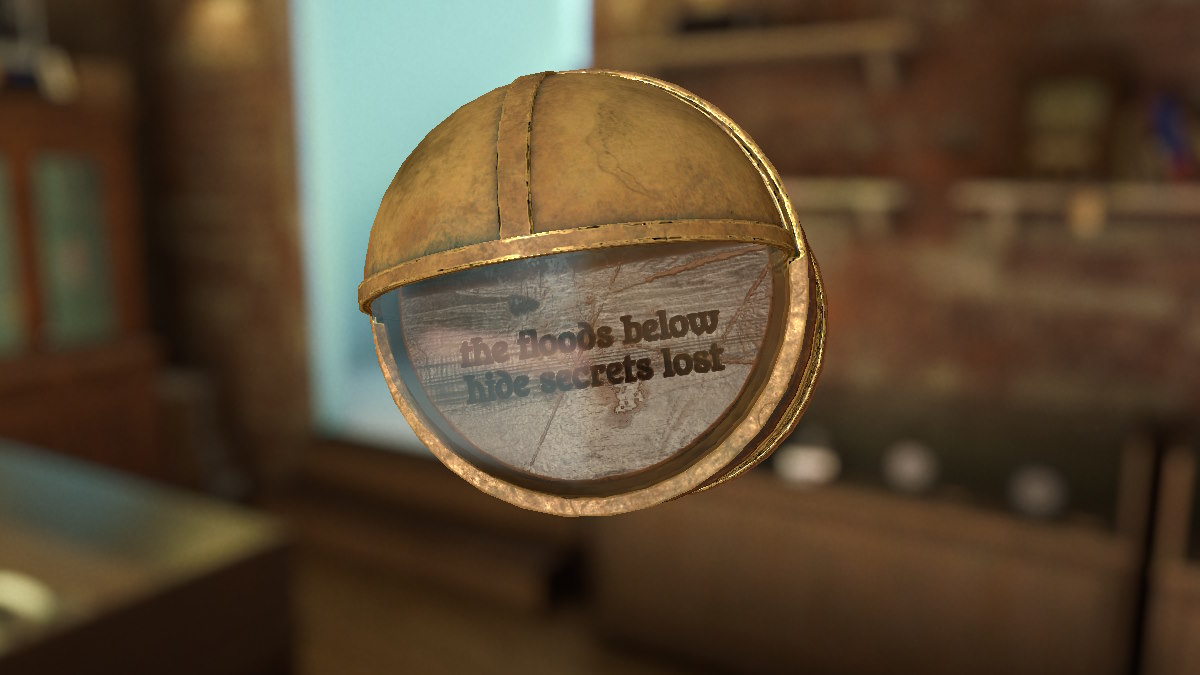
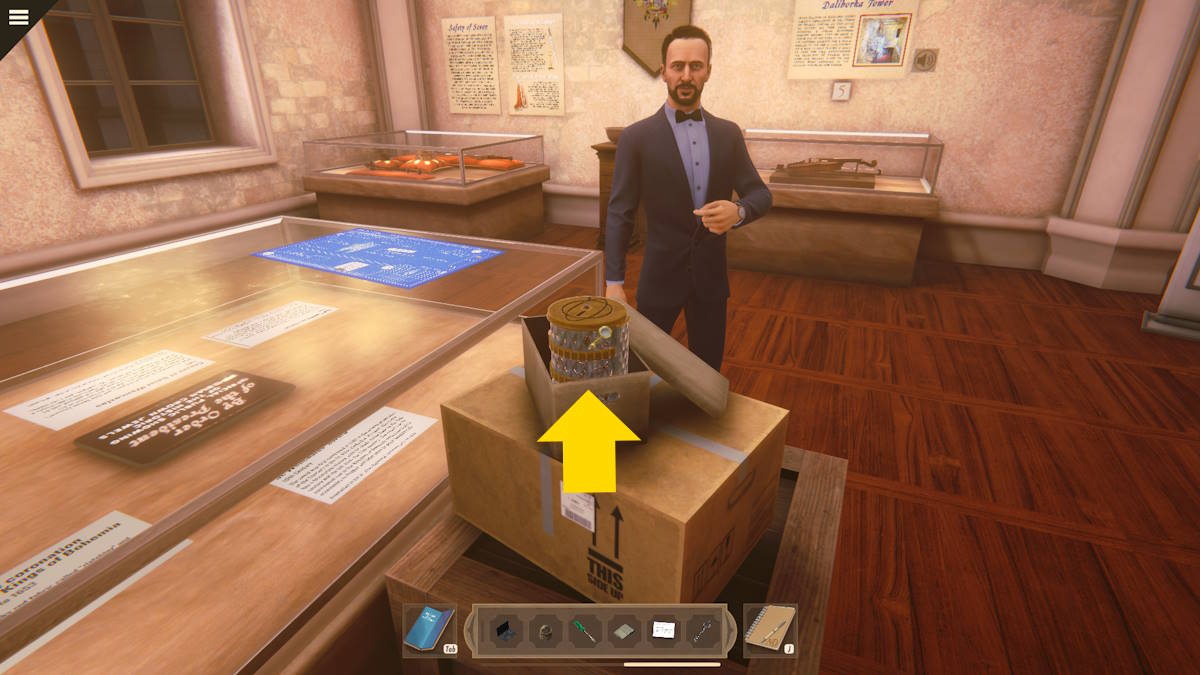
A tray will now slide open allowing you to take a Small Key. This completes the Marek’s Trunk task. The small key can be used at the bottom of the Snow Globe, revealing some kind of larger key and the message The floods below hide secrets lost.
Back to the tunnels
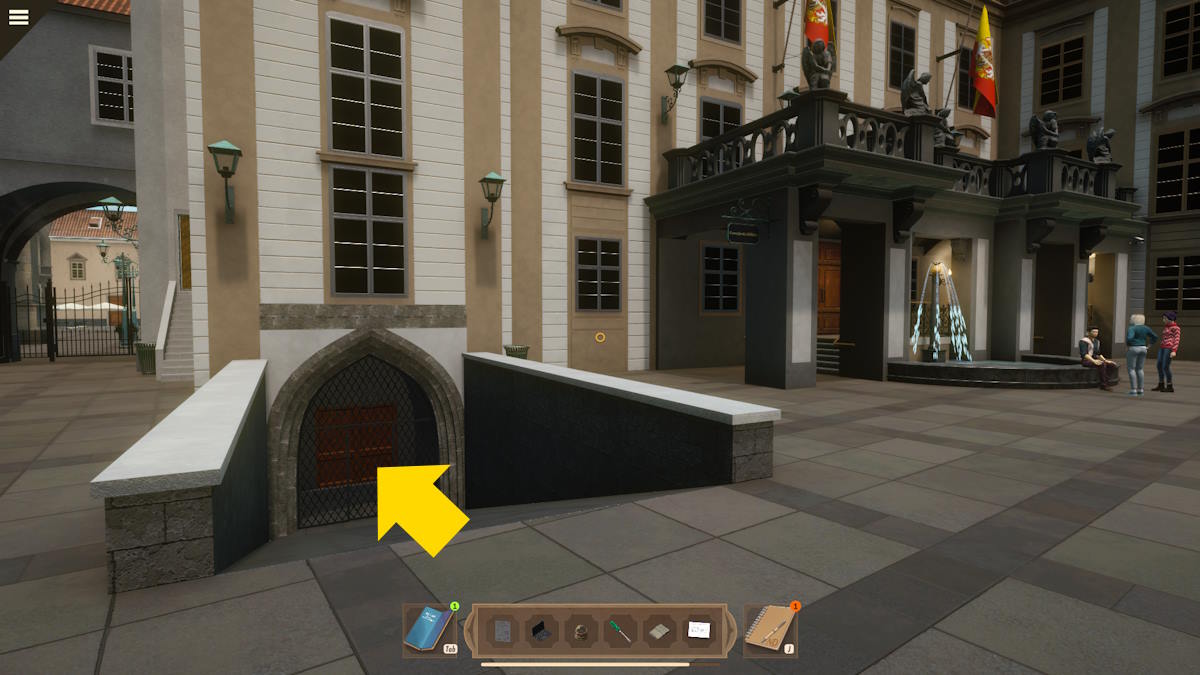
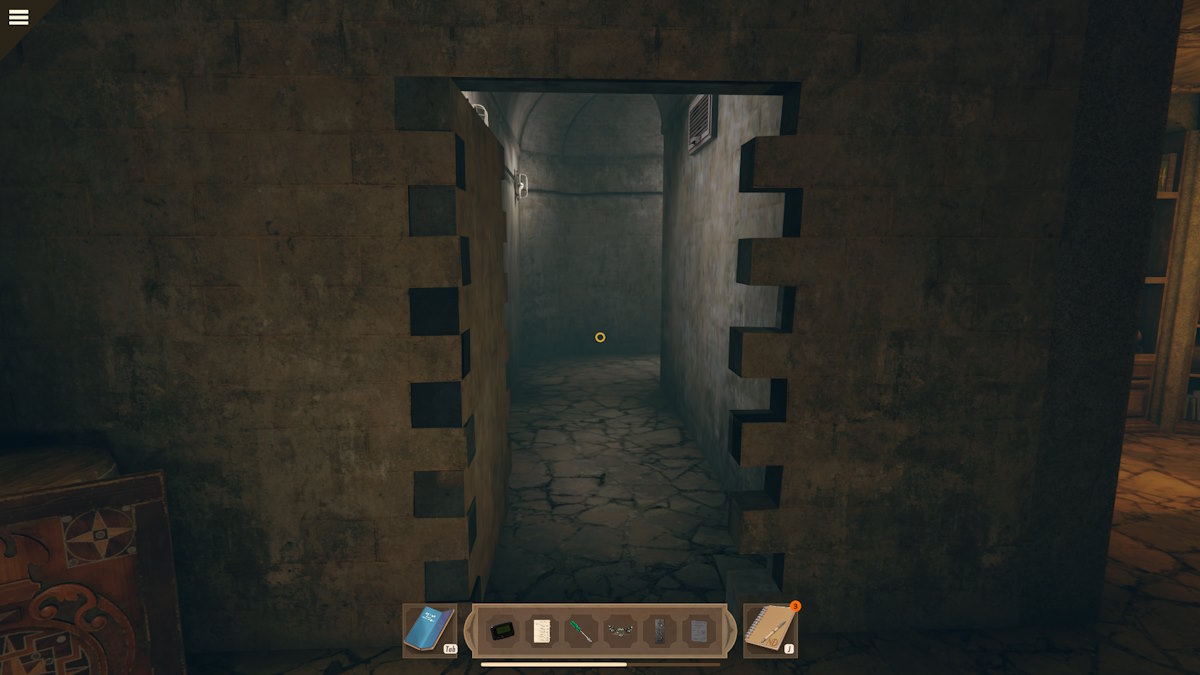
Go back to Castle Square, stand outside the exhibition, and go down the slop (pictured above) back into the tunnels below Prague. Don’t worry, you’re not going to be attacked this time!
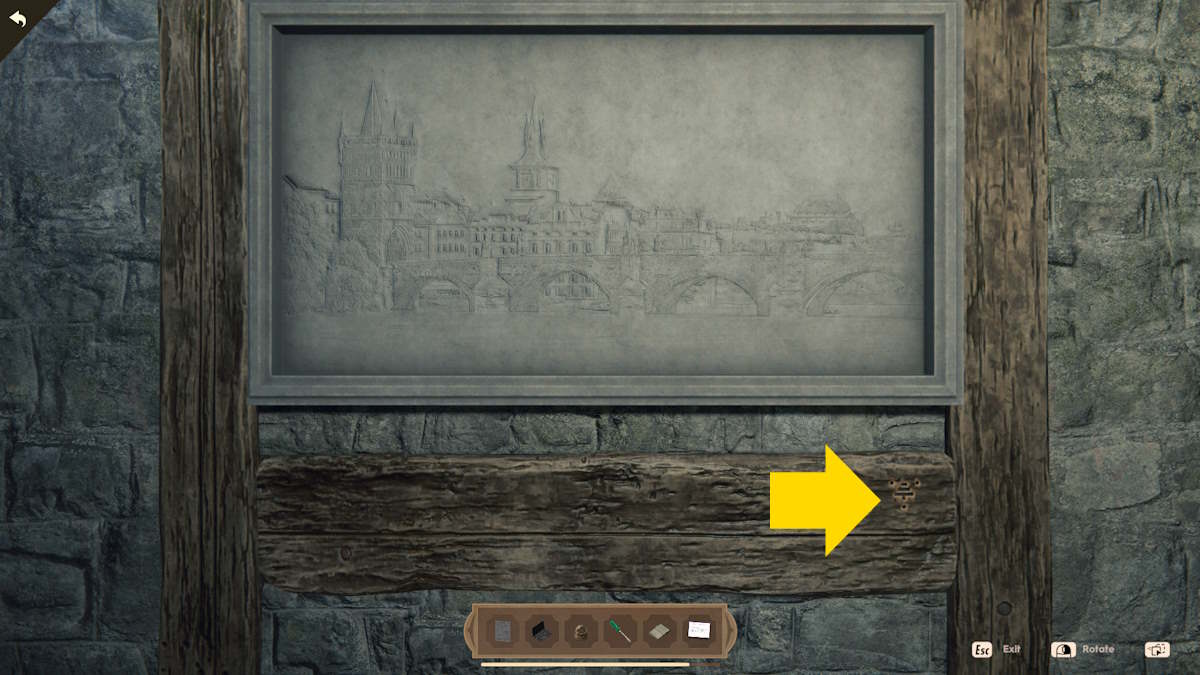
Walk forward, take the first left, and at the end of that passage, you’ll see an engraving on the wall to your right (pictured above). Walk over to the engraving and examine it for a closer look and then use the Snow Globe in the spot marked above to begin a light puzzle.
Drag the pieces from the bottom onto the engraving so that every space on it is lit up. You can see the solution above, as well as the door it opens next to it. Note that pieces with two or three refractors can be rotated. Once the door opens, head through.
The secret alchemy lab research
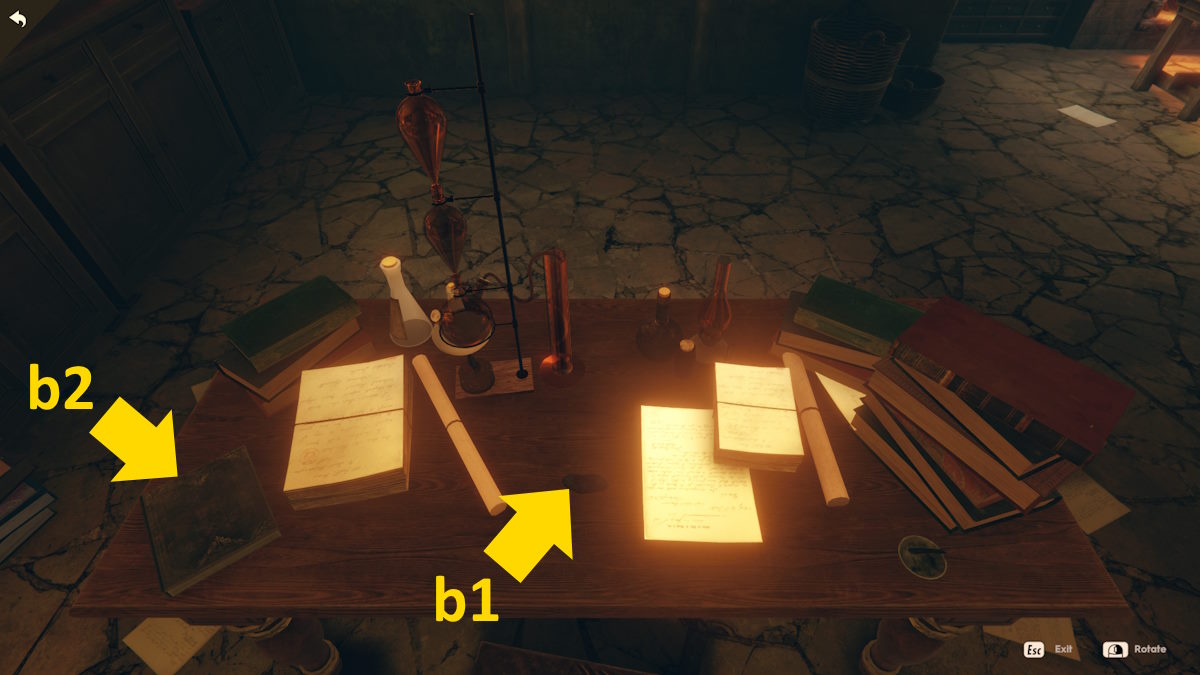
Walk across to the desk opposite where you come in and examine it for a close-up (above). Pick up the Black Stone (b1) and then open the book (b2).
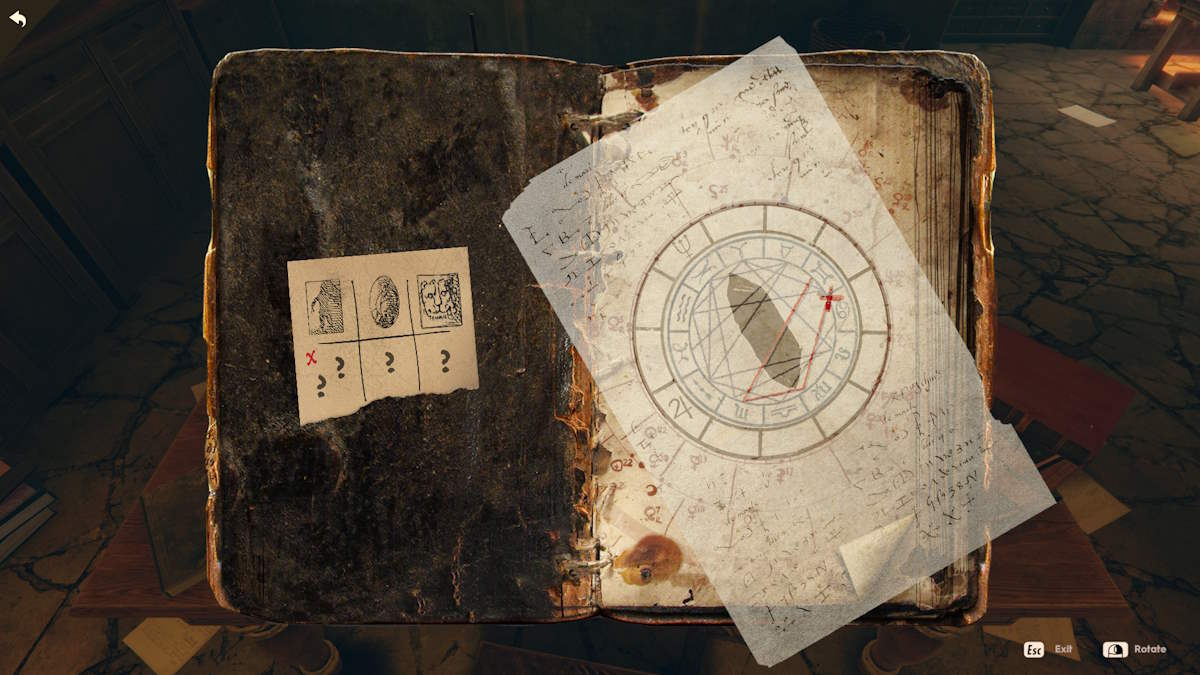
When you open it you’ll find the page on the left isn’t attached. Move it over the righthand page and it will attach itself to it. Now click this loose page to rotate it until it slots into the correct position above (you’ll know when it can no longer be moved). Working from the X on the loose piece of paper, you can see it marks four symbols from the X to three more points along the red line.

Flip the book page to the right, find the four symbols on the left column of the diagram, and note the symbols (and order) they equate to in the right column (see above). Also, note that each symbol on the pots on the right half of this page has a corresponding triangle pattern at the bottom. If you now flip the book back to the first page and look at the left side of it, you’ll see you now have a triangle pattern to match each top row symbol and a symbol to match each question mark on the bottom row.
Performing alchemy
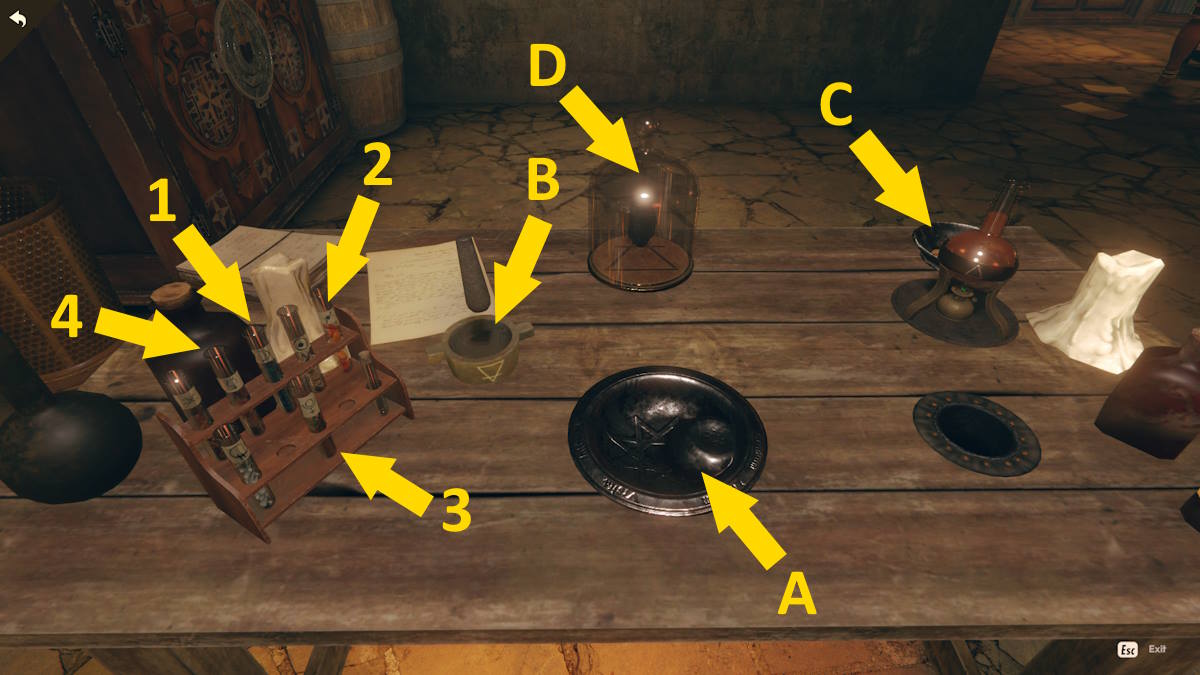
Now move over to the alchemy table itself (on the other side of the room, pictured above). Examine the table to get a close-up and do the following:
- Drag test tube 1 onto A
- Drag test tube 2 onto A
- Drag A into B and use the mortar and pestle on the ingredients until they become a white powder
- Move this new white powder from B back to A
- Drag test tube 3 onto A
- Drag A to C, which will liquify it before it returns itself to A
- Drag test tube 4 onto A
- Drag A to D
Opening the alchemy cabinet
You can now take the Lock Combination from D. Note the three symbols marked on it (above), turn to the cabinet next to the alchemy table, and examine it. Align these three symbols on the front of the cabinet and it will open. You need to do this in a specific order (otherwise the lock will reset).
- Inner ring: Two clicks clockwise
- Middle ring: One click anticlockwise
- Outer ring: Four clicks clockwise

Once the cabinet is open, examine the gems in the bottom-left corner for a close-up and move them until you reveal a Coin (marked on the image above). Take the Coin.
Now select the drawer in the middle of the top half of the cabinet and take the book from inside. You can look at the other artifacts in the cabinet, but can’t take them.
Leaving the tunnels
The way you came into the tunnels has been locked behind you so you can’t go that way. Turn left out of the door, turn left again, follow that corridor as it turns to the right, and then go left again to leave this section. You can however explore this section at your leisure if you want to.
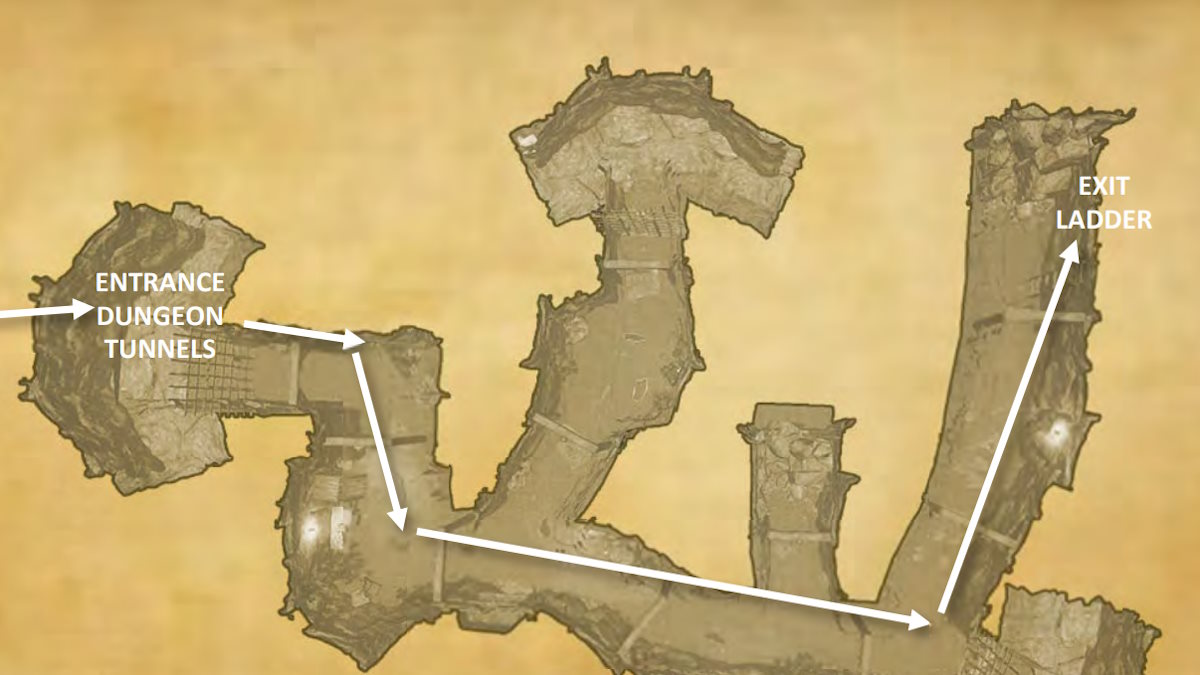
Once you go through the gate, it puts you in a new set of tunnels and It also seems that whatever was chasing you previously has returned. Follow the map above to get back outside as quickly as possible. Note the path you need looks like a dead end but there is a ladder on the right at the end of it you need to click.
Once outside again, you’ll get a call from Adela. Follow her instructions:
- Check the message from Adela and click Patricie’s phone number to add it to your address book.
- Go to the cafe and leave the book you found in the alchemy lab behind the counter (it will lean against the till monitor).
- Message Patricie to say you’ve left the book there.
You need to complete the Learn more about the Rezidente task before the day ends. Go to your phone and message Ned about it if you haven’t already. You also need to complete the Haunted Tour and get the journal update. After this, go and speak to Radek by the marionette carriage about the Rezidente.
Investigating Adela
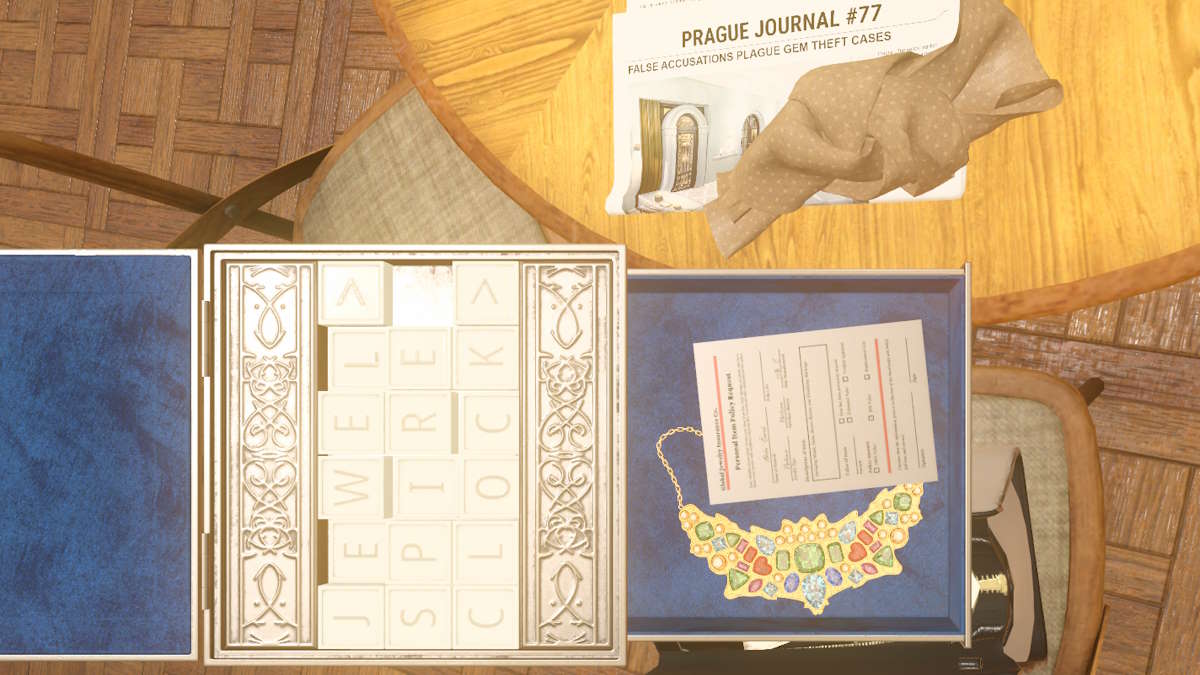
It’s time to see if Adela’s calls arriving just after you escaped the tunnels, twice, is a coincidence. Enter the cafe and talk to Patricie. She’ll agree to help you distract Adela, so now you can go and sit with Adela at the usual table. When Adela leaves to help Patricie, you can search Adela’s bag.
This section is timed, so you need to be quick (don’t worry though, as you’ll always get unlimited second chances). Open the metal box you find inside and slide the letters to make the words (top to bottom) jewel, spire, and clock. Inside you’ll find the necklace and proof she’d failed to insure it. As long as you have looked at the necklace and insurance document before she gets back, you’ll be OK.
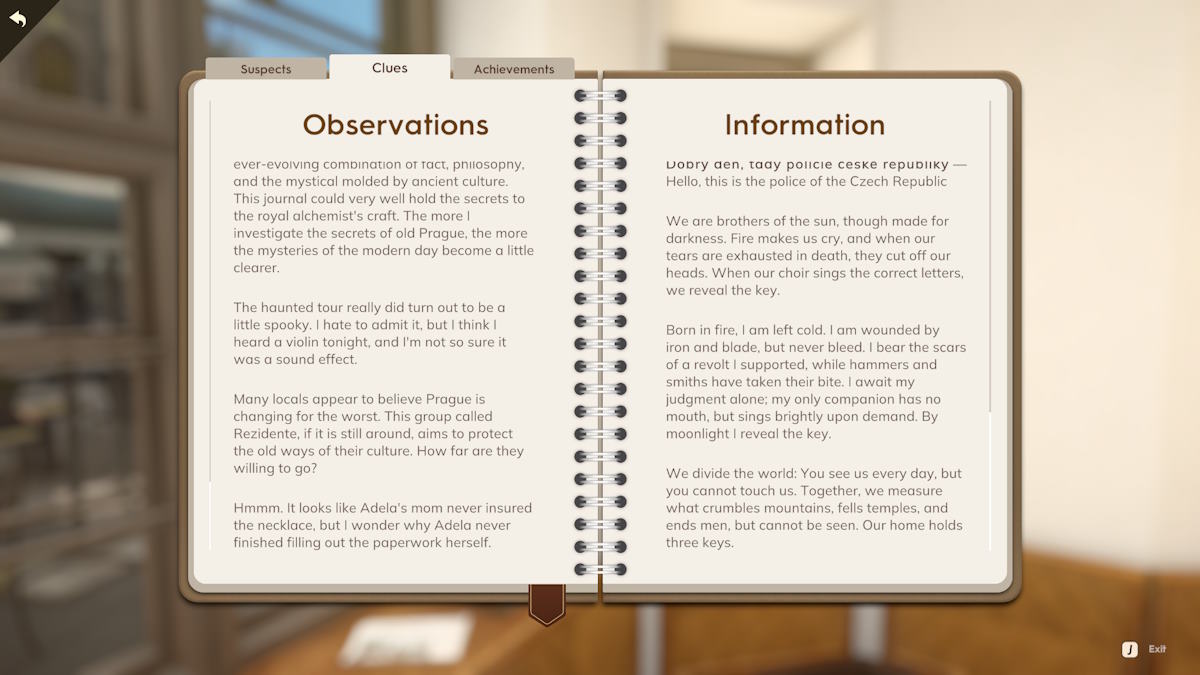
Once you finish snooping, Adela will return and give you the translations you asked for yesterday. She has found three riddles inside, which you can find on the Information page of the Clues section of your Journal. Talk to Patricie about the riddles too, as she can give you hints about each one.
Solve the journal’s riddles
Born in fire, I am left cold…

Head over to the exhibition and enter the Haunted Tour by clicking the poster as you did previously. Head over to the suit of armor. You need to click the dots (see above) so that the flowing white line of light that moves across the armor flows uninterrupted.
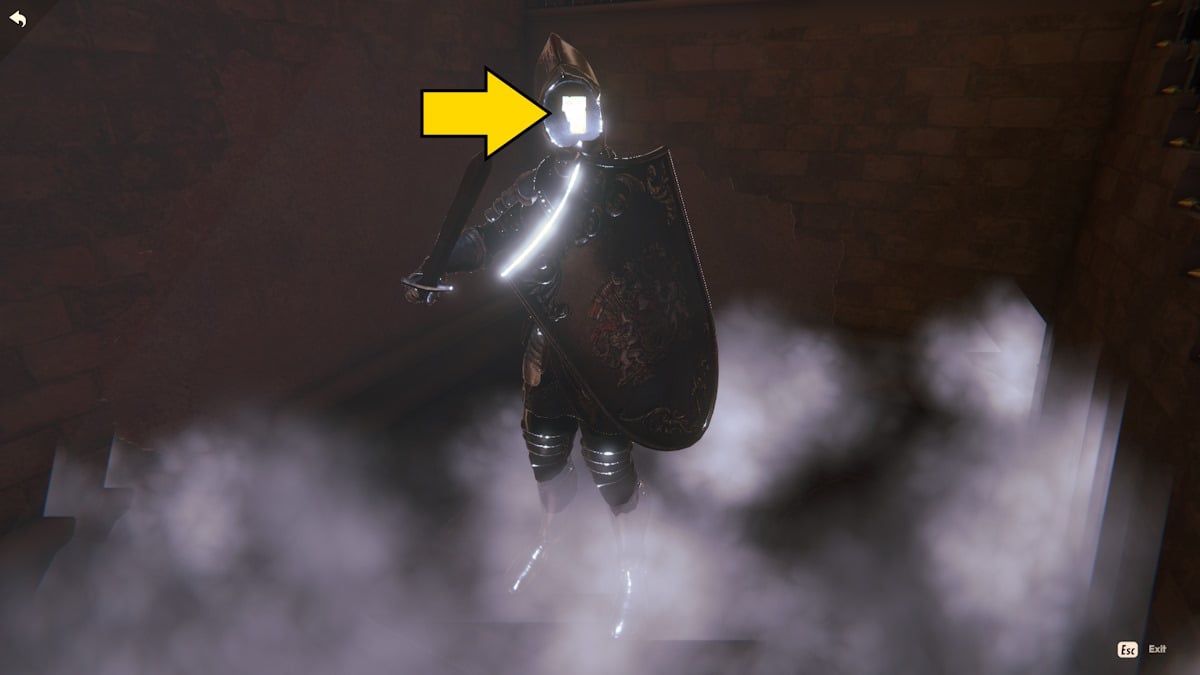
The number of times you need to click each spot is shown above. You’ll know when you have it right because the five dots will disappear, leaving just one on the helmet. Click it to open the faceguard and take one of the missing pages.
We are brothers of the sun…
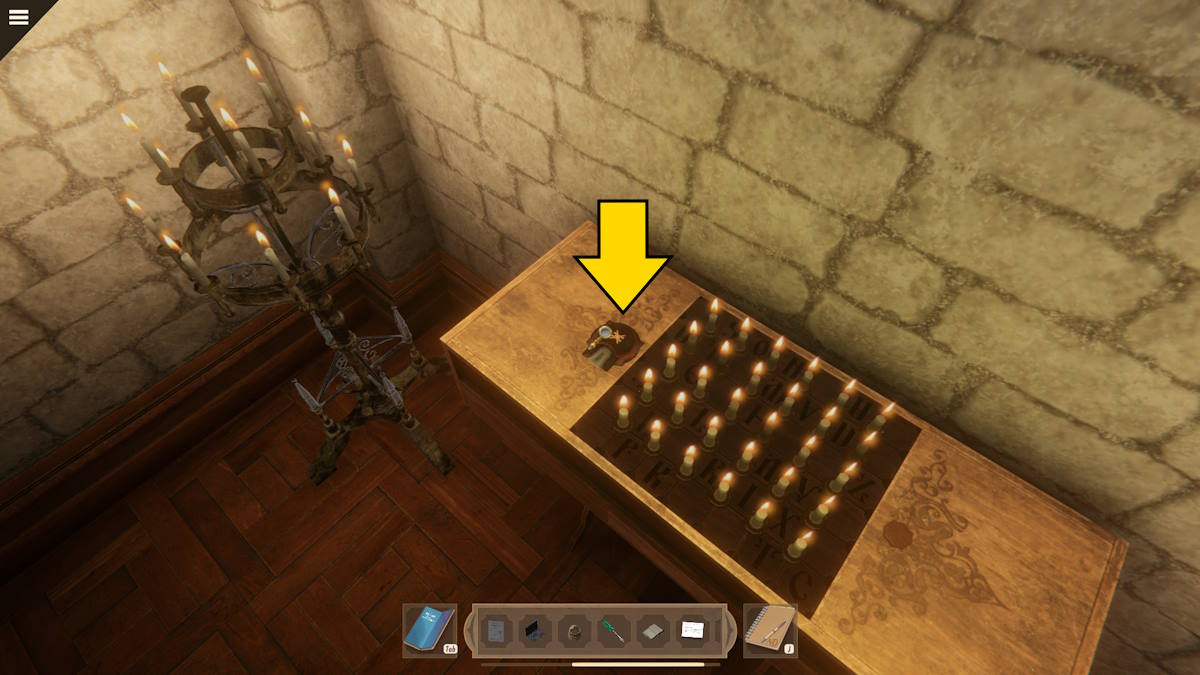
Come out of the haunted tour and go up the stairs towards Leo’s office. As you go through the door towards his office, you’ll see a table covered in candles on your right. Select the coin in your inventory (that you got from the cupboard in the alchemy lab) and use it in the slot marked above to get a close-up look at the table.
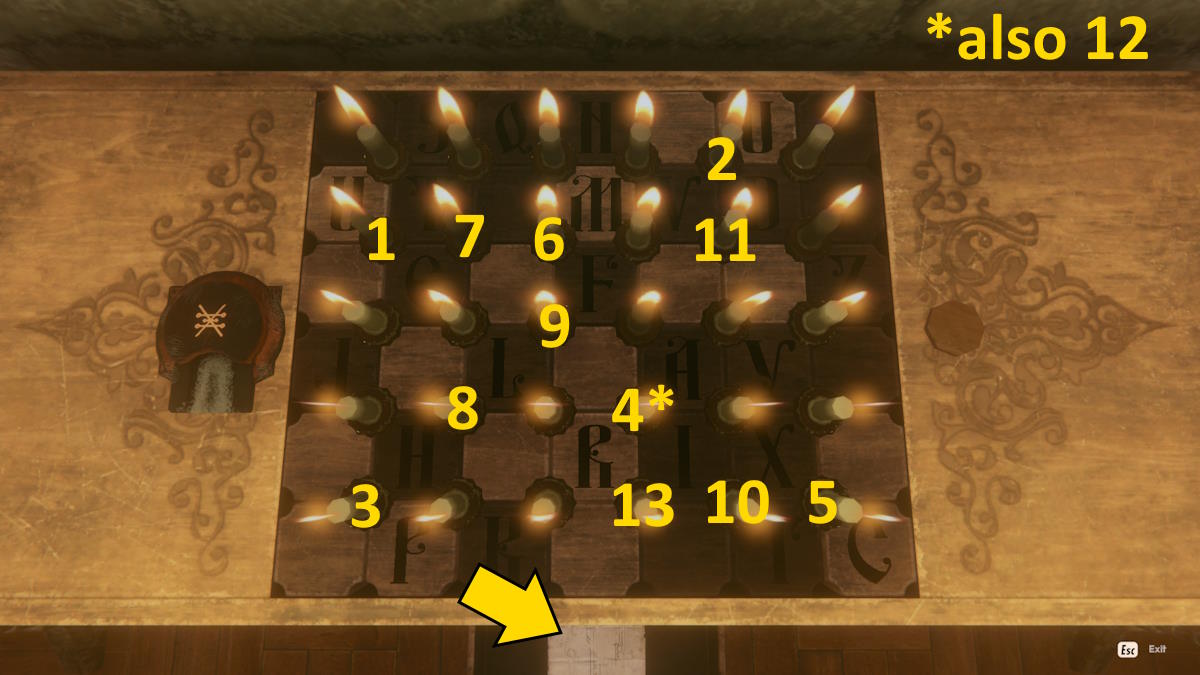
You need to select the correct candles by clicking them until only the letters that make the Latin word Cuprum are left highlighted. Each candle will light up, or dim, the four letters around it. I’ve indicated the correct order to click the candles in the image above. Once done, you’ll receive another missing page (see the arrow above).
We divide the world…
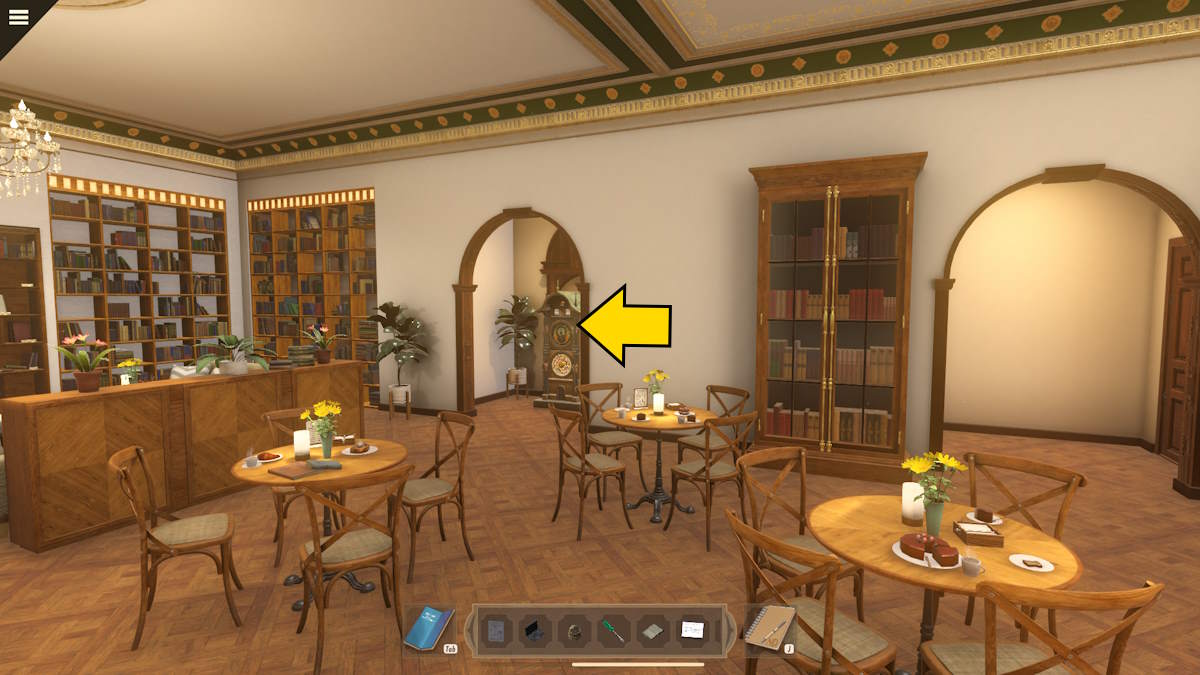
Head over to the cafe and examine the model of the astronomical clock (above). Start by messaging Ned gives you a lot of information on the clock. It needs to be set to the date and time Rudol II was coronated, on November 1, 1575, at 6 o'clock.
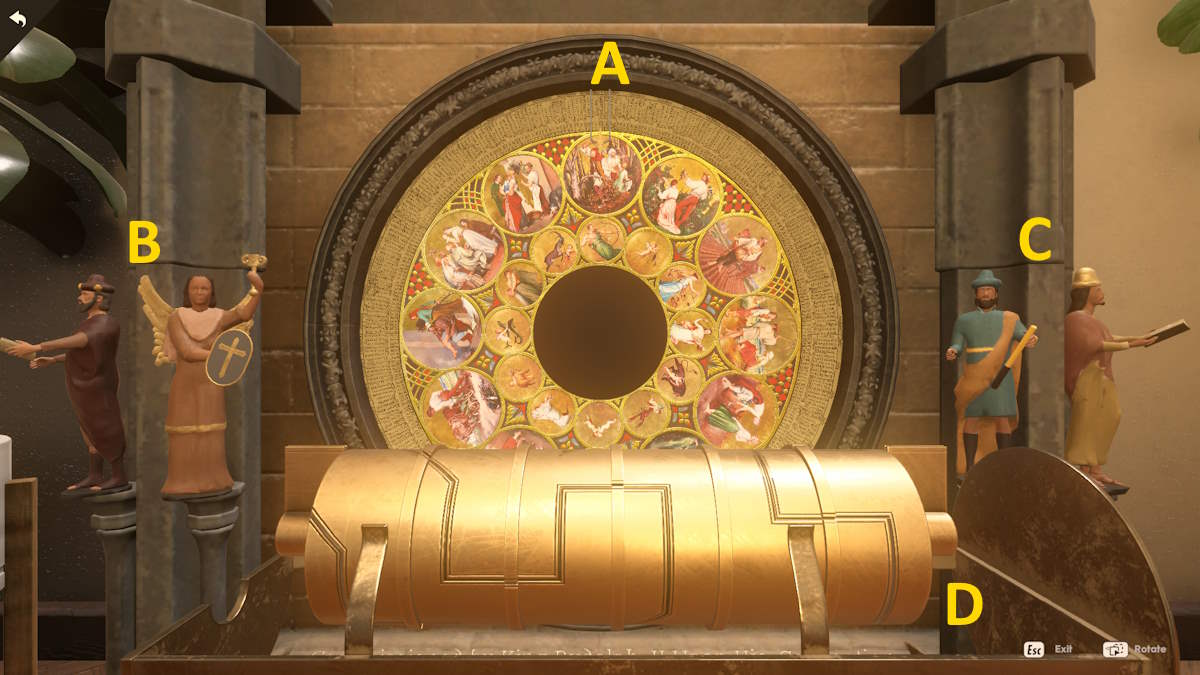
The bottom section of the clock shows the months in images, with the woodcutter (A, above) depicting November. Set this in the top spot by clicking the figure on the left with the shield (B). Click the figure on the far right (C) until the day marker is on 1, and a golden device will appear. Line up the sections as they appear above (D) and this part of the puzzle is solved.
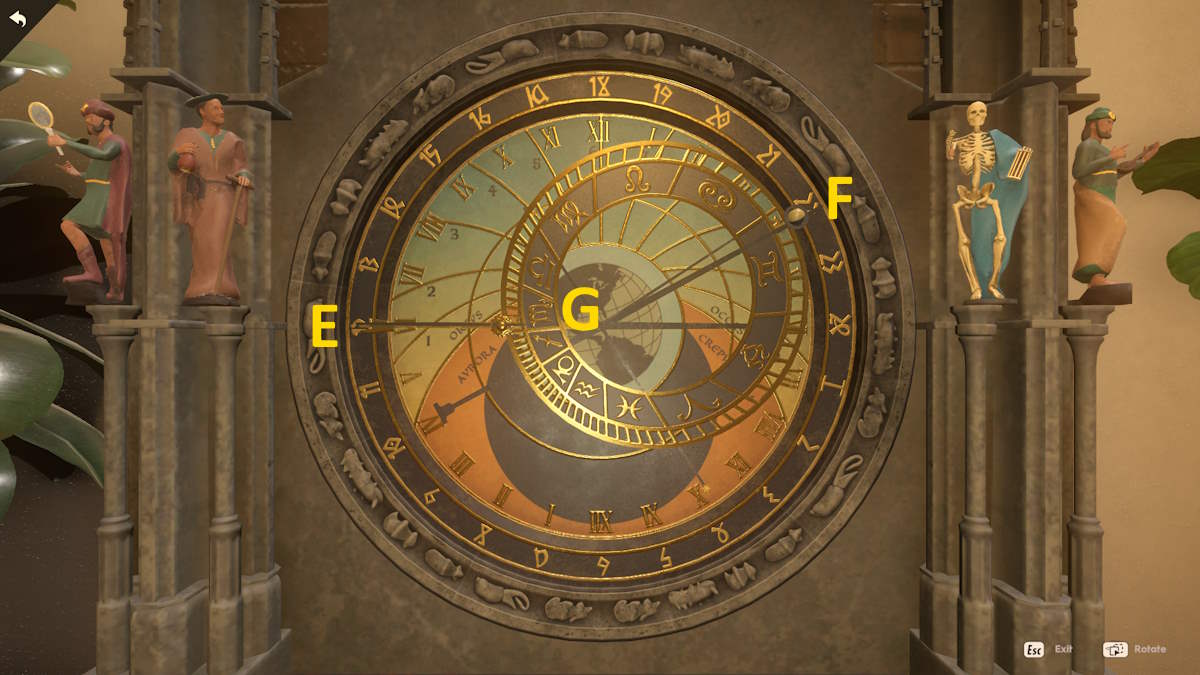
Now examine the top section of the clock and set the date here too (see the positions of the two hands, E and F, above, as well as the month G). This is tricky and just a case of trial and error as you move the clock hands. You’ll know when you have it exactly right as the clock face will open up, allowing you to take a key.
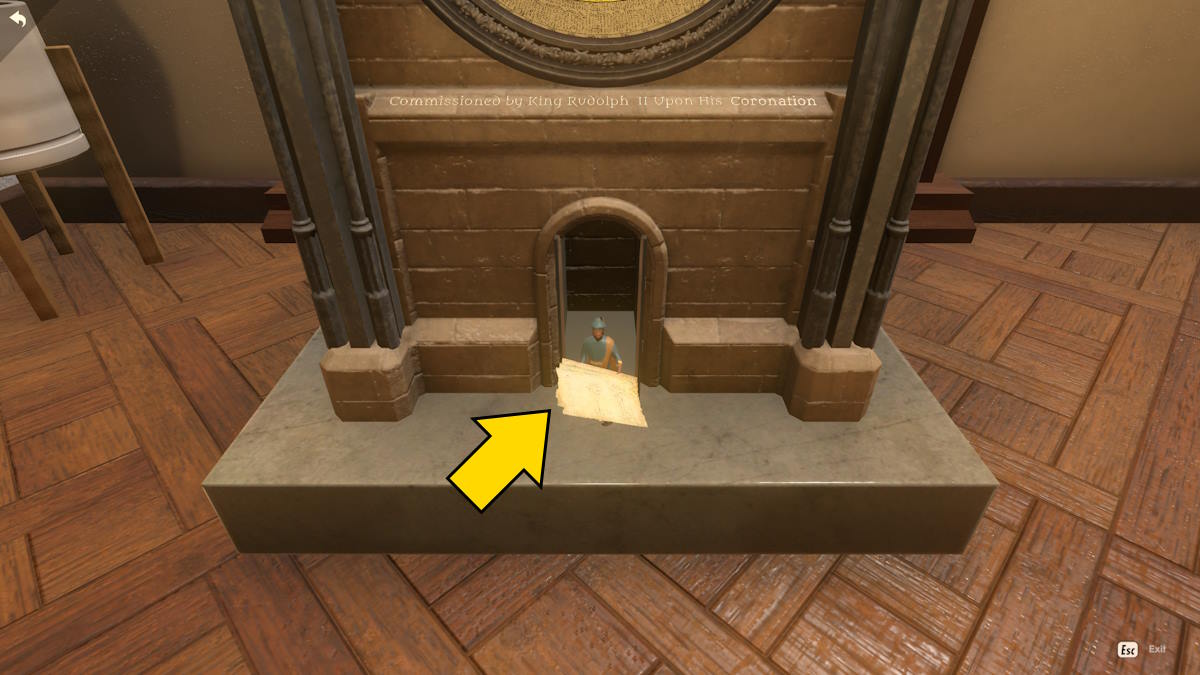
Now zoom in on the top of the clock, where two doors have opened to reveal two keyholes. Click one of the keyholes and you’ll automatically use the key. This opens a door at the bottom of the clock (above), allowing you to collect a missing journal page.
You’re being followed…
Call the police on your phone to find that, as far as they’re concerned, he got on the flight to Rome. Now call Zane for an update. He is on his way to Rome to check if Leo really did take the flight and arrive safely.
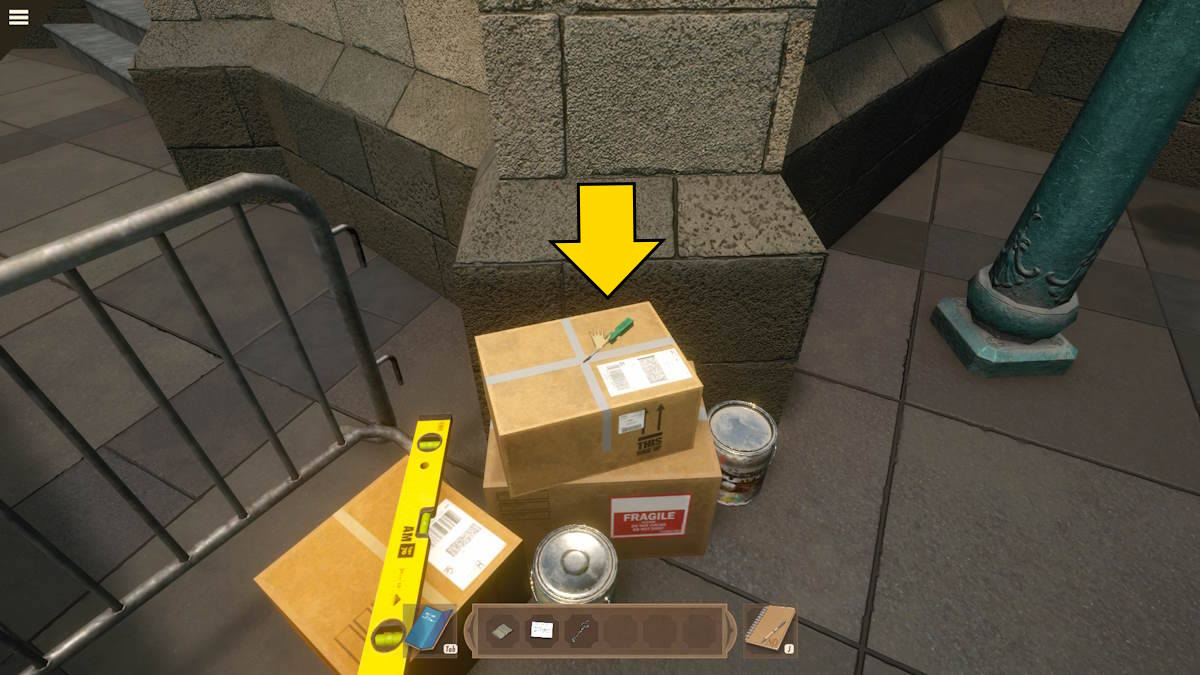
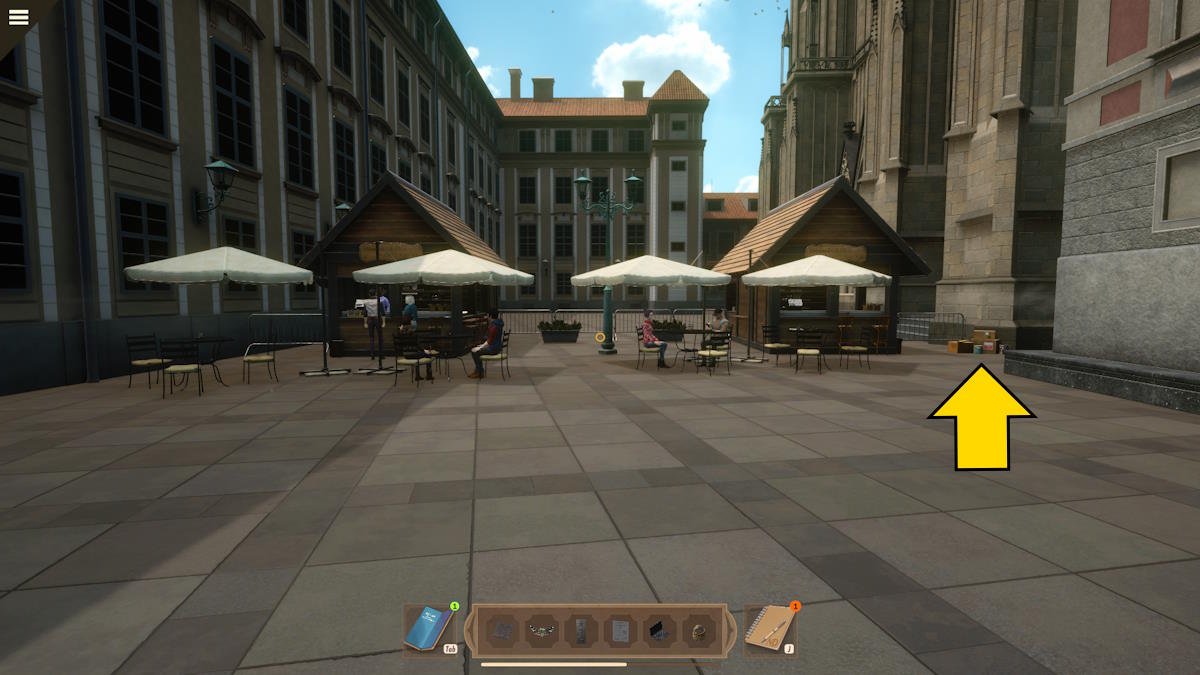
The next time you switch between Old Town Square and Castle Square, you’ll get a brief cut scene in which it appears you’re being followed. Message Ned to let him know before devising a trap for whoever is following you. From outside the cafe, head directly forward to the food huts (see above). Look to the right to see a pile of rubbish and then examine it to find and take a Screwdriver.
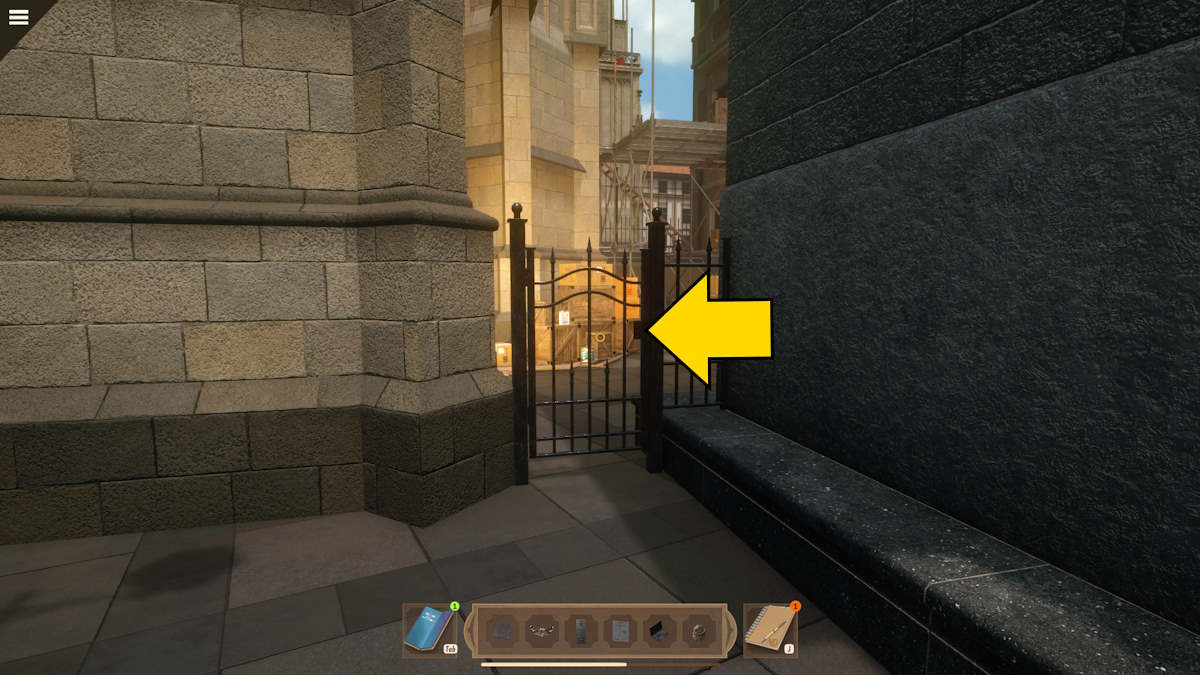
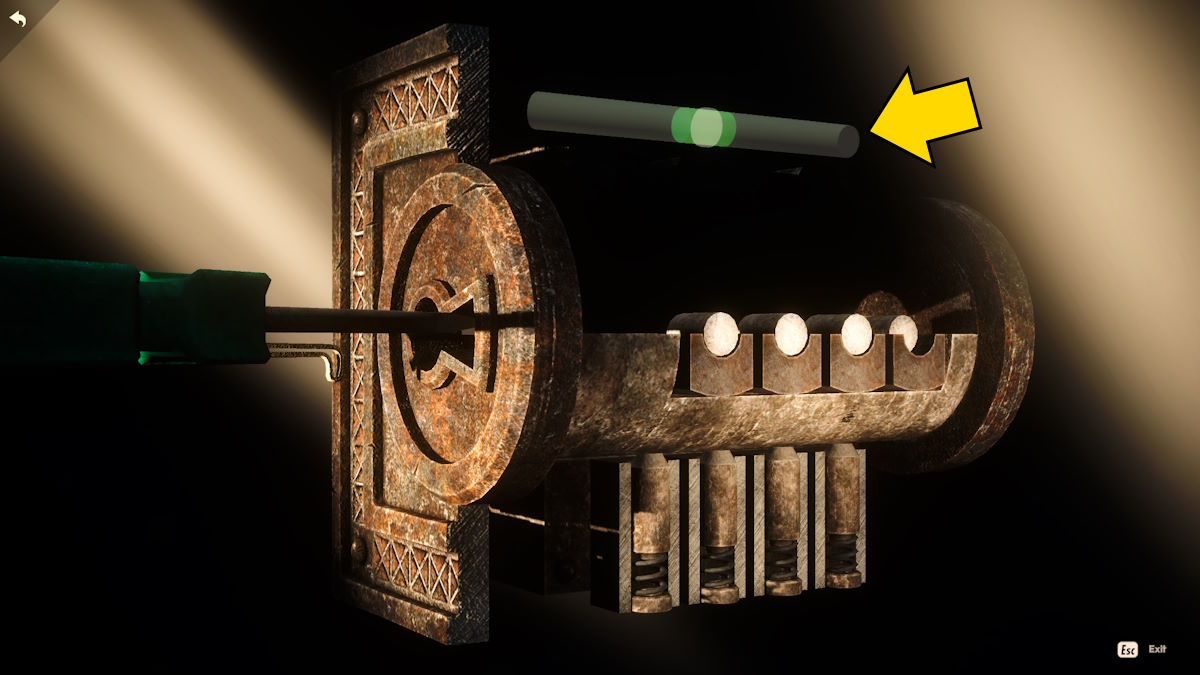
Now look right from where you are and use the screwdriver to pick the lock of the gate there. This involves a bit of timing, as you have to stop the slider in the green area four times in a row to succeed. Once it's open, head through.
Pick up the hammer and the boxes, and then head up the stairs. Place all the boxes into the transparent spaces at the top, then use the hammer to remove the bolts holding the gangway in place (make sure to do this from the edge or you’ll fall).


Finally, click the transparency of your phone on the box here to set the trap (the slideshow above shows all the steps).
Making the seven keys
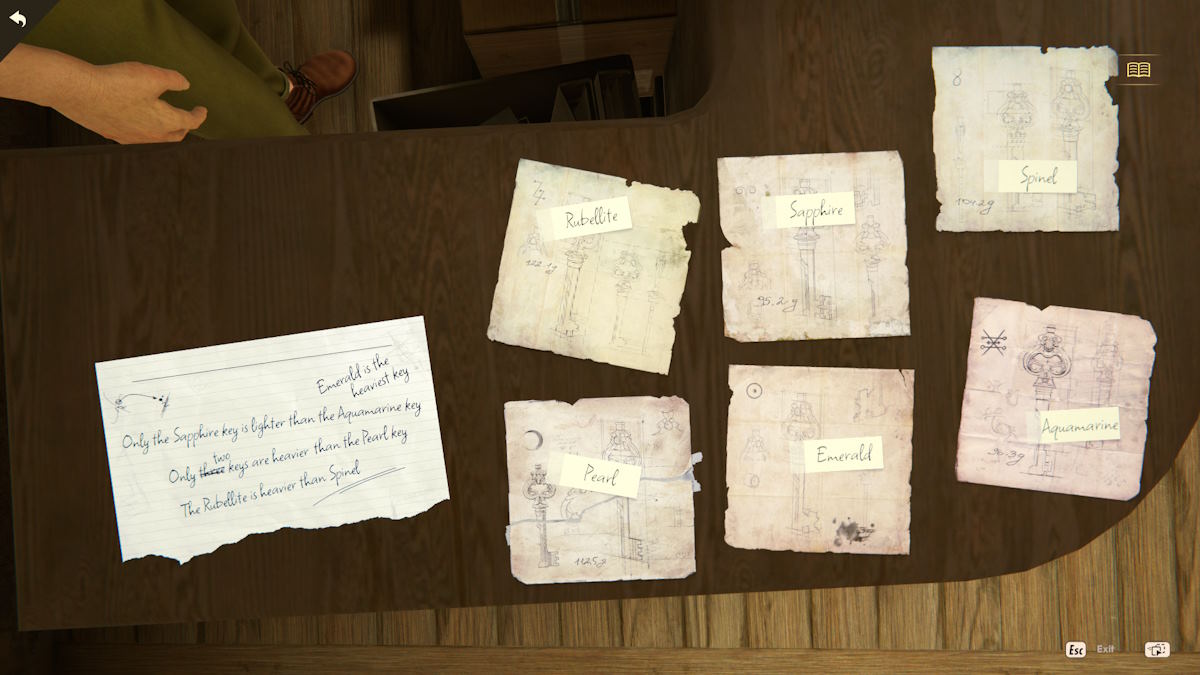
After speaking with Marek and Radek, Marek will give you a Rezidente Pin and you’ll head back to Aparat Computers and speak to them again. To make the keys you’ll first need to match the corect gems to the key diagrams. The riddle will give you the following, from left to right:
- Top row: rubellite, sapphire, spinel
- Bottom row: pearl, emerald, aquamarine
Uncover the Loutkari agent
Talk to Marek to devise a plan, and he’ll give you the Key Sketch and Radek’s Bag which contains a tracker. Head to the statue next to the marionette trailer and drop the bag as instructed (see above). Once you’ve dropped the bag, head back to Aparat Computers and talk to Marek again. He will give you a Tracker so that you can follow the movement of the keys.
Go back to where you placed the bag for the drop and the tacker will automatically start working. Move around until the beeps get closer together These are the spots:
- Next to the couple sitting on the bench
- In front of the church
- The gate out of the square (go through)
- The pavement by the road directly forward from coming through the gate
- The left-side doorway into the building. Go inside.
You’ll find yourself in some tunnels. The trace is easy to follow in the tunnels and, despite messages saying you must hurry, there is no time limit. You'll go through three sets of tunnels and eventually arrive back at the entrance to the alchemy lab. Use the snow globe to open it and head inside. Find out who the culprit is!
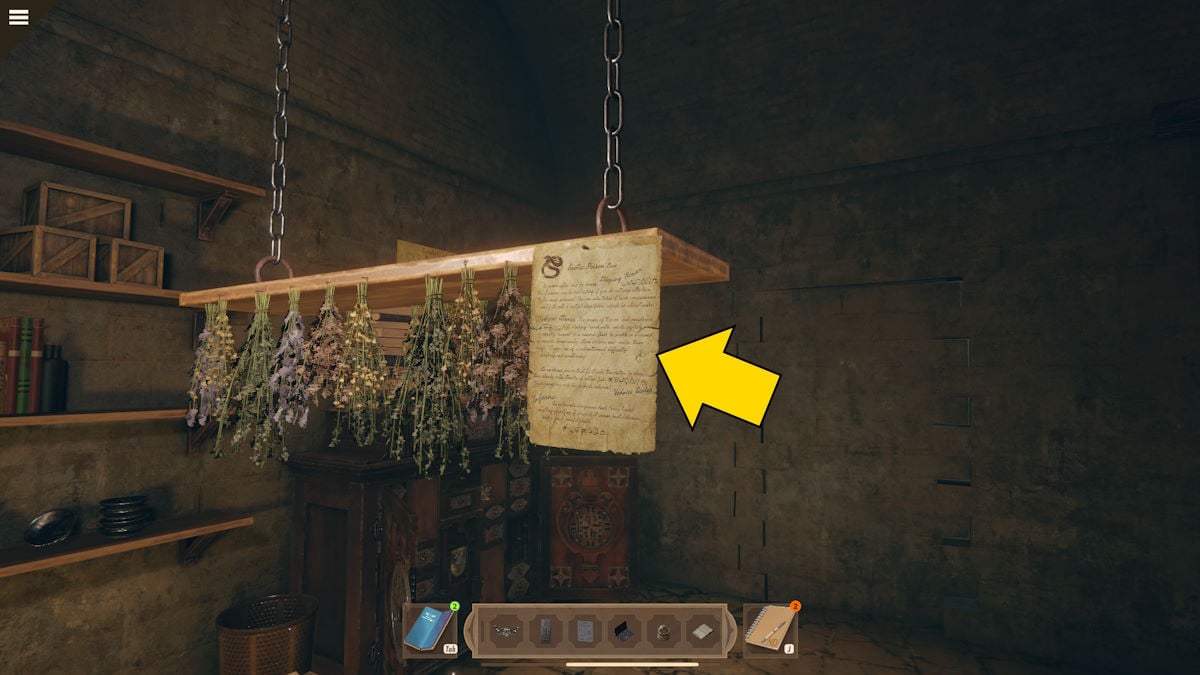
Find an antidote!
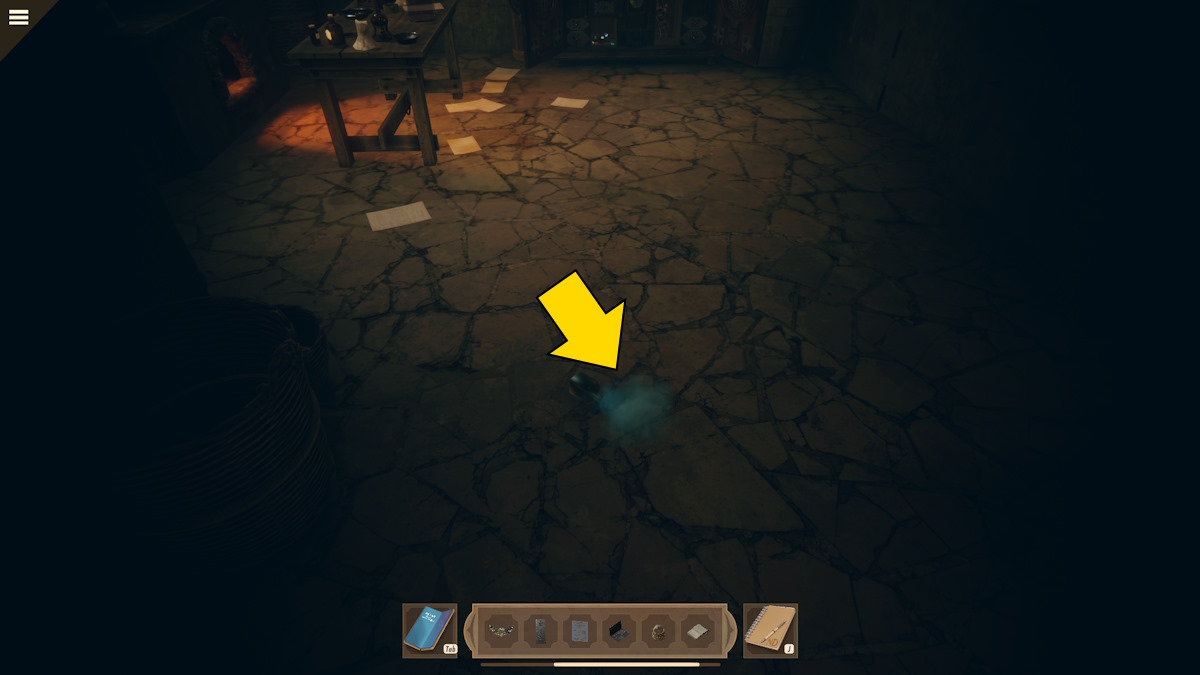
After the culprit poisons you and escapes you need to use the alchemy table to concoct an antidote for the poison she has thrown at you. Pick up the poison bottle from the floor (see above) and then check the recipe hanging above the alchemy table (the one you need is the third one down).
Now use the alchemy table to make the potion as you did previously, using the poison in your inventory on the table to be able to examine it and start the process. Note that if you’re too slow to make the antidote you’ll die (but as always, you have unlimited second chances). The order for making the antidote is as follows:
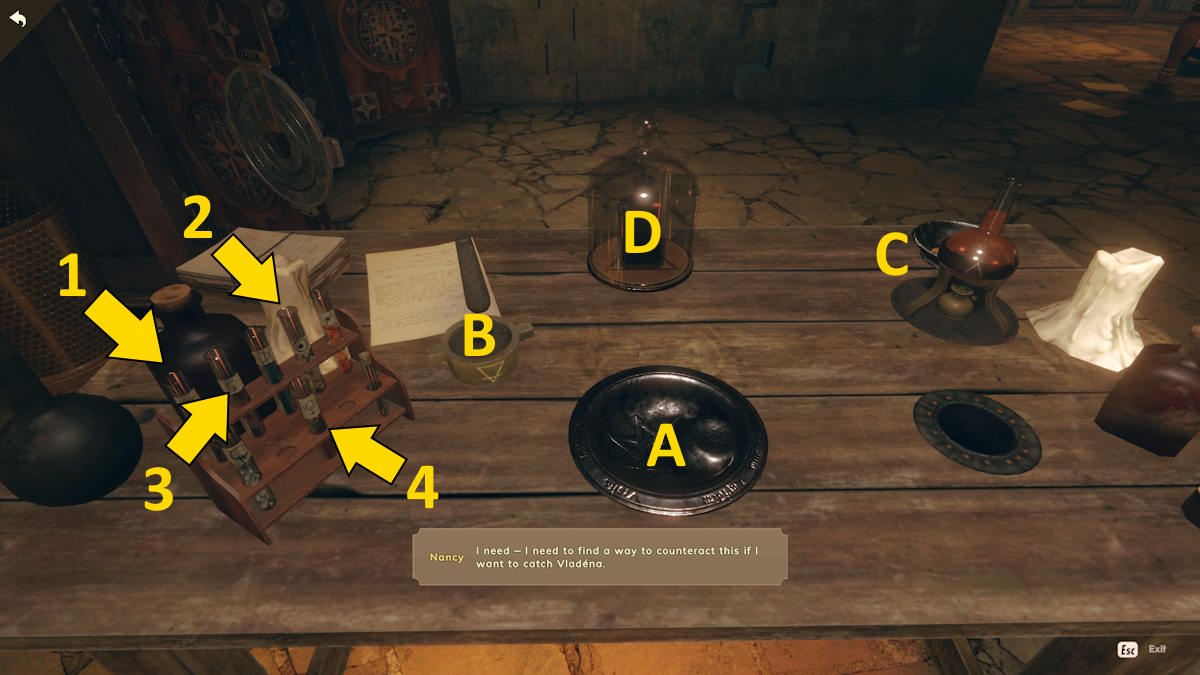
- Add 1 to A
- Add 2 to A
- Place the contents of A into B and use B to make white powder
- Place B back into A
- Add 3 to A
- Place A into C (which becomes liquid back in A)
- Add 4 to A
- Place A onto D
Now you can click the completed potion on the table (where you placed the poison) to cure the poison.
Pursue the poisoner and escape
There’s a door opposite the alchemy table next to the alchemy cabinet. Click it to open the door and follow the passageway.
In the room at the end, you’ll find Adela’s gems. Pick them up and then click the laptop to call Elka and Malek. Now you can leave the room through the wooden door.
The seven keys puzzle
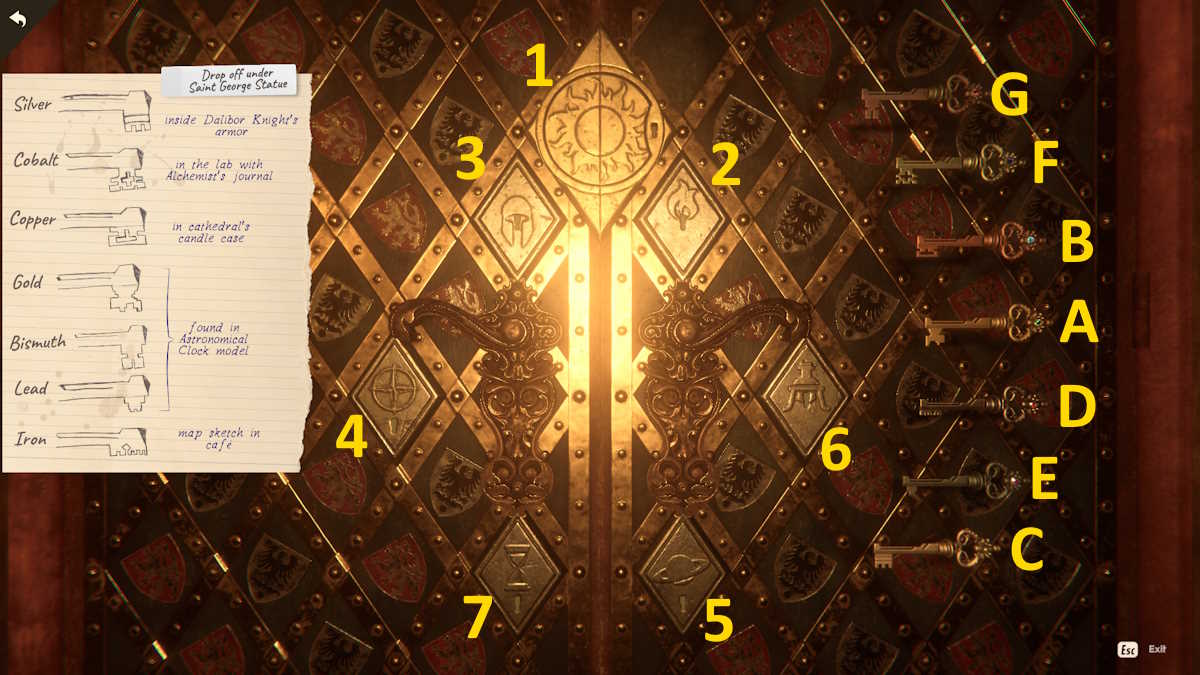
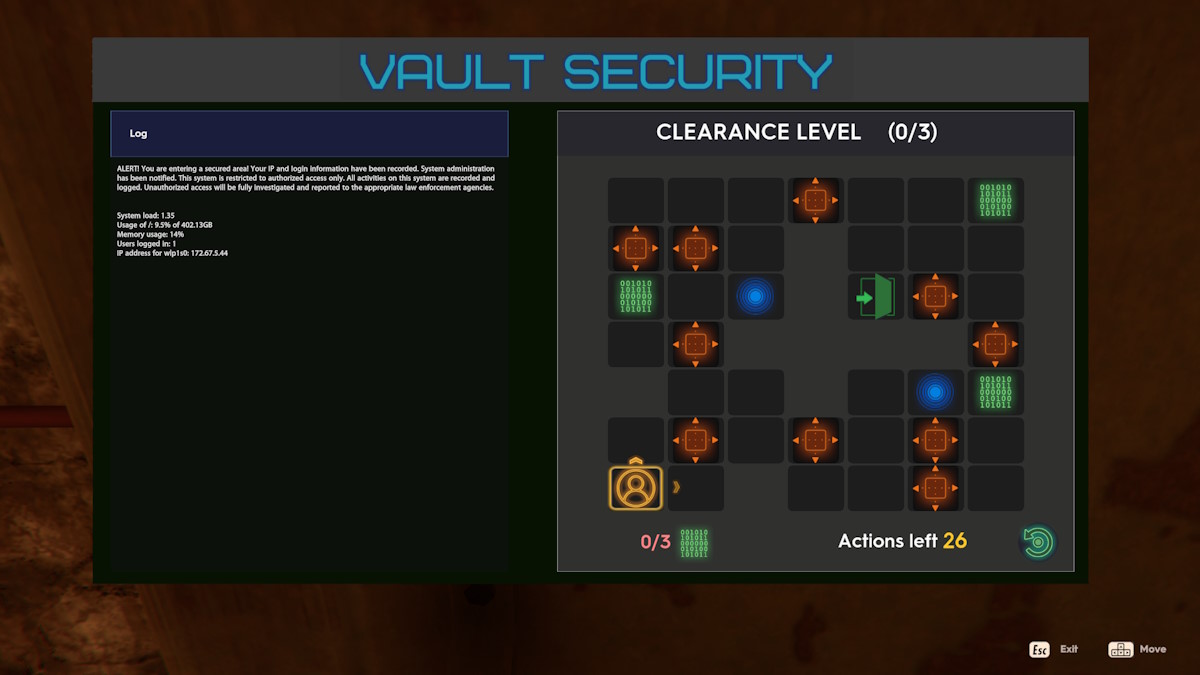
You’ll now find yourself next to an ornate door. Pick Marek’s bag up from the floor to the left of the door, and use it on the door to begin a lock-matching puzzle. You can see the solution above, but you must do this puzzle in the following order:
- Place A into 1 and then click the key in the lock to reveal the other keyholes.
- Match the remaining keys to the locks (B2, C3, D4, E5, F6, G7)
- Turn 1 once more
- Now turn the locks in number order, starting with 2 (2,3,4, etc)
This will open the door, so head through to the next door.
The biometric lock
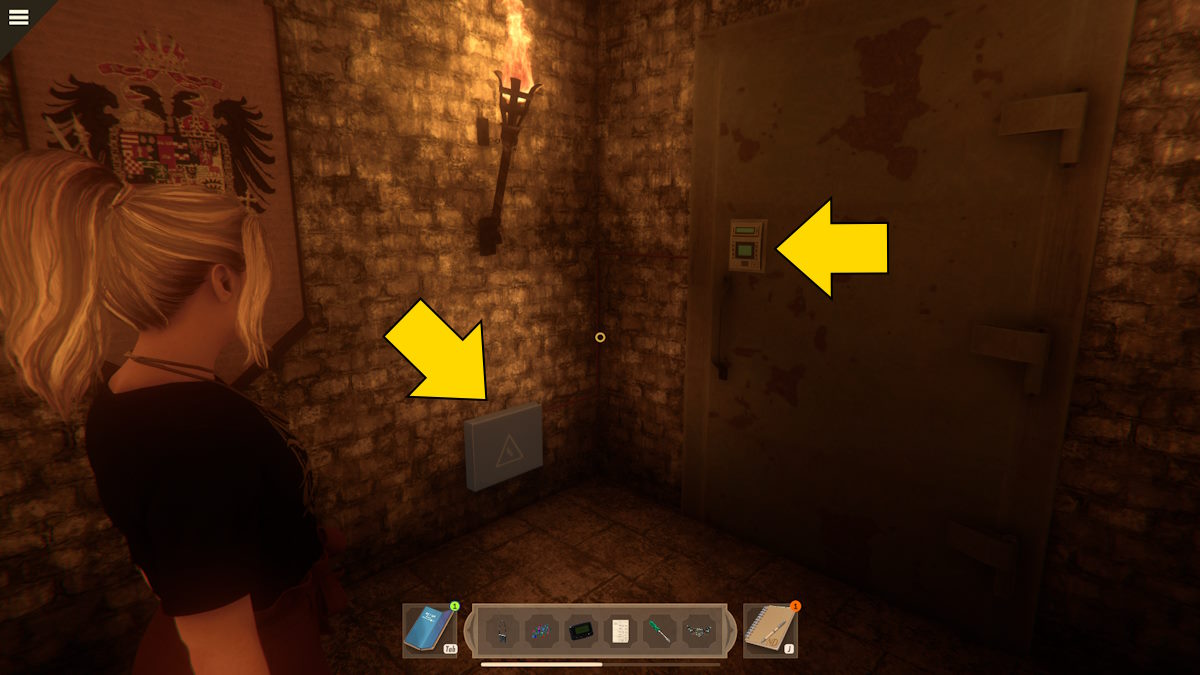
You’ll be joined by Elka, who wants to help. After speaking with her about the police, select the fuse box on the door to get power running back into the lock on the door (both marked above).
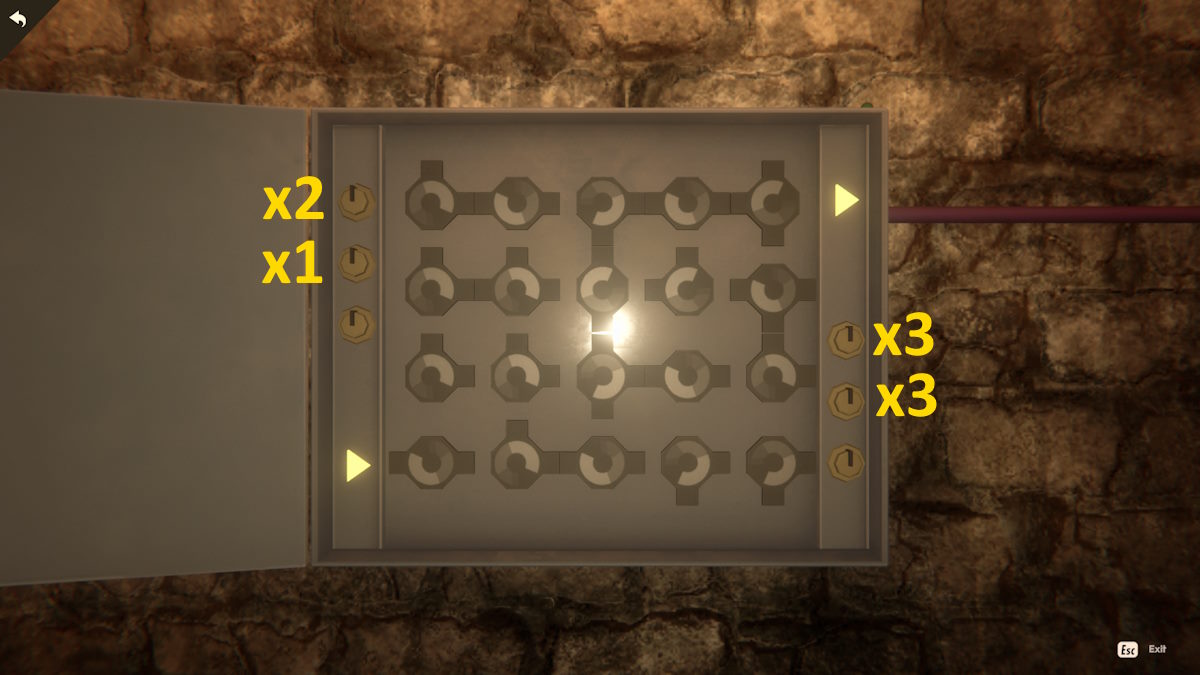
You’ll first need to solve the fuse box puzzle. To complete this you need to click the dials on either side of the fusebox to turn the associated dials. I’ve marked how many times each dial needs to be clicked above, but do them in the following order:
- Top left: Twice
- Middle left: Once
- Top right: Three times
- Middle right: three times
Now you can break the biometric lock. This is another upgrade in the difficulty of the cyber locks but the principle remains the same. There are three levels of security and the full solution is below:
- Up, right, up (x2), left, up (x2), right, down, right (x2), left (x2), up (x2), right (x3), down, right (x2), up, down, left (x2), down
- Up, right, up (x2), left, up, down (x2), left (x2), down (x2), left, right, up (x4), left, right, down, right, left, up (x2), right, down, right (x4), left (x6), right, down (x2), left (x2)
- Up, left, up, right, up, left, up, right, up, left, up (x2), right, up, right, down, right (x3), up (x2), right, left (x3), up (x2), right, up, down, right (x2), up, left, up (x3)
Click the door lock once more to trigger a conversation with Elka. It seems she isn’t as she seemed and is out to gain revenge for her mother’s death, by framing Malek for the crime. She has been working with the suspect!
The crown jewels and the gems
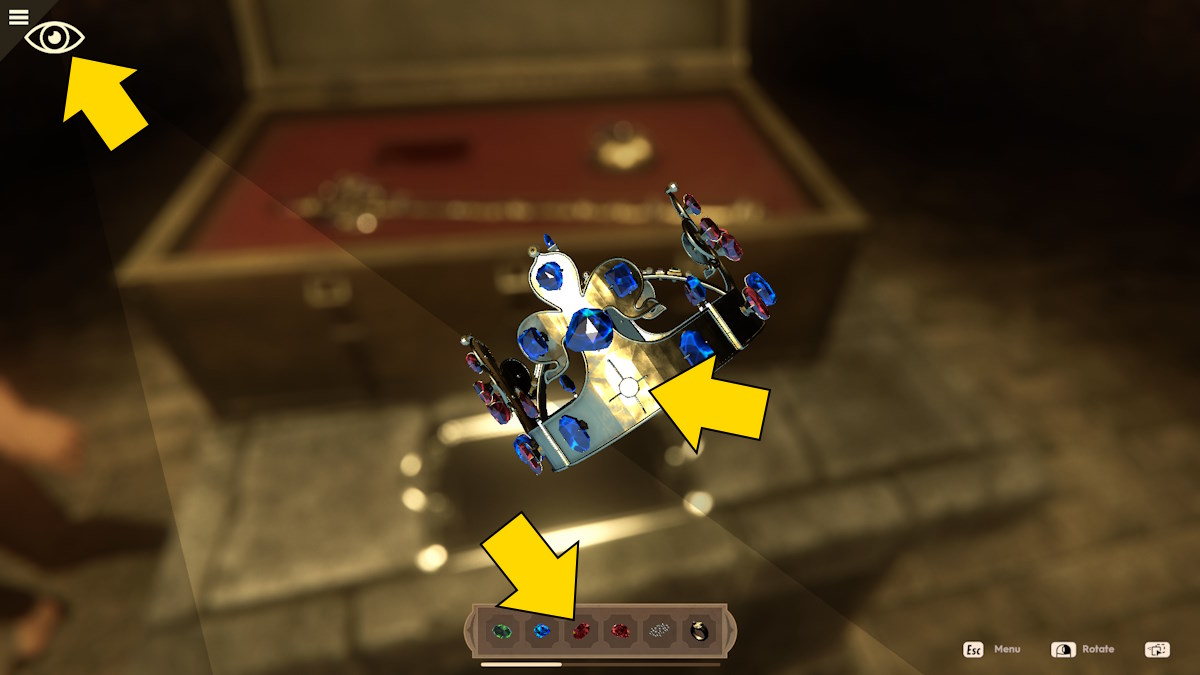
After the conversation, you’ll find yourself inside the vault with Vladena and also Leo, who is on the floor incapacitated. Vladena has a knife and forces you into switching the gems on the crown. On the plus side, you took Elka’s taser ring as you pushed her away and jumped into the vault.
Place each of the gems into its correct place on the crown (see an example above) and then rotate each of the gems until they’re at the correct angle. You’ll know each one is done when you can no longer alter its position.
Once you’ve finished setting all five gems into their correct positions, examine the missile of the crown and hover over the section I’ve highlighted above. You now need to place the taser ring that’s in your inventory into this spot. However, note the eye at the top left of the screen. This represents Vladena watching your every move, but she does get distracted.
You have to wait until the highlighted area from the eye is turned away from the crown before you place the taser ring. Otherwise, you’ll get caught and have to start the gem-placing process again.
Escaping from the crown jewels room
Vladena will try to put the crown on once you’ve placed the ring, and she’ll be shocked unconscious. Speak to Leo who will inform you there is another way out of the vault that you can escape through while Vladena is incapacitated. Note that this section is also timed, but you’ll get the usual unlimited number of second chances.
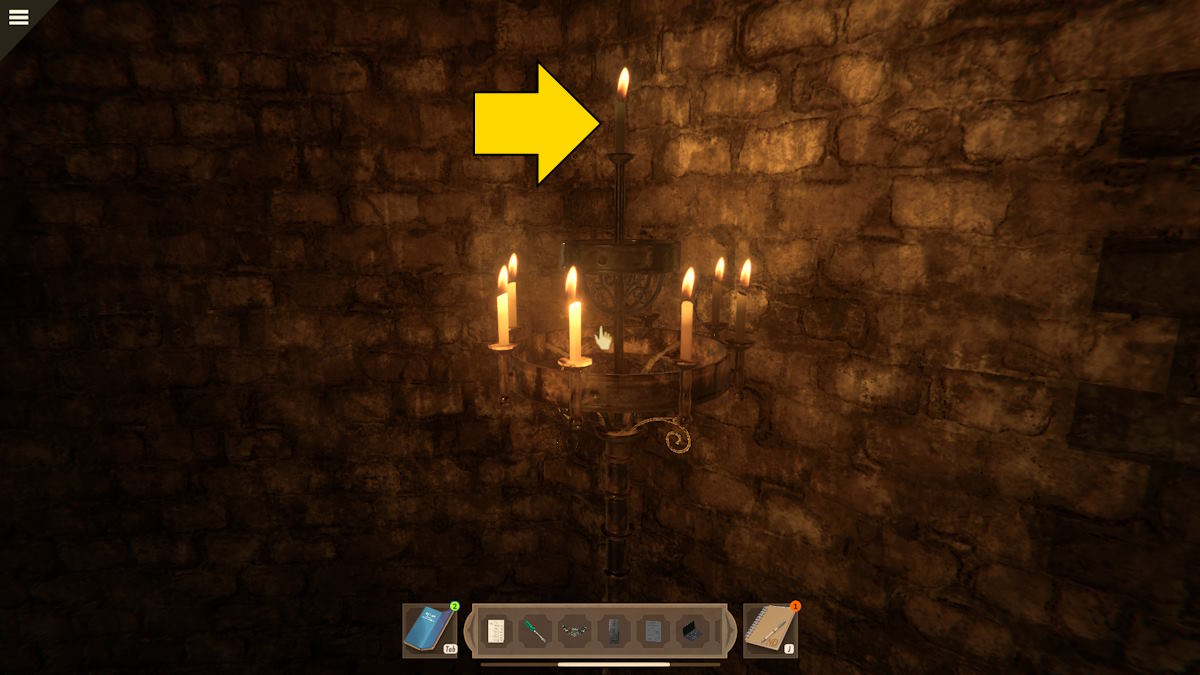
To escape the room, you need to activate five of the candle holders in the room in sequence. The order is determined by the number of candles in the top section of each one, starting with the one holding just one (pictured below) and then using the ones with two, three, four, and five candles respectively. This opens a secret door. Head through, speak to Leo, and then go down the corridor next to the staircase. Use the screwdriver to pick the lock (exactly as you did earlier) and escape.
For more on Nancy Drew here at Pro Game Guides check out Best Nancy Drew games of all time and All Nancy Drew Game Abbreviations – Acronym List!