
Final Fantasy 7 Rebirth Demo narrates the story of the Nibelheim portion from Crisis Core, or at least a version of it, including an awesome mini-game, boss fight, and cliffhanger to conclude the opening segment. Read on for a full walkthrough of the entire FF7 Rebirth Demo.
Final Fantasy 7 Rebirth Demo: Full Walkthrough
The demo starts with a short recap of what happened in Final Fantasy 7: Remake. Afterward, you'll dive straight into battle with Sephiroth.
Full Nibelheim Demo Walkthrough
Take your time in learning how to use Sephiroth and perform his combos. I recommend you practice not getting hit during this battle since Sephiroth's special attack bar will reset if you get hit by an enemy.
Nibelheim
After the battle and a short cutscene, you'll be at Nibelheim. Cloud will be the main controllable character at this point. The first objective is to either visit your mother's house or climb up the water tower.


Before you head there, there are a couple of chests and collectibles scattered around the village. You can use the images above as a visual representation of the chest locations and here are all of descriptive locations:
- Treasure Chest #1: Take the route on the left side of the village entrance. You'll see a small wooden shack next to the chest. It contains 1x Mega Potion.
- Treasure Chest #2: From the village entrance, move forward and take the stairs on your immediate right. The Treasure Chest is on the other side of a fence, where you will see a man jumping back and forth. It contains 1x Mega Potion.
- Treasure Chest #3: Inside the room opposite of Tifa's. It contains one bottle of ether.
- Nibelheim Sandwich: While not necessarily a treasure chest, you can get a free Nibelheim Sandwich by talking to the lady near the cooking station at the water tower.
- Tifa's Theme Piano Sheet: Inside Tifa's room.
After climbing the Water Tower, you can visit either the Nidhogg Hotel or Tifa's House. Going to the Nidhogg Hotel will allow you to meet Zangan and rest for the expedition while going to Tifa's House will unlock the first Piano Sheet for the mini-game.
Once you're done getting your highest score on Tifa's Theme in the Piano mini-game, head to the second floor of the Nidhogg Hotel and get ready to explore Mt. Nibel the following day.
Mt. Nibel

Following the short cutscene with Tifa joining the hike to Mt. Nibel, you'll be able to control Cloud again as he trails behind Tifa and Sephiroth. I recommend destroying the Shinra Boxes you encounter as they contain items like Mega Potion or Ether. Here are the enemies you will encounter in the first stretch of Mt. Nibel:
| Monster Name | Weakness |
| Insectoid Chimera | Ice |
| Kyuvildun | Ice |
| Velociwings | Wind |

After a short cutscene where Cloud decides to wander off on his own, take the opposite route of Sephiroth and Tifa and battle a few more monsters until you reach Treasure Chest #1 in Mt. Nibel, which contains 2 mixed hi-potions. You can use the image above to see the general area of Treasure Chest #1.

In the image above, if you keep heading up the slope, you'll see a glowing green materia on top of the rock pillars. Get behind the rock pillar and hold R2, and you should automatically vault to the materia. Picking up the materia will grant you Aero (Wind Materia). Push forward, and you'll find a dead end. Then, Tifa will direct you in the correct direction. After crossing through the narrow opening, you'll end up at the Mako Measurement Facility.
Mako Measurement Facility

Once you enter the facility, immediately head up the stairs and turn right. Pick up the blue materia orb, and you'll obtain the Level Boost Materia, as shown in the image above. Take the elevator, and you'll encounter the Screamer. Use Cloud's Punisher Mode to instantly fend off the Screamer's swinging arm. Once the Screamer is staggered, use Fire to eliminate the beast.


After the fight, continue forward, and you'll have a short and easy puzzle to solve. To activate the elevator, you'll need to use the Purifier to get rid of all the excess Mako within the surrounding area. Simply interact with the Purifier (L2 Button) and push/pull it toward the concentrated Mako energy (i.e. glowing green smokes on the ground as seen in the second photo above) spots.
Take the elevator up, and you'll get to the Southern Ridge - Summit Approach area. There are no enemies nor chests in this area, so proceed to the Bridge where a small cutscene will play, bringing you to the Gunnthra River Falls.
Gunnthra River Falls

Sephiroth will now join your party from this point forward, so make sure to set him as the party leader so you can always control him first at the beginning of every battle. In the photo above, after you climb up the initial set of rocks in front of you, you'll see a rest stop and an HP Up Materia.
Here are all the new monsters within this area:
| Monster Name | Weakness |
| Screamer | Fire |
| Twin Brain | N/A, but will be Pressured when attacked while it is using Screech |
| Zu | Wind |

Proceed to the cave in front of you after disposing of a few Insectoid Chimeras, and go straight to the right side of the cave where you can acquire the Empowerment Materia, which enables you to use Bravery. It is near the northern corner of the cave section, as seen in the photo above. Press forward, and you'll encounter a short cutscene once you reach the Mako Spring.


At this point, the game is very linear, so you won't get lost while exploring. However, I do recommend you make a detour before you reach the second Shinra Facility to obtain the Magnify Materia. You have to scale a set of rocks downward to obtain the material; check the second photo above for your map reference.

After obtaining the Magnify Materia, push through to the next Shinra Facility, and you'll fight Zu. Its weakness is Wind, so have Sephiroth or Cloud cast Aero. Move forward, and you'll see the first treasure chest in this area, which contains a mega potion. The treasure chest is on the right side after the Zu fight, as seen in the photo above.

Opposite the treasure chest, you'll see a glowing purple material on top of a small metal building (refer to the photo above). Use the rocks behind the building to get to the roof, and you'll obtain the Precision Defense Focus materia, which is very useful for extending your "parry" window time.


Make your way up the facility by using the set of ladders, and you'll see another glowing materia on top of a bunch of crates. Pick it up, and you'll get the Auto-Cast materia (First photo above). Ascend the ladder once again, and you'll see a glowing green materia on the right side of your screen. Press R2 to traverse through the area, and you'll gain a Comet materia (second photo above).

The next segment involves the Purifier once again, but this time, you'll have to open the gate so you can reach other Mako Spots with the Purifier. Before opening the gate, push the Purifier to the Mako spot in front of it and then clean the rest afterward.


Use the newly working elevator to ascend, and head over to the fenced area, where you'll see the second Treasure Chest housing an Elixir. You can also go down a set of stairs next to the rest spot to get to the third Treasure Chest containing another Elixir. Use the rest spot if necessary, as the next part is a boss battle. The general location of both chests can be seen in the photo above.
Materia Guardian Boss Fight Guide

The easiest way to fend off the Materia Guardian in its first phase is by focusing on either the Left or Right Hindlegs whenever Sephiroth or Cloud gets hit with the Seizing Claws. You can also opt to use Cloud's Focused Thrust to build up pressure, as well as the Synergy Skill called Voidshatter.

In the second phase, the Materia Guardian will scale the walls and use various ranged attacks on Cloud and Sephiroth. Use the Synergy Skill Counterfire to negate its ranged attacks like Mucous Discharge and Stonefall attacks. Keep repeating this strategy for the second phase until you can use any Fire spells to bring it down.

Lastly, in its third phase, the Materia Guardian will stand on the Mako Pipes, further empowering its attacks. Use Synergy Ability Double Helix to topple it from the high ground. Expend your ATB gauges and Limit Breaks at this point to dispose of the boss immediately.
Related: FF7 Rebirth State of Play breakdown: New story content, gameplay footage, minigames & more!
Aftermath
After defeating the Materia Guardian, there's not much else to do other than follow the story and proceed to the reactor. For this reason, I decided to keep the entire aftermath section out of the guide since it's mostly cutscene-based and storytelling scenarios, which everyone should experience firsthand.
Full Junon Demo Walkthrough
The Junon section of FF7 Rebirth revolves around exploring a small open area of the game where you'll be able to transmute items, gather treasures, and much more. Since the primary objective of the game is to find rare variants of monsters in the field and one story-based boss, I'll focus on providing information on those instead.
From here on out, I'll only have Tifa, Aerith, and Cloud as my party members, as I have finished the entire Junon demo by only using those three.
Fiend Sighting 1: Enmidunk Mini-Boss


The first Fiend Sighting you'll encounter are two Enmidunks. Enmidunks are weak to fire, thus making Cloud a very effective character because of his Punisher Mode and Firebolt Blade. Once the combat begins, build up Cloud's ATB and cast Firebolt Blade.
The Firebolt Blade will cause the Enmidunks to use See Red, which will increase their defenses and begin counterattacking your melee attacks. Don't worry too much about this, and keep Cloud in his Punisher mode and cast Firebolt Blade.
Once either of the Enmidunks is staggered, use Tifa to ramp up the Stagger Multiplier. Finish them off with Cloud's Firebolt Blade, and you're done with the first Fiend Sighting.
Fiend Sighting 2: Fonadu Mini-Boss


The Fonadu is a very straightforward boss fight. It's weak to Aero and Aerora, so you should equip your party members with those spells. Once you inflict enough damage during the battle, Fonadu will cast Death From Above. You should prepare to dodge this attack as it's the only way to pressure it during battle.
Fiend Sighting 3: Whymzelett Mini-Boss


Whymzeletts are very annoying to deal with, as they have a skill called Soothing Breeze, which will knock all party members away and heal enemies at the same time. Luckily, Soothing Breeze is also Whymzelett's downfall, as you can cast Blizzard/Blizzara to interrupt and pressure them.
I recommend putting Blizzard/Blizzara with Magnify on Aerith to disrupt both Whymzeletts if they decide to cast Soothing Breeze. Afterward, it's just a matter of dodging their well-telegraphed attacks and finishing them off with Cloud or Tifa.
Fiend Sighting 4: Silver Chimera Mini-Boss


The two Silver Chimeras are the easiest out of the Fiend Sighting questline. They do have powerful skills to look out for, like the Aquatic Beam, but they automatically become pressured after using the skill. Make sure to dodge the Aquatic Beam and rain down Cloud's Focused Thrust or Tifa's Focus Strike.
Silver Chimeras are also weak to fire, making this fight even easier since Cloud has his Firebolt Blade. Once either of them is staggered, use Tifa's Unbridled Strength two times, cast Omnistrike, then Rise and Fall. Finish both of them with Firebolt Blade, and you're done with the Fiend Sighting!
Related: Best Piano Performances We’ve Seen From Cloud So Far in Final Fantasy 7 Rebirth
Phoenix Boss

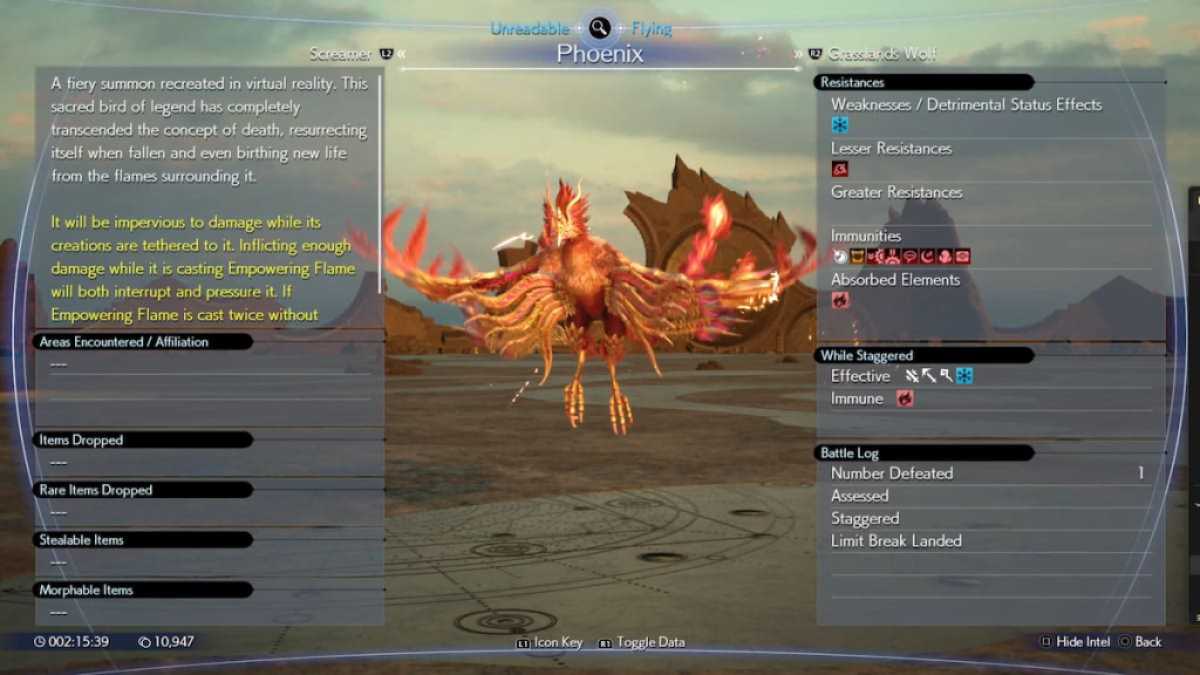
It's time for a secret boss battle. Phoenix makes an appearance in the Final Fantasy 7 Rebirth Demo, and it did make its presence known in Chadley's Combat Simulator. To unlock the Phoenix fight, you have to fight all enemies within Junon, including the four Fiend Sighting quests.
Afterward, you need to head to Chadley's location on the map above and clear the Junon Battle Intel and Junon Region Intel missions, and you'll unlock the Summon Entity: Phoenix mission in Chadley's Combat Simulator.
Phoenix First Phase

Phoenix is the toughest boss I have ever encountered in the demo. To start, Phoenix usually casts Empowering Flame. If you fail to inflict enough damage and pressure Phoenix, it will gain increased magic and attack damage.
Phoenix can summon three monsters when it casts Breath of Creation. The first set of monsters are Flan, Bomb, and Grandhorn. You need to eliminate all three before you can damage Phoenix again.
Phoenix Second Phase

Once you deal enough damage to Phoenix, it will summon another set of three monsters. This time, the monsters are Fleetwing, Archdragon, and Ogre. Dispose of them, and Phoenix will cast Empowering Flame again.
If you fail to interrupt it for the second time, it will use Rebirth Flame, which is usually a one-shot skill, wiping out your entire party. Even if you manage to survive Rebirth Flame, you'll encounter three newly summoned enemies at once.
Phoenix Strategy

Keep your party in top shape by having at least two members with Cure/Cura. Phoenix is weak to Ice, so have Aerith cast Blizzard/Blizzara during Empowering Flame. Use all limit breaks once Phoenix is staggered, and summon Ramuh when you get overwhelmed by the monster summons.
If the battle is too tough for you, Square Enix added a combat difficulty adjustment for Phoenix. You can opt to lower its strength so you don't get frustrated trying the battle over and over again. Lowering its strength doesn't have any adverse effects on the reward. You can still gain the Phoenix summon through this method.
Terror of the Deep Boss Fight
The final story boss of the Final Fantasy 7 Rebirth Demo is the Terror of the Deep. Avalanche comes into Junon City and comes across Yufi, who seems to be in deep waters as she encounters the Terror of the Deep.

The fight is very easy relative to the Summon Entity: Phoenix mission. The Terror of the Deep is weak to lightning, so have either Tifa or Aerith use Lightning Spells. Cloud can focus on dealing physical damage upclose. If any of your members get trapped in the Water Cell ability, use Lightning to quickly destroy it.
The Terror of the Deep can also use its tail to perform a grab attack, which deals massive damage. Use any other free party members to deal damage to the tail. If you damage the tail enough, you'll stun the Terror of the Deep.
In its second phase, the Terror of the Deep will begin to submerge under the platform and will reappear to damage your party. Keep up the same strategy or summon Ramuh, as it has more or less the same moveset in its second phase, and you're finally finished with the demo.
For more guides in Final Fantasy, check out All DMW Effects and Limit explained in Crisis Core right here in Pro Game Guides.
Write A Comment
FF7 Rebirth Demo Full Walkthrough (Nibelheim & Junon Guide)
This site is protected by reCAPTCHA and the Google Privacy Policy and Terms of Service apply.